Demand for higher precision and production speed requires the complete production chain to be considered.
Michael Wagner and Dr. Michael Sander, Satisloh GmbH
The optical industry covers an enormous range of applications and uses many manufacturing technologies. Optical manufacturing machines typically can be divided into two approaches: dedicated high-throughput single-application machines – e.g., replication tools for high-volume production – and versatile programmable machines for small- to medium-production volumes and varying applications. The latter typically are computer numerical control (CNC) machines, which offer flexibility and adaptability to varying specifications as well as fast time to market, even when changing production between lens geometries.
The higher precision and production speed sought by the optical industry bring specific requirements to CNC machines; for example, to speed up production of aspheric lenses when using CNC machines, it is important to improve the speed of each production step and to optimize the complete production chain.
A clear specification of the interfacing between individual production steps such as pre- and fine grinding, polishing, figure correction polishing and centering/edging is necessary. This specification can be used to define the optimum shape accuracy and surface roughness after grinding, reducing the polishing time.
Choosing fully automated two-sided lens processing, which can be combined with edging and beveling process steps in one run, can shorten the process even further. Looking at the type, the interfaces and the order of the required processing steps and discussing these with the optical system design department enables the design to be adjusted to fit the manufacturing technology, thus ensuring optimum results in both quality and economy.
Advances in aspherical grinding
The main factors necessary for precision aspherical grinding are: a stable machine with a very stiff base, high-precision spindles for the grinding tools and workpiece (with air- or hydrostatic-bearing technology), and high-precision CNC axes with high-resolution scales.
Other factors also play an important role. First, direct-driven axes with linear motors enable extremely fast and precise CNC-processing motion. Using a maximum of four tools optimizes the processing to get maximum surface quality and shape accuracy, even for difficult-to-process material; this also may include an additional step for the finest grinding to reduce subsurface damage.
The grinding spindle orientation in cup-wheel mode vs. disk mode typically is rotated ~90°, which normally results in two different machines (or a more expensive processing center). However, we have developed and patented a system that allows the grinding spindle orientation to be changed over an extremely wide angle range to enable the most common grinding modes – the cup-wheel tool and disk tool grinding – in one machine. The whole spindle can be rotated around the B-axis by ±180°.
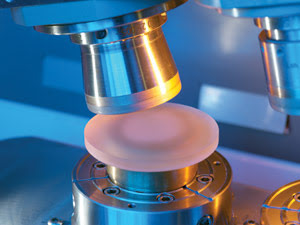
Figure 1. In on-axis cup-wheel mode, the outside tool lip is used for grinding.
Processing modes
Three grinding modes for processing of aspheres were investigated and characterized using this system (Table 1). The outside tool lip is for grinding in the on-axis cup-wheel mode (Figure 1). Because the contact area between tool and surface is small, this mode excels in applications requiring small-curvature radii, concave shapes and aspherical shapes with turning points. The small removal area impedes a fast process, and the achievable surface roughness (Ra) and shape accuracy are limited because of unavoidable tool wear.
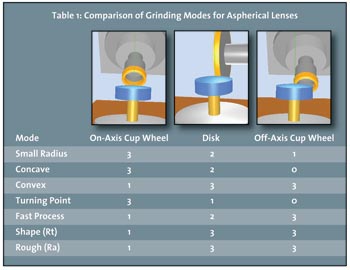 The disk mode (Figure 2) offers good results in all relevant categories. For this reason it is probably the most widely used technology for aspherical grinding.
The off-axis cup-wheel mode requires suitable process control software. Its advantages – very fast grinding process and excellent surface quality, in terms of both shape accuracy and smoothness – result from the relatively large contact area between the tool and lens surface. Figure 3 shows an impressive example of the surface quality (Ra < 21 nm) achieved using the off-axis cup-wheel mode. The mode is ideal for convex shapes, but not applicable to concave shapes or turning points.
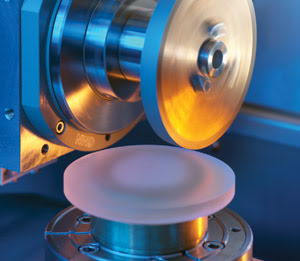
Figure 2. Disk mode aspherical grinding is shown.
To have this knowledge and choice of modes greatly benefits the user, who can tune his production to optimum performance and economics.
One-machine polishing
Polishing high-precision aspheres previously required two separate machines: one for polishing the ground lens and one for the figure correction, or corrective polishing. Each procedure has been performed using processes such as conventional polishing with slurry, magnetorheological finishing or ion beam figuring.
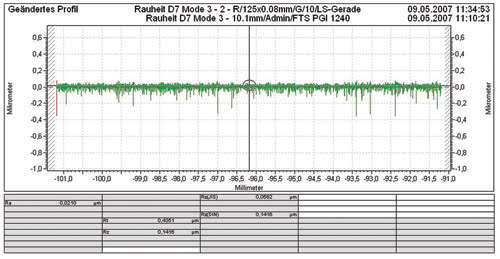
Figure 3. The off-axis cup-wheel grinding mode can provide excellent surface quality.
A unique seven-axis polishing solution (Figure 4) that combines pre-/fine polishing with corrective polishing to accuracies of better than λ/10 significantly advances aspherical lens production technology – and can be used for free-form optics. This technology produces a finely tunable polishing rate, which can accomplish both the fast pre- and fine polishing of the ground surface and the very low rates required during corrective polishing.
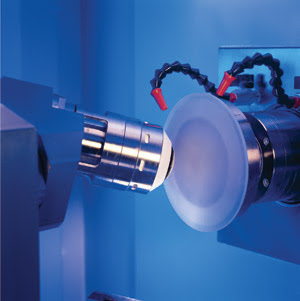
Figure 4. Pre-/fine polishing and deterministic corrective polishing can be achieved with high accuracy using seven-axis polishing.
The polishing tool can be described as an elastic ball-segment-shaped membrane, whose elasticity is adjustable using pressurized air from the back. An automated procedure generates a set of parameters to define the influence spot function and polishing rates. Other variables, such as density of polishing slurry, polishing pad material, pressure of polishing tool, rpm of workpiece and polishing tool, and the precession angle, are contained in the influence function (Figure 5).
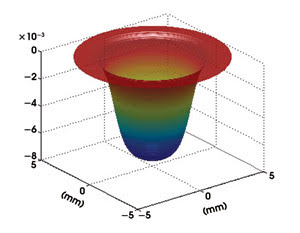
Figure 5. Shown is the influence “spot” function.
A direct link between the machine software and metrology equipment is essential for deterministic corrective polishing. After the form measurement (Various metrology technologies can be used, including interferometers, profilometers and coordinate measuring machines), an error map is transferred from metrology to the Precessions software from Zeeko Ltd. of Coalville, UK. The influence function – which describes the removal area and rate – calculates the tool path and dwell time needed for the desired shape correction. Depending on the shape and curvatures of the optics, deterministic material removal during polishing can be achieved with spiral-, raster- or randomized mode tool paths.
The precession angle of the tool, as illustrated in Figure 6, is a relevant factor for the removal rate and high surface quality. The option to vary spot size and influence function during the process makes this an extremely powerful polishing method.
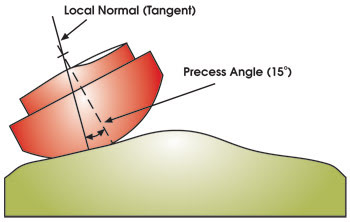
Figure 6. Adjustment of the precess angle allows precise control of the polishing rate.
The technical advances described cover two typically time-consuming production steps of complex high-precision optics: grinding and polishing. Faster grinding, more flexible choice among multiple grinding tools and higher grinding surface quality (in both shape and roughness) together reduced processing times to 50 or even 25 percent of previous-generation grinders. On the polishing side, production throughput is optimized by using deterministic corrective polishing – a direct link to metrology equipment – which also can be applied to the ground surface.
Meet the authors
Michael Wagner is manager of the applications engineering team, and Michael Sander is head of precision optics, both at Satisloh GmbH in Wetzlar, Germany; [email protected].