David Rideout, Olympus America Inc.
There are more than 500 companies in the
US alone that make optical equipment. The number of products with built-in lenses
is increasing. Few cell phones or personal computers are sold today without a still
or video camera included. We see the predominance of microlenses in CCD arrays and
the move toward the use of LED lighting as a green alternative. One day, every Christmas
light might even include a lens.
Today’s optical lenses are being manufactured according
to ever-increasing requirements for precision, rendering easy, accurate and reportable
inspection critical. In addition, industrial use of optical components is increasing
exponentially, so efficiency and cost-effectiveness in manufacturing and quality
control are more important than ever.
Although inspection of lenses and coatings is vital to the success
of many products, quality and measurement issues must be balanced with the need
to keep costs down and throughput up in a production environment. The cost/capability
balance is a key driver for what instrument is used. In addition, experience shows
that various technologies have particular strengths in handling specific types of
lens inspections.
Today’s spherical and aspherical optical lenses are inspected
and analyzed for a number of features, including flatness, curvature, coating thickness,
color measurement and reflectivity. Any deviation in curvature or flatness of a
lens from its original design will change the focal point of the light passing through
the lens and also may increase the level of spherical aberration within the optical
system.
This will alter the specifications and effectiveness of the lens,
changing the performance of the primary product as well, be it an LED or a camera.
In addition, lens coatings continue to evolve, and the coatings themselves often
require additional levels of inspection. Changes in the thickness, reflectivity
or color level of a coating affect the way light is transmitted through the lens.
For example, antireflective coatings absorb light – thus reducing reflection
– and other coatings may change the level of static electricity being transmitted
through the system. If a coating does not match design specifications regarding
reflectivity, evenness or thickness, it can affect the usability of the final product.
Two technologies most often used in the inspection of optical
lenses are interferometry and a type of spectroscopy called spectral reflectivity.
Interferometers analyze the actual shape of the lens by examining how light entering
it is refracted or reflected.
Spectral reflectivity systems allow measurement of the thickness,
optical properties and reflectivity of coatings, defining the way the lens absorbs
or reflects various wavelengths of light. As such, they allow manufacturers to ensure
that the correct types of coating are used and that the proscribed thickness and
evenness of the coating on each lens element is correct in a manufactured optical
system. Both technologies address part of the overall application, but neither alone
is sufficient to do a complete analysis.
Olympus has been building lenses for microscopy, endoscopy, photography
and other advanced applications since 1919 and uses both technologies extensively
to measure and analyze its optical products. The company builds its own spectral
reflectivity and interferometry systems to meet its exacting standards for both
optical performance and cost efficiency. These systems currently are not sold in
the US, but there are numerous commercially manufactured inspection systems that
are available to lens manufacturers.
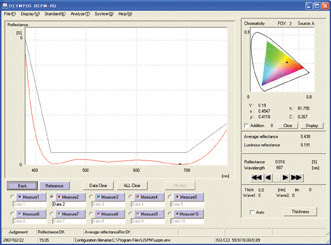
Spectral reflectivity
Spectral reflectivity systems usually consist of a specialized
type of microscope and custom software. The sample is struck with light at specific
wavelengths, and all reflected light is analyzed. The returning light has been altered
by the sample, and the alteration can be analyzed to determine the reflected or
incident direction and wavelength. Analyzing the reflected spectral composition
from a coated sample and comparing the data received to reference optical properties
can help engineers determine the precise wavelength characteristics of a coating
(Figure 1). Coating thicknesses also can be analyzed using a laser confocal microscope
if the user knows the refractive index of the coating. Current software platforms
can do this automatically for quick inspections.

Figure 1. Spectral reflectivity is commonly used to analyze lens
coatings. An Olympus USPM-RU captured this image.
Using the same spectral data, users can determine the thickness
of the coating because spectral reflectance also is affected by the difference
between the light reflected by the coating and the light reflected by the lens surfaces.
Comparing thickness levels with corresponding spectral reflections provides direct
correlation that can be used for measurement.
The greatest advantage of spectral reflectivity systems is that
they offer nanometer- or even angstrom-level repeatability. In addition, analysis
can be performed using either transmitted or reflected light, depending upon the
system and the inspection requirements. One drawback in the past has been the need
to avoid internal reflection from the rear surface of the lenses being examined.
However, a key advantage of some more recent systems is that they allow rapid and
highly accurate spectroscopic measurement of thin samples without interference from
rear surface-reflected light, which was not possible with traditional spectroscopes.
Thus, companies now can avoid back-side interference without incurring the additional
time and cost of special sample preparation.
Interferometry
Interferometers typically are tabletop devices that use light
to compare a fabricated product to a reference sample whose dimensions it is intended
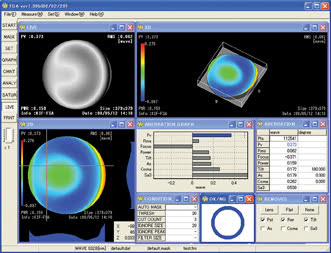
to match (Figure 2). Light is passed through a reference lens to the fixtured sample
(lens) and then onto a reflecting mirror, where it is sent back to the receiver.
When the sample image is combined with a reference image, the fringe pattern generated
is used to analyze the shape of the product’s optical surface.

Figure 2. Lens curvature is typically inspected using interferometry.
An Olympus KIF-20 captured this image.
Depending upon the specific technique being used, an interferometry
system may use white light or laser illumination. The instrument most commonly used
for lens inspection is a laser-based technology called a Fizeau system, which typically
uses a reference sample similar to the surface being inspected. Some higher-end
models can accommodate both flat and spherical surfaces, but most systems do just
one or the other.
The results reveal any variations in height from the theoretical
smooth surface of the lens, with the user receiving both an image of the fringe
pattern itself and data describing the deviation from the reference surface. Software
then can analyze these differences to provide highly precise and repeatable measurement
data on how much the manufactured product varies from the reference sample (Figure
2).
Importantly, because interferometers can be used to examine surfaces
larger than 100 mm, entire lenses can be analyzed at one time. And interferometers
can provide reproducible data below 100 nm at very low magnifications. Fizeau interferometers
also have the advantage of flexibility, accommodating not only lenses but also almost
any surface needing precision flatness inspection, including wafers, mirrors, solar
collectors and magnetic heads.
Other surface analysis technologies are available to provide similar
measurements such as profilometers and laser confocal microscopes, but each has
trade-offs. Profilometers, although sometimes easy to use, can be slow and offer
little beyond what the interferometer can achieve. In addition, they often feature
touch probes, which can damage delicate lenses.

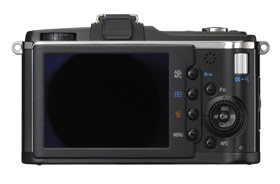
Figure 3. As industrial use of optical components continues to expand, efficiency, cost-effectiveness
and quality control in manufacturing become more important than ever. Most digital
cameras today include still and video, and their lenses must be inspected carefully.
The PEN E-P2 digital camera was inspected with the Olympus USPM-RU.
Laser scanning confocal microscopes provide enhanced lateral measurement
and slope inspection. They are, however, usually not able to provide Z-axis measurements
as precise as those offered by interferometers. And though they have enormous capabilities
for a wide variety of purposes, confocal microscopes are neither the least expensive
nor the easiest systems to use in a manufacturing environment. They are most often
devoted to off-line engineering and research and development work, while interferometers
are optimized for volume production.
Today’s lens manufacturers most often use both spectral
reflectivity systems and interferometers to analyze their products. For instance,
a phone manufacturer might demand that the curvature of the tiny lenses in its mobile
phone cameras be inspected via interferometry, while the evenness of the coatings
on those lenses is verified via spectral reflectivity.
In the future, product advances may lead to further reduction
of unwanted light reflecting from rear surfaces in lenses, better reflectivity for
minute areas, quicker and more accurate results, enhanced measurement wavelengths
and improvements in software that one day could allow a manufacturer to combine
data from various lens and coating inspections for enhanced process control.
Meet the author
David Rideout is group marketing manager of industrial microscopes
at Olympus America Inc., Scientific Equipment Group; e-mail: [email protected].