Jessica Uralil, Hamamatsu Corporation
It can be difficult to determine the best imaging system to meet various needs, as laboratory conditions and suitable image quality requirements are among numerous factors to consider. Simulation software is an option worth exploring.
When you design an imaging system for some specific purpose, there are many factors to consider. For instance, what are the conditions under which your sample will be imaged? What sort of image quality will the users of your system find satisfactory? And what combination of optics and camera will best suit your design, given the needs of your users and the expected final cost of the system?
As far as the camera piece of this puzzle goes, there is a way to simplify the search for the right device from among many commercially available options – namely, by using simulation software. With simulation software, you see on-screen how changes in different parameters will affect the quality of images produced by a camera. Simulations can be performed to study adjustments within just one camera or to compare several types of cameras at once. Either way, by eliminating the need to physically set up cameras in order to see such effects, simulation software can reduce the time for camera selection and thus contribute to faster product development.
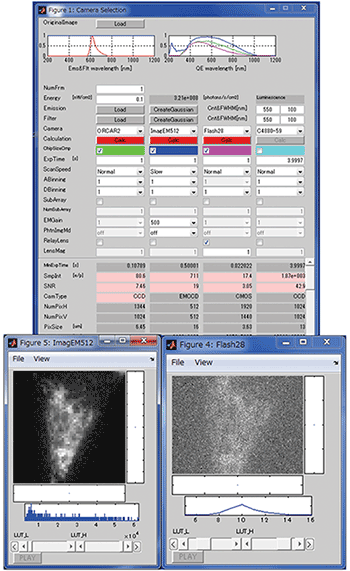
Figure 1. Simulation input GUI and output images from two cameras (at left, ImagEM, and at right, ORCA-Flash2.8).
In this article, the usefulness of simulation software is illustrated by reference to examples from one particular camera simulator developed by Hamamatsu Photonics. When using this simulator, the first step is to obtain a high-quality TIFF file of the type of image your system will eventually capture. This file serves as the input upon which the simulator will apply its various algorithms, including those meant to simulate changes in imaging conditions (such as input light intensity, lens magnification or object-to-sensor distance) or changes in camera parameters (exposure time, sensor size or readout noise). The simulator’s user interface provides many such settings, and settings for multiple cameras can be entered at the same time. The output of the simulator will be one simulated image per camera specified, as shown in Figure 1.
Comparing changes within a single camera
In the simplest case, the simulator demonstrates how changing one parameter in a single camera will affect image quality. For example, increasing exposure times with any camera gives it more time to collect enough light to better differentiate signal from noise. But how much light is enough light? That is, how many photons must be captured in order to achieve an acceptable level of image quality for the intended users of the system? This question can be answered visually and quantitatively by the simulator.
Figure 2 shows a series of images produced at varying levels of input light, plus their histograms. This data is derived from an accurate noise model of the particular camera being simulated. When other types of cameras are evaluated at the same input light levels, the simulator will generate a series of images that are visually and quantitatively distinct from these images.
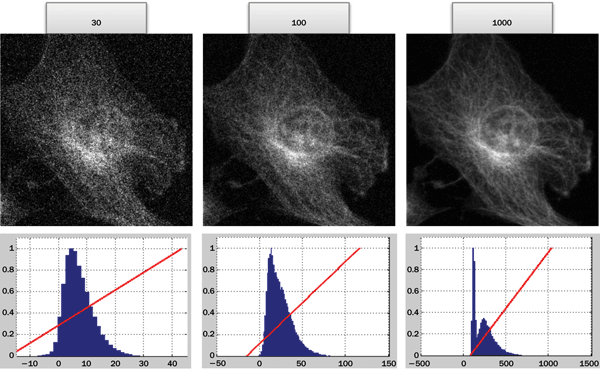
Figure 2. Simulation of a scientific CMOS (sCMOS) camera at varying input light levels. As exposure time increases, the peak photon level in the image rises (from 30 to 100 to 1000 photons), and higher signal-to-noise ratio is achieved.
Comparing differences between two cameras
The simulator includes settings for a wide variety of parameters, and it has been used to compare several types of advanced cameras for demanding low-light applications in the life sciences. One such technology is scientific CMOS (sCMOS), which, over the past few years, has been widely adopted for microscopy because it offers a combination of desirable features (high sensitivity, fast readout, high resolution and wide field of view) that had previously not been available in one scientific camera. Today, there are several models of sCMOS cameras on the market. They differ in specifications such as sensor format, pixel size and shutter modes. Many simulations have been performed to enable researchers to visually and statistically compare these differences.
For example, sCMOS cameras have two kinds of shutter modes: rolling shutter and global shutter. In rolling shutter, the camera does not capture the entire frame at the exact same instant but rather reads out the image one line of pixels at a time. By contrast, in global shutter the entire frame is captured at the same moment, which means that each pixel in the sensor shares the identical start/stop time of exposure. The two shutter modes have their respective advantages. Rolling shutter provides faster frame rates than global shutter and, in terms of image quality, has less readout noise than global shutter (as shown in Figure 3). But due to its line-by-line readout method, rolling shutter may cause image distortion.
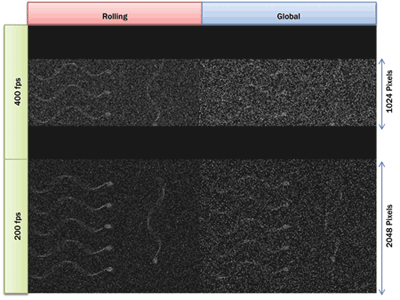
Figure 3. Simulated images of sea urchin sperm were used to compare an sCMOS camera in rolling shutter mode against an sCMOS camera in global shutter mode at two different speeds (200 fps and 400 fps).
So which shutter mode is better for your application? If you were to depend solely on a physical demonstration of rolling shutter versus global shutter to answer this question – using actual cameras to see the differences in the two modes – in the real world, it would take some effort to acquire the desired data. On the other hand, with the simulator you can quickly evaluate the two modes at varying frame rates and sample intensities, and then choose the appropriate camera based on the data.
Comparing background noise in three cameras
Image quality may also differ significantly depending on the type of camera technology used in an imaging system. For instance in life-science imaging, there are at least two CCD-based technologies that could provide a better fit than the newer sCMOS technology, depending on the specific conditions of an application. Each has its own niche. In applications that allow longer exposures, cameras built around low-noise interline CCD sensors might produce better images than sCMOS cameras, and at lower cost. At the other end of the sensitivity spectrum, there are a small number of ultralow-light applications for which expensive electron multiplying CCD (EMCCD) cameras are still the best option. Simulation software has proven useful in weighing the trade-offs among these technologies.
Consider signal-to-noise ratio (S/N), a key determinant of image quality. In designing an imaging system, you will always want to know whether a particular camera will have the S/N needed to deliver acceptable image quality under the conditions that the system will be used. What the simulator can show you is that in identical conditions – same input light level and exposure time, and optically matched pixels – each type of camera will exhibit a distinct S/N. In terms of signal, this is because each camera has a different level of sensitivity, as determined by how many photons are detected (quantum efficiency). In terms of noise, each camera has a unique noise footprint that is specific to sensor type, readout mode and camera design. The simulator models all of these parameters in order to generate an output image that accurately represents empirical results.
In addition to camera noise, the simulator can show the effects of shot noise on image quality. Shot noise – noise in the signal due to the particle nature of light – is calculated as the square root of the signal, which means its effects are more severe at low light levels. In cases where there are not many photons to begin with, this should be taken into account because small signals in the background could affect your system’s ability to distinguish between relevant and irrelevant signals. Figure 4 illustrates a simulation in which photons were introduced in the background.
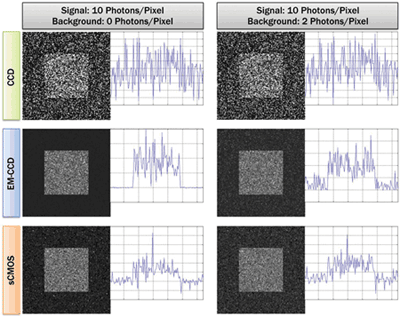
Figure 4. Image noise comparison between an interline CCD, an EMCCD and an sCMOS camera at different background levels. Even a small amount of signal in the background can make detectability of relevant signals more difficult.
Comparing high-speed imaging in four cameras
The effect of exposure time on image quality is often studied with simulation software. In this example, involving the simulation of a DNA sequencing technique, fluorophores were placed on a grid to represent moving particles in a flow cell. The goal of this simulation was to determine which type of camera would deliver the highest image quality at the shortest exposure time. In this sophisticated simulation, three imaging methods were compared:
• Step-and-settle with an interline CCD camera and an sCMOS camera;
• Time delay integration (TDI) using an image sensor specialized for high-speed imaging of moving objects;
• Continuous imaging with an sCMOS camera and pulsed laser.
Exposure times and line rates were adjusted throughout the simulation, and external variables such as laser intensity and optical magnification were also optimized. Figure 5 shows the final results from several simulations and multiple iterations.
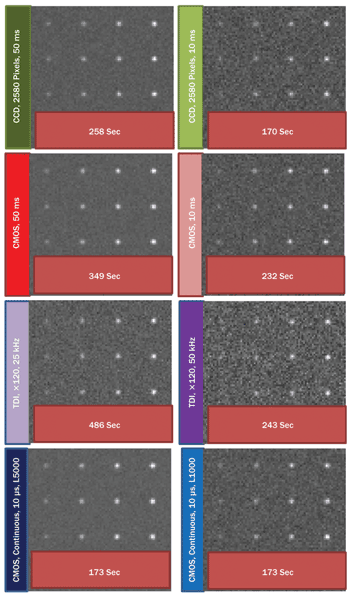
Figure 5. Simulated images of fluorophore dyes on a grid (to emulate a flow cell). Four cameras are compared to determine which one produces the best image quality at the shortest exposure time.
Easier evaluations
As imaging conditions become more complex and possible camera options more varied, choosing a camera can be a lengthy and difficult process. In this context, the major benefit of simulation software is that it significantly reduces the effort required to gain an initial understanding of how image quality varies from one type of camera to another, thus shortening your design time. The Hamamatsu simulation software described above is one example of a feature-rich simulator that has been used for many life science imaging applications. Its large number of parameters has also proved beneficial in the design of imaging systems for nonbiological applications, such as car speeding systems, electron backscatter detection and x-ray imaging.
Meet the author
Jessica Uralil is a sales engineer at Hamamatsu Corp. in Boston; email: [email protected].