Josef Heinisch, Trioptics GmbH
Classical optical measurement techniques combined with modern
PC technology provide accurate alignment, bonding and cementing of optical components
and systems. These processes are fully automated and significantly reduce production
time and cost.
The processes involved
in manufacturing optical lenses – grinding, polishing and coating –
have become increasingly automated in the past few decades. Computer numerical controlled
grinding and polishing machines, as well as computer-controlled interferometers
for the examination of the surface profile, are in widespread use.
However, many lens manufacturers still use simple optical or tactile
measurement instruments for determining centering errors. More often than not, the
lenses are still adjusted manually. The adjustment and centering errors of the
optical components have a decisive influence on the image quality of the lens. The
use of electronic autocollimators and automated adjustment equipment makes the mounting
process quicker and more precise – for example, when cementing achromatic
lenses or bonding lenses into a mount.
Centration error measurement
When measuring a centering error using the reflection mode (Figure
1), an electronic autocollimator, read via a PC, is at the core of the measurement.
An illuminated target (usually a reticule) is projected at the center of curvature
of the spherical or almost spherical lens surface under investigation. In this instance,
the rays of light meet the surface at an almost perpendicular angle. Some of the
light is reflected back along the exact path it came (a condition of autocollimation)
and displays the target on a CCD camera. A lateral shift of the center of curvature
creates a direct lateral shift of the reticule image.
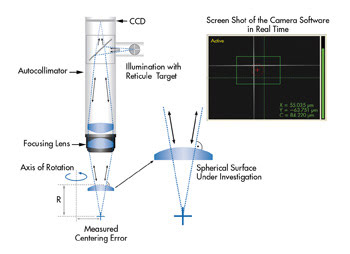
Figure 1. This diagram demonstrates the principle of measuring centering
errors with an electronic autocollimator using the reflection mode.
If the surface under investigation is rotated around a reference
axis, a corresponding circular movement of the reticule image is created on the
CCD sensor. The radius of this circular path is directly proportional to the position
of the center of curvature in relation to the reference axis. The live reticule
image depicts the exact position of the center of curvature in the X-Y axis, whereby
the center of the circular path represents a reference point in the overall space.
Powerful light sources and light-sensitive CCD sensors ensure that even test items
that are well antireflection-coated produce a sufficient autocollimation image.
In extreme cases, it is also possible to carry out the measurement
using near-infrared (750- to 1000-nm) illumination. In this spectral range, the
antireflection coatings optimized for the visible range have enough reflectivity.
As an alternative to incoherent light sources, laser autocollimators are available,
although these can produce images that are difficult to interpret due to speckling.
Centration error measurement of objectives
The effectiveness of measuring centering errors with an electronic
autocollimator in combination with computers is apparent when measuring multiple
lenses.1 This method identifies the centering error of each individual lens surface
in a mounted optical assembly. Any selected axis of rotation serves as a reference
axis. Suitably precise air bearings with radial and axial runout errors of <0.05
μm are available.
First, the centering error of the outermost optical surface is
measured in relation to the axis of rotation. The next step is to focus in to the
center of curvature of the second optical surface. For the calculation of the position
of the center of curvature (Z), the optical properties of the first outermost surface
must be taken into account. When evaluating the true centering error (X, Y) of the
second surface using optical calculations, it is also necessary to take into consideration
both the optical properties and the centering error of the first surface previously
measured. This calculation simply requires the design data (radius, center thickness,
refractive index) of the item under investigation. When the exact centering error
of the second surface has been identified, the centering error of the third surface
can be measured, and so on. This measurement process has proved itself to be extremely
robust.
Using design data alone is more than suitable for the evaluation,
as it is unusual for a significant difference to exist between that data and actual
lens measurements. In practice, it is possible to gauge with a single autocollimator
the positioning errors of 20 or more surfaces to an exactness of <1 μm.
To clarify the effectiveness of this measurement process, Figure 2 shows the measurement
results of an optical assembly. The sample assembly consists of two identical achromatic
lenses with surface radii in the region of 40 to 120 mm. The multiple-lens measurement
provides the exact position of all the centers of curvature in relation to the rotational
axis. Since an achromatic system consists of three optical surfaces, the optical
axis of a single achromatic lens can be displayed via a regression line through
the three centers of curvature. This is indicated by the dotted blue and green lines
in Figure 2.
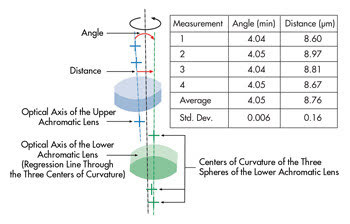
Figure 2. Measurement of the angle and the distance of the optical
axes of the lenses to each other.
If the optical axes are known, it is possible to define the angle
and distance between both optical axes (here in the plane of the upper vertex).
These calculations are automatically executed as part of the measurement process.
The results are shown in Figure 2. The multiple-lens measurement of the objective
has been carried out four times. After each measurement, the item under investigation
was removed from the bearing and, without any particular provisions, replaced for
the next (measurement at a 90° azimuth angle). The result is a standard deviation
of 0.16 μm in the distance measurement of both optical axes.
If the exact positions (X, Y, Z) of all centers of curvature are
known in a fixed system of coordinates, this information may be used to optimize
the optical assembly. In the example given here, the upper achromatic lens can be
realigned by the previously measured magnitude of 8.8 μm in the direction of
the optical axis of the lower lens (green line).
Automated cementing of achromatic lenses
There is a new process for adjusting two single lenses of an achromatic
lens.2 Based on the multiple lens method, it does away with the precise initial
adjustment of both lenses. Instead, the exact position of each of the three centers
of curvature is identified in its uncemented state. The axis of rotation of a highly
accurate bearing serves as a reference axis for the measurement of the centering
error, but not as a reference axis for the adjustment. Hence there is no need for
precise, self-centering mechanical holders. Both lenses are fixed to the rotor of
the bearing, and their center remains unaltered throughout the measurement process.
The cement between the lenses is still fluid at this point.
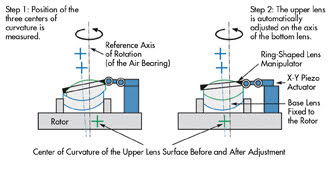
Figure 3. The multilens measurement method is used for the automated adjustment of achromatic
lenses in the cementing process.
Once the centering error has been measured, the center of curvature
of the upper sphere is adjusted according to the optical axis of the lower lens.
A ring-shaped support, fitted with an X-Y piezo actuator, is placed on the upper
lens. It moves the upper lens so that all three centers of curvature eventually
lie on the one line, the optical axis (Figure 3). The cement is then hardened using
UV light. The entire measurement and adjustment cycle lasts only 10 to 15 seconds.
This method is five to 10 times more accurate than the manual process and is particularly
effective in the production of small optical components with 1-mm diameters –
endoscopes, for example.
Automated bonding of lenses into a mount
When bonding lenses and optical elements into a mount, the optical
axes of these elements must be brought into line with the axis of the mount itself.
The axis of the mount can be given in terms of the symmetrical axis of a cylindrical
mount. An instrument for the precise alignment and bonding is shown in Figure 4.
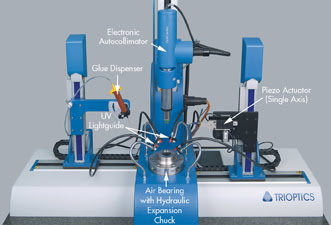
Figure 4. The frontal
view is shown of an automated centering and bonding station for the assembly of
lenses into a mount.
Figure 5 is a schematic representation of the basic process. The
workpiece (mount with unglued lens) is positioned on the rotor of a rotational axis.
The mount’s support has previously been aligned to the axis of rotation to
a degree of accuracy of 2 μm. A so-called hydraulic expansion chuck is used
as the support, which can transfer the center accuracy almost perfectly to the lens
mount.
Before the centering error is measured, a robot arm moves in with
a dispenser of UV-curable glue. The glue is applied to the lens and the mount by
rotating the test item 360°. The centering error of the upper lens surface
is now determined using the autocollimator.
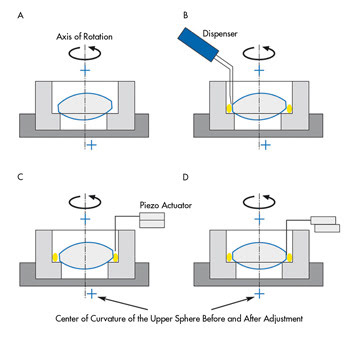
Figure 5. Panels A to D show the step-by-step process of automatically bonding a lens into
a mount.
Since the mount and therefore also the ring-shaped face of the
lower lens surface are centered perfectly with respect to the axis of rotation,
it is sufficient to center the upper surface. To achieve this, a manipulator is
introduced on another robot arm. The manipulator may be fitted with either a single-axis
piezo actuator (Figure 4) or with three single-axis piezo actuators (Figure 6),
which are fixed at 120° from one another on a ring. In the instance where only
one actuator is used, the test item must be rotated before the final adjustment
in such a way that the axis of rotation, the center of curvature and the piezo axis
are all on the same line. If three actuators are used, the lens can be adjusted
on the center of rotation without rotating the sample again.
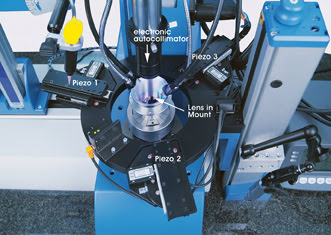
Figure 6. Pictured is an automated bonding station with three piezo actuators.
The accuracy of the adjustment can be increased by taking an additional
measurement of the position of the mount’s axis. A linear measuring sensor
(resolution 0.1 μm) is placed on the edge of the mount (Figure 7) and takes
measurements over a 360° rotation. The results are presented using a sine curve
that identifies the X-Y coordinates (centering error) of the mount. Using the piezo
actuators, the lens can now be adjusted to the direct center of the mount (green
cross in Figure 7).
Once the lens has been successfully adjusted, the glue can be
hardened by switching on a UV light source. The advantage of such a process is that
the lens can be adjusted with great exactness on the mount, without the mount itself
having to be perfectly adjusted to the axis of rotation. The multiple-lens measurement
described here, the cementing of achromatic lenses and the gluing of lenses are
perfect examples of the advantages of a computer-aided measurement of centering
errors.
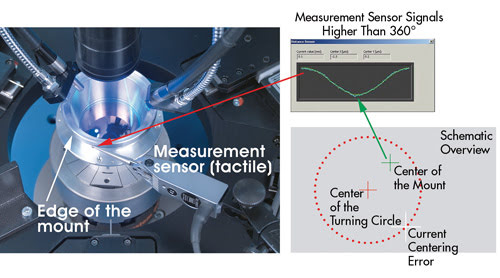 Figure 7. The center of the mount’s circumference can be identified
using an additional measurement sensor. The lens is positioned using three needles
(set apart from one another at a 120° angle) and adjusted to the center of
the mount.
The previously laborious and therefore expensive form of adjustment
has been simplified by intelligent measurement technology. The consistent use of
this technology enables a greater degree of accuracy in the production of optical
systems and therefore new design opportunities for more compact and higher-quality
lenses.
Meet the author
Josef Heinisch is a physicist at Trioptics GmbH in Wedel, Germany;
e-mail: [email protected].
References
1. Verfahren zur Messung optischer Oberflächen innerhalb
einer mehrlinsigen Anordnung. Patent Application 10 2004 029 735.5-51, German Patent
Office.
2. Verfahren zur Herstellung con Systemen zusammengesetzter Linsen.
Patent Application 10 2005 013 755.5, German Patent Office.