X-ray line-scan cameras accelerate in-line inspection of products.
Robert Roche and Maridel Lares,Hamamatsu Corp.
In a security-conscious age, there is a world of information to keep tabs on. Walk into an airport or a federal building, and you are screened for forbidden objects. If you run a small retail shop and are busy in the back room, knowing when a customer enters the front of the store is a key concern. Manufacturers must be vigilant about product quality.
The inspection methods employed in these situations vary from a simple motion sensor to the most technically sophisticated imaging devices. All have one goal: no mistakes.
For a wide range of manufacturing industries – such as electronics and semiconductors, food and beverages, and pharmaceuticals – electronic imaging is the tool of choice. One technique, nondestructive x-ray inspection, can be put to work as part of the production line to examine every object on a conveyor belt for defects or contamination.
Bottom line benefits
Besides aiding processing and quality control, in-line inspection benefits the bottom line: saving time, money and resources by catching the defective product early in the production process.
X-ray inspection employs an imaging system enclosed in a cabinet for safety. A typical configuration consists of a source placed above a conveyor belt, below which is a detector. The conveyor moves the object to be imaged between the source and detector, and x-rays penetrate the object to create a magnified image on the detector. The magnification level depends on how far the detector and the object are from the source. Lenses are not used. The sharpness of the image depends on the size of the x-ray source’s focal spot: The smaller the spot (ideally in the range of tens or hundreds of microns), the sharper the image.
Because the objects to be imaged are moving at a fast pace, in-line inspection requires a detector that can perform high-speed imaging. For this application, an x-ray line-scan camera is a better choice than other types because it offers advantages in speed, lifetime and cost.
Line-by-line scanning
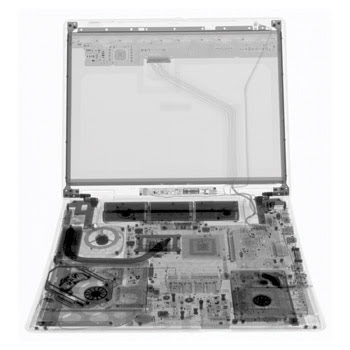
A traditional line-scan camera’s sensor is made up of a single long line of active pixels. It can be amorphous silicon, a CCD or a CMOS photodiode array. The sensor is coupled to a scintillator, which converts x-rays into visible light. Line-scan cameras are used solely for imaging moving objects, with the speed of the object matched to the speed of the camera to avoid distorted images (Figure 1).

Figure 1. X-ray line-scan cameras have a wide-area scanning capability with good resolution and dynamic range. This x-ray image of a laptop computer was taken with a Hamamatsu C9750 line-scan camera.
Because a line-scan camera has one line of active pixels, it scans one section or slice at a time. The slices are then rapidly stitched together to create an image. For example, Hamamatsu Corp.’s x-ray line-scan camera with a CMOS sensor reads out the signal in a pixel line (one slice of an image) in 0.24 ms – a speed that amounts to reading 4166.7 lines continuously per second. Because of its high-speed capability, a line-scan camera can image objects that are zipping by at a rate of several to hundreds of meters per minute. An x-ray line-scan camera with 400-μm-pitch pixels can image objects that are moving at a rate from 4 to 100 m/min.
In comparison, an area or 2-D detector such as a flat panel sensor or a 2-D CCD camera produces images more slowly. A 2-D sensor captures full-frame images at once rather than line by line; consequently, it can take several tens to hundreds of milliseconds to read out the signal from all the pixels before producing an image. During this delay, a line-scan camera could be processing additional objects.
Another of line-scan’s advantages is that it requires less x-ray radiation than 2-D sensors do. The reduced amount of radiation eases cabinet design considerations and reduces tool footprint. It also means a longer life for the camera and a lower lifetime cost (maintenance and replacement).
However, a disadvantage of a regular line-scan camera is its lower spatial resolution compared with that of a 2-D sensor. Standard line-scan cameras tend to have a pixel size larger than 100 μm and do not offer sufficient resolution for some applications. Also, they are not sensitive enough to detect very low light levels. For situations when a regular line-scan camera is not adequate, a more sensitive variation – one that operates in time delay integration (TDI) mode – is a better solution.
High resolution and sensitivity
A line-scan camera operating in TDI mode is a better choice for in-line inspection that requires high resolution (<100-μm-pixel pitch), the detection of low light levels, or both. The primary advantage of TDI is that it allows the collection of more photons without increasing the integration time for one exposure, resulting in a high signal-to-noise ratio or sensitivity.
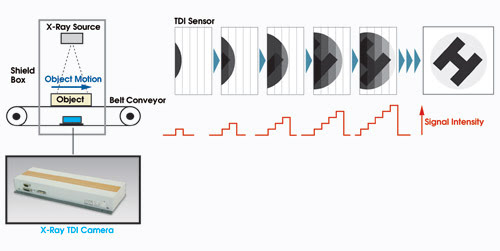
The high sensitivity of a TDI mode line-scan camera derives from its sensor, a CCD consisting of an array of lines called TDI stages. These stages are used to take multiple exposures of a moving object, which increases the signal (Figure 2). As the object shifts, the signal travels in tandem through the TDI stages and is accumulated. The final intensity of the signal is proportional to the number of stages.

Figure 2. Shown on the left is a typical setup for an in-line x-ray imaging system. On the right is the operating principle of time delay integration. As an object shifts, the signal travels in tandem through the time delay integration stages and is accumulated, resulting in increased signal strength.
Time delay integration’s high sensitivity is advantageous for high-resolution or low-light imaging. A high-resolution system has small pixels that collect less light than larger ones. This could be a problem with a regular line-scan camera, but not with a TDI version having the same pixel size. Through its multiple time delay integration stages, a TDI line-scan camera collects enough signal to overcome noise – a capacity that allows it to detect lower levels of light than a regular line-scan camera with larger pixels.
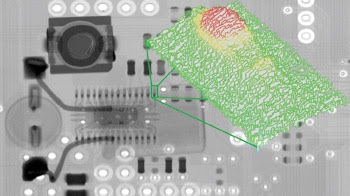
An x-ray TDI line-scan camera is well-suited for continuous in-line inspection of printed circuit boards and surface-mounted components because it delivers the required resolution, sensitivity and speed. Many systems integrators perform off-line (sampling) inspection using 2-D detectors such as flat panel sensors or x-ray cameras. However, with an x-ray TDI line-scan camera, they could perform in-line inspection of all printed circuit boards, including the printed pattern, wire bonding, ball grid arrays and other parts, and solder conditions (Figure 3).

Figure 3. This x-ray image of a printed circuit board with surface-mounted components was taken with Hamamatsu’s C10650 x-ray time delay integration line-scan camera. The back fillet under stacked parts, wire bonding in the integrated circuit, the void in the die-bond pad and lapping films can be seen. A 3-D profile of the noted back fillet is displayed.
Another application for which an x-ray TDI line-scan camera is useful is inspecting packaged medicines. In the pharmaceutical industry, x-ray imaging is used to check pills for cracks, to measure density and composite distribution, and to inspect packaged drugs for missing or defective items. These types of inspections require good resolution and sensitivity.
So, whatever the needs of an industry are, an informed choice of an in-line x-ray inspection system is paramount. The first step is determining the specific requirements and then matching the camera to those requirements. As a general rule, an x-ray line-scan camera offers higher speed and lower cost than a 2-D sensor. For higher resolution and sensitivity, an x-ray line-scan camera operating in time delay integration mode is more appropriate. The bottom line is that assessing your needs and evaluating the inspection system carefully will pay dividends in the long run.
Meet the authors
Robert Roche is a product manager and Maridel Lares is a technical writer at Hamamatsu Corp. in Bridgewater, N.J.; e-mail: [email protected]; [email protected].