Combining thermal imaging technology with x-ray techniques is advancing production of medical devices, while also aiding the expansion of application opportunities throughout the bio realm.
AARON GRECO, ARGONNE NATIONAL LABORATORY
Medicine and biotech industries make and utilize high volumes of custom pieces, including prosthetics, implants, personalized medicine, and large-scale medical devices. Getting these products to market faster and more efficiently can save millions in revenue. However, production today is often bogged down by complex manufacturing processes with numerous iterative steps that contribute to long development cycles and process inefficiencies.

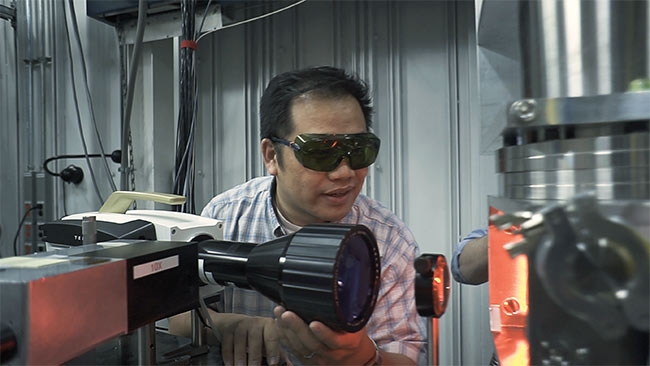
Tao Sun, an x-ray physicist at the U.S. Department of Energy’s Argonne National Laboratory, lines up an IR camera, the first to be installed at an x-ray synchrotron source. The setup provides 3D images of the printing process in nearly real time to benchmark printing processes. Calibrating the x-ray results to the IR camera will allow the use of such cameras to detect defects in processing on manufacturing lines. Courtesy of Argonne National Laboratory.
Additive manufacturing, or 3D printing, has the potential to ease some of these burdens. By building products layer by layer using a computer-generated design, additive techniques can yield a wide range and often more intricate set of designs. And they can do it faster than traditional casting and molding techniques.
Additive methods have flourished as a tool for rapid prototyping, but recent advancements in 3D-printed technologies, computing software, and materials are broadening the application of such methods to moderate and mass production of complex, custom devices.
For drug and medical device makers, the potential benefits of adopting additive manufacturing techniques could be far-reaching. These technologies have the potential to substantially reduce lead time in product development and to shorten time to market, which can help manufacturers meet consumer demand more quickly. These techniques also can minimize unnecessary waste and energy usage.
However, the field is still young and under development. To realize the potential benefits of additive manufacturing, more knowledge is needed. At the U.S. Department of Energy’s (DOE) Argonne National Laboratory, researchers are building this knowledge using powerful x-ray imaging capabilities at the Advanced Photon Source (APS, a DOE Office of Science user facility). The addition of a new IR camera at the APS will further illuminate additive manufacturing processes. The camera was funded through a Laboratory Directed Research and Development (LDRD) program as part of Argonne’s Manufacturing Science and Engineering program, which hosts the world’s brightest, highest-energy x-ray beams.
Additive manufacturing research
The APS has a beamline optimized for additive manufacturing research conducted by industry, academia, and government scientists. A high-speed IR camera and 3D-metal-printing apparatus are affixed to the beamline. The apparatus supports laser bed powder fusion, an additive technique that uses a laser to melt and fuse metal (or polymer) powder, building up materials layer by layer.
Argonne is the first laboratory in the U.S. to add both a metal laser printing simulator and an IR camera to a high-energy beamline. These resources, and the scientists who maintain them, are being used to study metal additive manufacturing processes in intense detail. With x-ray imaging we can capture the 3D-printing process at 6.5 million frames per second, and with IR imaging we can visualize thermal details at 95,000 frames per second.
Joining thermal imaging, x-ray
X-ray and thermal imaging are being used to study additive manufacturing because these techniques can shed light on the complex dynamics that control the properties of finished products.

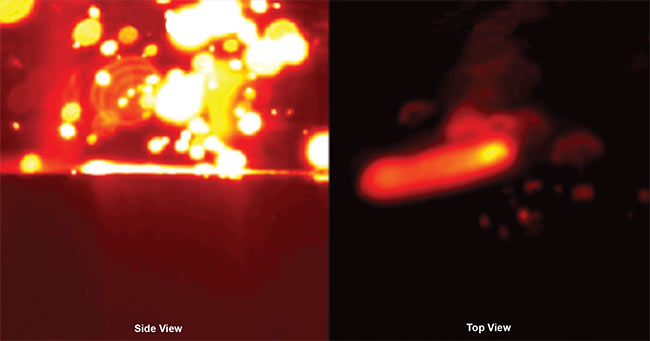
IR and x-ray imaging of the 3D printing of a metal part. Together, these imaging techniques can help scientists better understand the 3D-printing method,
allowing them to benchmark processes and materials to reduce defects. Courtesy of Argonne National Laboratory.
Heat transfer is one example. It affects how materials melt and solidify to build finished products. IR imaging helps detail these dynamics by showing the heating and cooling rates at the surface of materials.
X-ray imaging and diffraction techniques also contribute critical knowledge, namely details about the properties and structure of materials at the microscopic level. With both techniques, researchers can begin to construct the underlying physics of the entire process. This knowledge can help additive technologies mature and overcome their many challenges, a feat that could widen their adoption in medicine, biotechnology, and numerous other fields.
Understanding defects
Low reproducibility of quality parts is among the chief challenges of additive manufacturing today and is driven by the formation of defects. Tao Sun, an x-ray physicist at Argonne, along with colleagues and other researchers from Missouri University of Science and Technology and Carnegie Mellon University, has used hard x-ray imaging at the APS to study how defects form, as well as the conditions leading to their formation.
While at a glance the process may appear simple, there are in fact many dynamic processes and complex interactions taking place during the laser-metal interaction. These can have an impact on a product by altering aspects such as porosity, surface roughness, and residual stress, which can undermine quality.
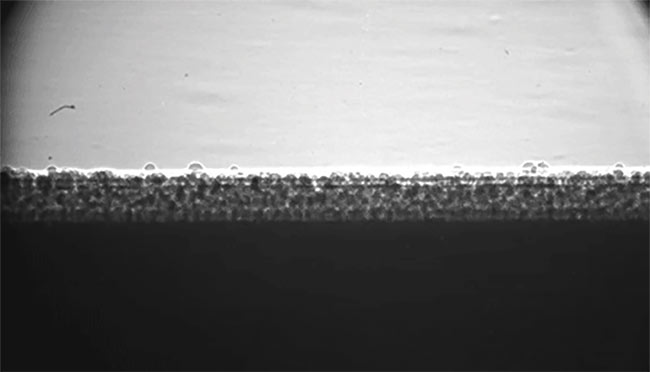
The researchers’ work has produced a moving picture of the 3D-printing process, capturing in stunning detail the formation of defects within the microstructure of the material. It has also generated details related to melt pool dynamics, power ejection, solidification of the material, and phase transformation. Such knowledge can support manufacturers and other researchers in creating ways to minimize or mitigate defects in the future.

The Advanced Photon Source generates high-energy x-rays that show 3D printing in near real time. Courtesy of Argonne National Laboratory.
IR imaging complements x-ray imaging in the study of defects. For example, it can support research into the formation of plumes — vaporized particles that can disrupt the performance of the laser. During 3D printing, plumes form as a laser hits and moves across metal powders. In a vaporized phase, these particles can’t be captured with x-ray imaging but are illuminated through IR imaging. Coupled with knowledge from x-ray imaging, researchers can evaluate how this phenomena affects laser performance.
Optimizing product design
Data generated through x-ray and IR imaging can help advance production by improving the design of models used to control the printing process. Modelers can, for example, use these experimental insights to adapt models to more accurately predict the characteristics of printed materials, or to predict process dynamics such as how a laser will melt a powder or when a powder will change phases. When combined with machine learning, computer modeling could also be used to control processes in near real time; predictive and real-time process controls can advance reproducibility and enable faster optimization of parts.
X-ray analysis and predictive computer modeling can also speed up the adoption of new alloys by benchmarking materials and process conditions. This would eliminate the need for costly x-ray inspections of finished parts, or the overbuilding of parts to ensure durability at the expense of weight.
Argonne’s modeling and simulation experts are supported by facilities such as the Argonne Leadership Computing Facility (ALCF), another DOE Office of Science user facility. The ALCF boasts computing resources 10 to 100× more powerful than systems typically used for scientific research. Its resources are open to researchers from universities, industry, and government agencies to accelerate benchmarking and adoption of additive manufacturing practices.
Coupling an IR camera with Argonne’s x-ray imaging capabilities creates an opportunity for real-world system users to gain from the knowledge being developed at the laboratory. By integrating IR cameras to their own additive manufacturing systems, users could potentially leverage laboratory insights to improve their own systems.
For example, if Argonne were to identify a thermal signature associated with the formation of a defect, a system user could possibly use that to identify within their own systems when a defect is forming and make adjustments to avoid it.
These potential applications remain far out in the future, but they expand opportunities for leveraging both techniques. Success involves seeing this foundational science being applied in the real world to improve systems and designs. The installation of the IR camera brings us closer to that objective.
Meet the author
Aaron Greco, Ph.D., is the manager for Argonne National Laboratory’s Materials for Harsh Conditions group in the Applied Materials division. He also serves as principal investigator on a project designed to improve the reliability of wind turbine drivetrains, and has more than 10 years of experience in tribology and advanced surface engineering. He
has a doctorate in mechanical engineering from Northwestern University; email: [email protected].