C.W. "Ron" Swonger, Coherix Inc.
Precision noncontact metrology application factors can seem complicated, especially when 3-D or multispectral measurements are involved. Here’s how to ensure a robust and otherwise optimized metrology solution for your application.
The competing requirements for the most challenging measurement applications in industry and other technical endeavors can be daunting when their complexity takes the design or application engineer into territory that is “uncharted” in his or her experience.
This is especially the case when 3-D high-precision measurement or sensitive multispectral measurement requirements are part of the application picture. A deep analysis of all relevant optical characteristics of all system components is required, as is an understanding of the surface characteristics and composition of the materials that are to be measured and the ambient operating conditions under which measurements must be performed.
Dimensional considerations
It is deceptively easy to say that measurement accuracy and repeatability must be better than some particular value simply because the established tolerances for the quantity to be measured are some number of times greater than that. But in reality, the surface structure and geometry can produce surprises in the testing and validation of systems if they are not analyzed in advance. Measurement errors may not be Gaussian in their distributions under some conditions related to processes that created the surfaces and other factors. Complete height maps may be needed (Figure 1).
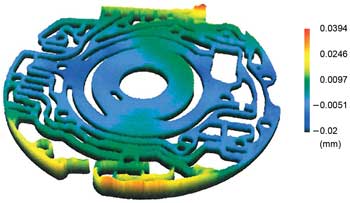
Figure 1. A 3-D pump body height map. Images courtesy of Coherix Inc.
It is important to understand whether the conventional “3-sigma” or other statistical accuracy measures are adequate for meeting the basic objectives of the measurement process. For example, in some applications, the worst-case errors are the most critical to control. In addition, the accuracy of any system can vary with surface conditions, so that actual accuracy statistics may be “multimodal” – that is, their distributions may differ for variations in surface finish, ambient conditions or other process variables.
Surface finish considerations
For some classes of precision-manufactured parts or materials, the general class of surface finish measurements is of primary interest. It is common to divide that range of measurements according to the spatial frequency (or spatial wavelength) domains of roughness, waviness and profile (or “shapiness”), and to focus on which of those domains are most relevant to the functioning and appearance of the surface. A wide variety of metrics has been used for each of these domains. Unfortunately, legacy devices using old mechanical technology are not practical for measuring those surface metrics in all directions on the surface nor to measure the entire surface in acceptable periods of time. So few are experienced in measuring dynamically directional surface metrics – in which the important direction of measurement varies across the surface.
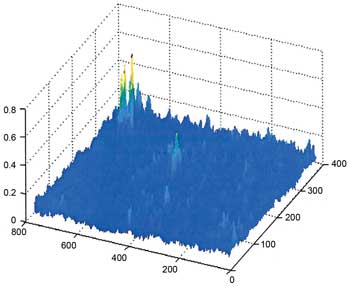
Figure 2. An omnidirectional ISO Ra surface roughness map.
There is also little experience in industry with measuring these surface finish metrics in all directions at once: omnidirectional (directionally independent) roughness, waviness or profile (Figure 2). Yet one or more of these directionally sensitive measurements may be the critical factor in the actual performance of the surface, such as when bearing or sliding surfaces are involved.
Local defect/artifact detection
A second class of inspection applications is concerned with detecting small defects or contaminants on surfaces. Often, these may be as small as microns in size and may occur unpredictably at any point on a surface (Figure 3). The result may be either functional failure of the surface or cosmetic defects that lead end users to perceive low quality of the surface. In this class of application, the requirements often include:
• A very high probability of detection, well exceeding 99 percent.
• A low false-detection rate to ensure minimal rejection of good product.
• Accurate classification of defect types so that proper remedial actions can be taken.
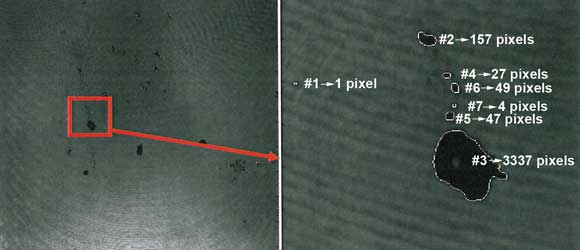
Figure 3. An example of a machined surface with porosity, with enlarged view of an area where pores from a few tens of microns to a few hundred microns in size are detected. Tool marks on the surface also are visible.
Such isolated surface defects may be 3-D or 2-D, spectral or best defined in terms of surface finish parameters described earlier. The minimum defect size of interest is another key requirement issue that must be addressed in such applications.
Surface spectral considerations
When surfaces must be inspected (measured and classified) on the basis of their optical spectral (e.g., color) characteristics, an entirely different set of issues exists. The factors that are critical may include polarization, saturation, hue, brightness and specularity. In turn, some of those characteristics will depend upon the condition of the part in terms of applied moisture, dust, contaminants, corrosion and other external effects.
Complete optical characterization of surface samples, used to define an optimum sensing component configuration in a metrology system, is referred to scientifically as the bidirectional reflectance distribution function, or BRDF. It is never practical to have a metrology system, in online production use, measure the BRDF of surfaces being inspected. But it can be very important to consider the BRDF of the surfaces of interest during the design/development phases of the metrology or inspection solution, so that the inevitable variations in surface characteristics do not result in undesirable accuracy shortfalls.
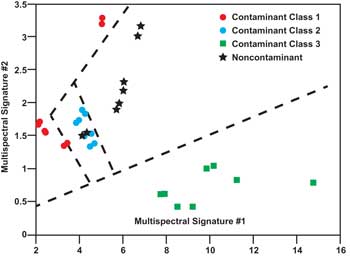
Figure 4. Two multispectral signatures produced on every resolved surface point enable automated detection and classifying of three types of contaminants and also artifacts of no concern. Higher-D multispectral vectors that separate more classes do not clearly display on paper.
User understanding
An often underestimated factor in high-precision multidimensional metrology is the human usage factor. Even when the ultimately intended mainstream purpose of the measurement or inspection is an automated “pass/fail” decision, it can be almost guaranteed that the most urgent moments of use will come when an intelligent and experienced user must immediately understand the characteristics and significance of the data underlying those results. And in many applications, the opportunity for design engineering or manufacturing engineering analysis of measurements is a frequent and high-value benefit. Immediate interactive human visualization functions of the measurement system will accelerate production process launches, shorten the time for correcting process faults and avoiding scrap, provide data for reducing product costs, and prevent wasted downstream processing of defective product components.
Multispectral and 3-D visualization of measurement results bridges the gap between the noncontact sensor/processing system and the intellect of the engineering and manufacturing human experts who understand what to do when abnormal measurements occur. The designs of the most successful and valuable measurement systems take into account who will want to use the system to quickly answer which specific questions and when (Figure 5).
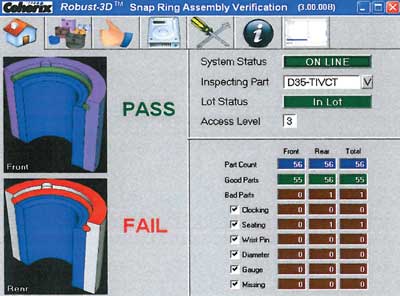
Figure 5. An interactive high-definition metrology display.
Measurement throughput
Measurement and inspection of various manufactured parts and other materials occur at a very wide range of surface and object coverage rates across different applications.
Traditionally, there has been a tendency, forced by old technology, to measure less completely than the processes warrant in terms of surface coverage or of sampling rates. Modern measurement technology platforms now permit consideration of any application with regard to:
• The speed with which defects can develop.
• How randomly the defects occur – in time and in location on the surface.
• How large of an area requires measurement.
• How rapidly parts and surfaces are produced on the production line.
• The cost penalty for any given amount of delay in detecting defects or process drift.
Depending upon the specific types of measurements required, throughput may be most appropriately stated in terms of either tens of thousands of inspected parts per hour or in terms of surface sampling rates of millions of 3-D surface sample measurements per second. The value of measurement and inspection information depreciates rapidly as the time delays increase from when a surface defect is created until actionable information can be taken to prevent its undesirable recurrence on subsequent surfaces.
The bottom line
Noncontact multidimensional platforms exist that each address some part of the “measurement/inspection applications space.” Diverse applications are found in the many industries and other sectors where precision verification and process control in the manufacturing or handling of materials are important.
Although there is no single “silver bullet” that is the optimum configuration for every measurement application in this large and challenging “measurement/inspection applications space,” a solution can be configured to address and solve almost any point in that space. The rapid pace of advances in sensing, processing and algorithm technology components has significantly expanded the range of technically and economically feasible solutions. It only takes experienced and thorough analysis and engineering to select and configure the right platform for the application at hand.
Meet the author
C.W. “Ron” Swonger is director of advanced contract developments at Coherix Inc. in Ann Arbor, Mich.; email: [email protected].
Factors to keep in mind when assessing a metrology solution:
• All three dimensions of the object to be measured and those of the smallest defects that must be detected.
• The quality of the part or materials surface finish – its roughness and waviness.
• Local defect/artifact detection.
• Surface spectral considerations – the surface reflectance as a function of the optical wavelength.
• User understanding of the material and of the manufacturing process.
• Measurement throughput.