Mike Zecchino, 4D Technology Corp.
Dynamic laser interferometry is an established technique for measuring
optical-grade surfaces in the presence of vibration and air turbulence. Unlike traditional
laser interferometry, dynamic interferometry does not require expensive vibration
isolation systems, extensive mechanical coupling between the instrument and test
optic, or air flow abatement. The method provides a cost-effective means of assessing
the quality of large optics, often 1 m in diameter or larger, even when the optic
must be placed many meters from the interferometer to enable measurement.
While dynamic interferometry is useful for verifying an optic’s
final shape, it also can provide accurate shape data to guide polishing. This data,
gathered early in – and even throughout – the process, allows more aggressive
polishing that greatly shortens manufacturing time.
There are challenges in measuring large optics during polishing,
but dynamic interferometry has been applied to overcome them.
Measuring optics during polishing
Measuring a large optic in a shop-floor environment presents multiple
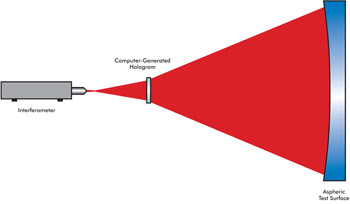
difficulties. Figure 1 shows a typical setup for measuring a large aspheric optic.
The size and curvature of the optic dictate that it must be located many meters
from the measurement system.

Figure 1. This diagram shows a setup for measuring a large aspheric optic. Courtesy of 4D Technology Corp.
This measurement poses difficult challenges for a temporal phase-shifting
laser interferometer. Because a temporal phase-shifting system acquires data over
a sequence of frames, its acquisition time is long, on the order of hundreds of
milliseconds. Over the duration of the measurement, vibration and air flow would
hinder or, more likely, prevent the acquisition of data. Vibration and turbulence
would therefore need to be tightly controlled, which would mean coupling the instrument
and optic through a single vibration-isolated pad or stand, as well as carefully
controlling air flow and temperature differentials in the facility. All of these
measures would be expensive and would require significant alteration of a facility.
The polishing process presents additional metrology challenges.
Maximizing polishing throughput requires that the measurement process, including
setup, alignment, data acquisition and analysis, be as fast as possible.
Also, the surface quality of an optic in its rough shape will
exceed the measurement capability of most systems. Early in the polishing process,
a large optic may have local surface deviations exceeding 40 μm. Such high
local slopes are difficult for measurement systems to resolve. Qualitative methods
provide some degree of process feedback, but the sooner a manufacturer can acquire
quantitative data, the faster and more accurate the polishing process can be. This
early quantitative feedback becomes even more critical for guiding automated polishing
equipment.
Polishing feedback
In an instantaneous interferometric measurement, all data is acquired
simultaneously in a single frame, rather than sequentially across several frames.
Acquisition time can be only tens of microseconds, making the systems virtually
insensitive to vibration. This insensitivity allows measurement when the test optic
is located far from the instrument, even on a separate concrete pad. Furthermore,
the effects of air turbulence can be easily removed from data using averaging techniques.
Where a traditional interferometric measurement will be compromised by even minor
air perturbations, an instantaneous measuring system actually performs better with
a degree of fast-moving turbulence.
Several methods have been developed and commercialized for instantaneous
phase data acquisition:
1. In the software-based spatial carrier method, high-frequency
tilt fringes are applied by tilting the reference surface relative to the test beam.
The tilt fringes are then filtered out by the software algorithms that determine
the phase and thus the surface heights.
2. In an off-axis Fizeau interferometer, the test and reference
beams pass through separate internal apertures, which select the correct polarization
states from the test and reference optics. The apertures also filter the tilt fringes
and high spatial frequencies.
3. In a stitching interferometer, multiple data sets covering
small portions of an optic are stitched together to provide a full measurement of
the total surface.
4. In dynamic interferometry, polarization elements separate the
test beam into four or more phases. All phase data is recorded simultaneously and
analyzed to determine surface heights.
Each of these instantaneous methods may be able to provide final
quality control for large optics. However, most methods cannot provide feedback
for the early stages of polishing. In a spatial carrier system, the filtering required
to remove the tilt fringes limits the spatial resolution and thus the range of slopes
that can be resolved. High spatial frequencies are also filtered out by the apertures
used in Method 2, again resulting in a reduced range of measurable slopes. A stitching
interferometer retains high spatial frequencies, but great care must be taken to
preserve low-frequency data during the stitching process. Only dynamic interferometry
has proved capable of measuring the full range of spatial frequencies present during
polishing across a large aperture in an environment typical of a polishing process.
Measuring a large aspheric optic
Optical Surface Technologies of Albuquerque, N.M., designs, manufactures
and coats custom optical components for specialized applications. In a current project,
the company is polishing six 1.4-m-diameter parabolic mirrors. Stringent requirements
dictate that the final surface quality will have to be 29 nm root mean square (rms)
roughness, so both large-scale shape and small-scale structure are important to
monitor during polishing.

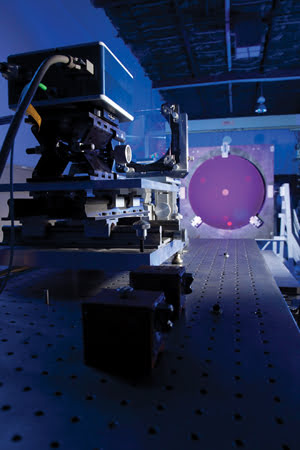
Figure 2. Pictured is a measurement setup for a 1.4-m parabolic optic. The interferometer is in the foreground, along with the computer-generated hologram and optic. Courtesy of Optical Surface Technologies.
The test setup requires the optic to be located approximately
3 m from the interferometer, which means the optic must be located on a separate
concrete slab. The measurements must be completed in an environment with significant
background noise and vibration since the facility is located near the intersection
of two major expressways.
The manual polishing process consists of two phases: first polishing
the blank to a sphere and then polishing in the final shape. Acquiring reliable
measurement data early in the process is critical for producing the mirrors on a
tight schedule, noted Rod Schmell, optical fabrication manager at Optical Surface
Technologies. “If we can see surface deviations when the surface quality is
at 33 waves rms, then we can polish more aggressively and converge on the final
shape faster,” he said.
For these measurements, the company first employed an off-axis
Fizeau interferometer, but because of the extreme local slopes, reliable data could
not be obtained. A dynamic interferometer was then used and was found to measure
accurately (Figure 3) even at the rough blank stage. “We had data we could
believe, and we tracked it throughout the polishing run,” Schmell said. “The
data gave us confidence to work the part more quickly.”

Figure 3. Dynamic interferometric measurement of a large aspheric surface during the early stages of polishing is seen in this image. Courtesy of 4D Technology Corp.
Also important was the dynamic interferometer’s ease of
use for in-process measurement. Setting up the off-axis Fizeau system required alignment
of two spots per optical element; determining which spot was correct required significant
time and effort. The Twyman-Green-type dynamic interferometer did not have this
limitation. This advantage, along with minimal system drift and other benefits,
enabled the polishing team to reduce downtime for a measurement to 15 min.
Dynamic interferometry provides quantitative feedback for manual
and automatic polishing operations, from rough polishing to final shaping. Overcoming
the difficult measurement environments found in most polishing operations, dynamic
interferometry enables aggressive polishing with less downtime, so manufacturers
can deliver high-quality finished optics in less time.
Meet the author
Mike Zecchino is applications engineer at 4D Technology Corp. in Tucson, Ariz.; e-mail: [email protected].