Spectrally controlled interferometry, a recent advancement in traditional interferometer technology, improves the manufacture of optics that have multiple flat surfaces.
ROBERT SMYTHE, ÄPRE INSTRUMENTS INC., AND ZACHARY HOBBS, SYDOR OPTICS INC.
Measuring flat and prismatic optics with a traditional laser interferometer is difficult to impossible. Optical engineers, scientists, and technicians struggle to obtain accurate measurements on optics with two or more flat and parallel optical surfaces because of mutually interfering back reflections. This mutual interference can degrade or hinder measurement, making it difficult to tell whether a part meets specification.
To suppress back reflections and enable measurements, users have — for more than 50 years — tried work-arounds such as painting, taping, or adding unwanted wedge. There is even a bit of tribal lore regarding the best color or brand of paint to use to achieve better measurements. Such is the acceptance of this limitation.
These work-arounds can add hours to production, add material costs for paints and supplies, and still leave users wondering whether the parts actually meet specification. Work-arounds can also damage and scrap parts. And at times, even the best methods do not work, as is the case with RBG prism combiners. Their millimeter dimensions, with as many as five mutually interfering surfaces, cause a completely confused interference pattern.
Adding to these difficulties are increasingly sophisticated applications — including windows for cellphones, filters for lidar and biological components, prisms for projection systems, substrates (such as wafers for LEDs), and plates for disk drives — all of which place an increasing demand on both the volume and accuracy of optical components. During the manufacture of plane-parallel optical plates, for example, certain parameters must be controlled, including flatness and midspatial frequency surface features, roughness, parallelism, and transmitted wavefront deviation. Now, because of these new applications, and because the thickness of a plate can range from hundreds of millimeters to just a nanometer, it has become impossible to directly measure these optics with conventional laser Fizeau interferometry.
Accepting “the way it is” does not work anymore.
How we got here
The two most common commercially available modalities of interferometry to measure flat optics are white-light interferometry (WLI) and laser interferometry (LI), each with capabilities and limitations. WLI, which was developed before the laser, isolates surfaces and is helpful for measuring the front surface of a plane-parallel optic because the back surface reflections do not influence the measurement. Unfortunately, white-light interferometers are difficult to set up and align
because the optical interference only occurs over a micrometer-narrow region. Optical components with a diameter larger than a few millimeters become near impos-
sible to measure because of the extreme difficulty of finding the interference pattern. In addition, the requirement that the interferometer have equal optical path lengths between the test and measurement arm limits WLI measurements to the top surface.
LI, which was productized around 1975 following the commercialization
of the laser, was successful in part because of the limitations of WLI. Unlike WLI, LI produces fringes everywhere, making for easy setup, alignment, and measurement of flat or prismatic optics. LI also works best when a single surface needs to be measured. Interference from multiple surfaces creates confusion, making measurements impossible (Figure 1). As previously mentioned, work-arounds are typically employed with limited success.
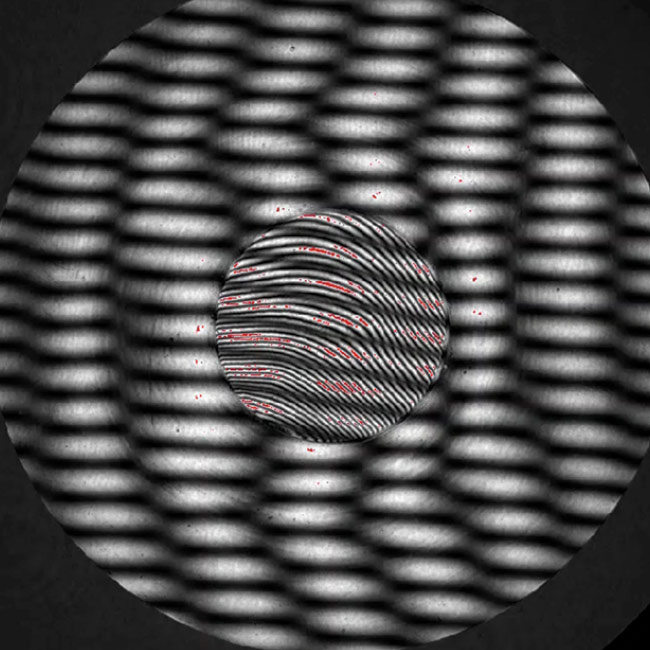
Figure 1. A 1-cm-thick plane-parallel substrate with a 250-µm-thin plate cemented to it, causing a confused interference pattern that is impossible to measure with a laser Fizeau interferometer. Courtesy of Apre Instruments Inc.
Historical solutions
Four techniques have been applied to try to overcome these issues.
1. A Twyman-Green interferometer with
a white light source. The Twyman-Green interferometer originated in the early 20th century, prior to the introduction of lasers. This system included a filtered light source, which created fringes at
a micrometer-narrow plane in space. The optic was placed at the narrow
position, where interference occured, and was then measured. Use of the Twyman-Green is now limited to specialized applications because of the
difficulty in setting it up, finding the narrow fringe position, and aligning within it.
2. A grazing-incidence interferometer with a low-spatial-coherence laser source. In grazing-incidence interferometers, the light projects out at a steep angle of
incidence, up to 80º from the surface normal. The steep angle — combined with a laser light source that is made into a spatially incoherent disk of light instead of a point, as is common with a laser Fizeau interferometer — isolates the front surface, enabling just that surface to be measured. Back surface reflections are suppressed, but with
decreased optical resolution and the strict setup parameters of spacing the part ~200 µm from the reference surface, grazing incidence is limited to a few applications, including volume production measurement of glass and sapphire wafers.
3. An interferometer with a scanning or stepping laser source. These interferometers use multiple wavelengths of light during measurement, unlike LI, which uses one. While acquiring interferogram data, the laser is continuously scanned or stepped through a range of wavelengths. The multiple surfaces are then identified via one of several analytical techniques, and data results can be gathered and reported. These systems are easy to align because of their long laser coherence. Data acquisition times can be in the tens of seconds to beyond a minute, where the thinner the part the longer the acquisition time. Long acquisition times make the systems environmentally sensitive, thereby decreasing measurement accuracy. Further, the measured surface is mathematically identified; therefore, the interferogram of the surface of interest is not visually seen before or after measurement, so there is uncertainty that the desired surface was measured and that the measurement is correct. Plus, the thinnest optical surface isolation ranges from 0.9 to 9 mm optical path length, depending on the wavelength used. These systems are therefore limited to thicker parts and environments with low vibration and calm air turbulence.
4. A delay-line, coupled-cavity Fizeau white-light-source interferometer. This method overcomes the limitations of the laser Fizeau; it acts as a white-light interferometer, combining a Twyman-Green with a Fizeau. The test cavity becomes coupled to both interferometers by utilizing the same white light source and imaging optics. This configuration, using a broadband white light source, projects localized interference fringes in front of a Fizeau interferometer. Adjusting the cavity length of the Twyman-Green interferometer moves the fringe location closer or farther from the Fizeau reference surface. These systems isolate surfaces, but fringes can be hard to align because they are highly localized and difficult to find, so they act similarly to a white-light Twyman-Green.
SCI solutions
Demonstrated in 1997 by professor
Johannes Schwider1 and commercially available since 20172,3, spectrally controlled interferometry (SCI) enables — without unique preparation — the rapid measurement of flat and prismatic surfaces. SCI uses a standard Fizeau interferometer in which the laser has been replaced by a new light source that produces an electronically controlled spectrum. This new light source can transform any Fizeau — saving time, reducing scrap, and improving accuracy. (See “The Benefits of SCI.”)
Fringe location, width, and phase
In all interferometers, the light-source spectrum controls how and where the interferogram is produced (Figure 2).
A laser has a narrow spectrum and produces high-contrast interference over a wide range of optical paths (Figure 2a). This is the configuration used most for optical testing based on a Fizeau interferometer.
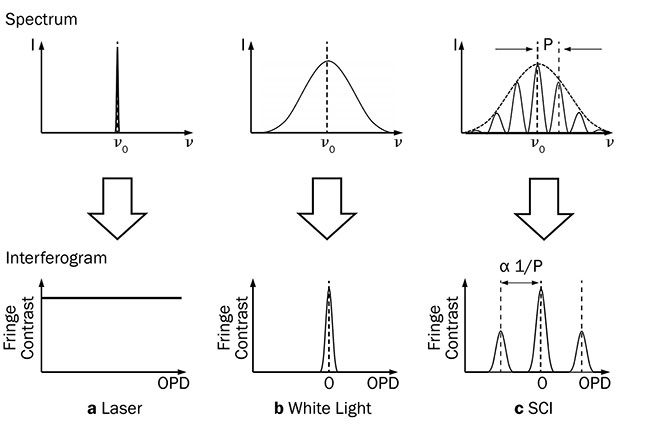
Figure 2. Source spectrum determines interferogram structure. Narrow laser spectrum produces broad fringes (a), wide white light spectrum produces narrow fringes (b). Spectrally controlled interferometry (SCI) spectrum produces fringes at 0 OPD (optical path difference) and side lobes controlled by the period of the spectrum (c). Note: Measurements are made at the side lobes. Courtesy of Apre Instruments Inc.
A white light source has an opposite, broad spectrum (Figure 2b), which leads to a localized interference pattern at the position where the optical path lengths of the interferometer test and reference arms balance — at zero optical path difference (OPD). Localized fringes mean back
surface reflections are eliminated. This configuration — white light plus balanced optical paths — is used for surface-profiling with coherence scanning interfer-
ometer (CSI) microscopes and limited
optical testing with the Twyman-Green interferometer.
The Benefits of SCI
- Easy setup with long coherence, like a laser Fizeau interferometer.
- Measures 100-µm-thin plates without work-arounds.
- Less than 1-sec, vibration-tolerant data acquisition.
- Electronic phase-shift control measures fixed cavities.
- Quick visual display and checking of measured surface.
-
Works on any Fizeau interferometer, with a quick change on the ÄPRE
S-Series.
|
With a structured spectrum (Figure 2c), the interferogram has the same zero-OPD fringe location as with a white light source — at the reference surface — but it also has side-lobe interference fringes distant from the reference surface. In a Fizeau
interferometer, these distant fringes act like white-light fringes. Using this new light source, the interferometer can have properties of both laser and white light sources, along with additional capabilities. The width, position, and phase of the side-lobe fringes can be electronically controlled via the SCI source —
enabling a unique and growing set of applications.
SCI control parameters
With SCI, new parameters control interferometer measurements. Source spectrum width, period, and phase can be electronically controlled, and these three control interferogram width, position, and phase (Figure 3).
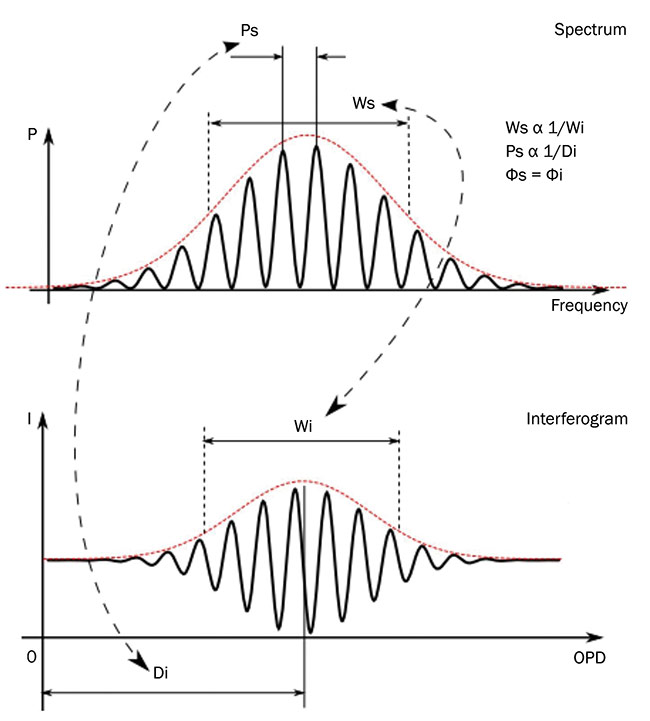
Figure 3. Three SCI control parameters: spectral width (Ws), period (Ps), and phase (Φs). Fixing the source period (Ps) under a broadband source (Ws) creates a fixed narrow region of interference in front of any simple Fizeau interferometer. Wi: interferogram width; Di: interferogram distance; Φi: interferogram phase. Courtesy of Apre Instruments Inc.
Spectral width (Ws) is inversely proportional to interferogram width (Wi). This is the same for the other two modalities, for a laser (narrow line, broad interferogram) or white light (broad spectrum, narrow interferogram).
Spectral period (Ps) determines the interferogram position (Di) distant from the zero-OPD position — the reference surface in a Fizeau interferometer. This capability is unique to SCI.
Spectral phase (Φs) equals the interferogram phase (Φi). Phase shifts for data
acquisition only depend on spectrum phase. Thus, phase shifting requires no mechanical motion, as in standard phase-shifting interferometry, and has no thickness limi-
tation, as in wavelength-scanning systems.
This capability is also unique to SCI. Spectral phase shifting enables phase shifting measurement of thin components, and also benefits large-aperture inter-
ferometers where mechanical phase shifting is difficult and expensive.
Application
SCI has found practical applications in a number of areas.
Filter substrates. Previously, as with other plano optical components, to measure a simple filter substrate, the back surface would be painted, allowed to dry, measured, and the paint would be stripped; then the second surface would be painted, allowed to dry, measured, and
the paint would be stripped. If the compo-
nent passed inspection, it would be packaged for shipment. If it failed, after further polishing, this process would be repeated. With SCI, however, the part is simply aligned, as in a laser Fizeau, and a vibration-
tolerant phase measurement is made in less than a second — front and back,
and possibly internal interference —
to provide total thickness variation.
Total measurement time is now around two minutes, with significant cost sav-
ings and increased quality control (Figure 4).
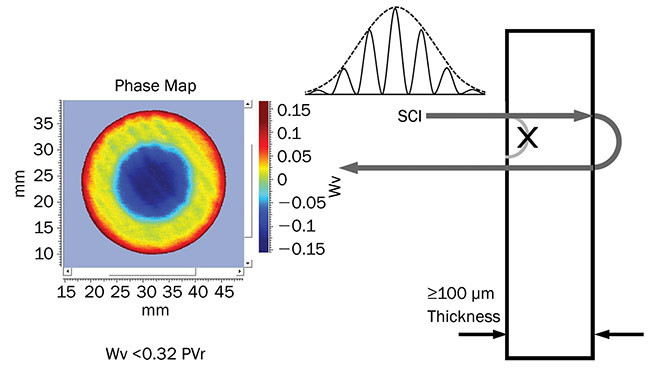
Figure 4. Micro-optic RBG combiner prism set measured with SCI. Wv: waves; PVr: robust peak-to-valley. Courtesy of North Inc. and Apre Instruments Inc.
Glass/sapphire wafers. These thin plates can now be measured to high lateral-
image resolution in seconds in a standard Fizeau, without requiring grazing incidence to suppress back reflections.
RGB combiner prisms. For the first time, these millimeter-size parts can be measured. RGB combiners are important to microprojection systems and head-up
displays (Figure 5).
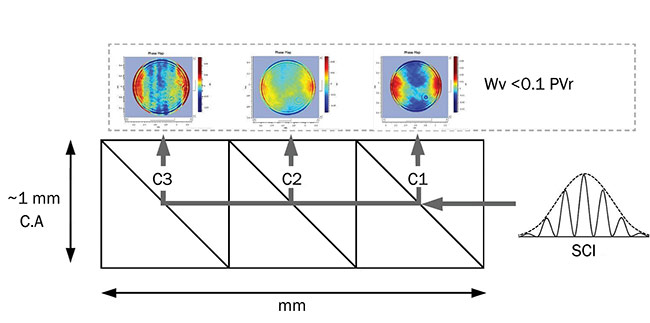
Figure 5. Thin plane-parallel plate, back surface measured with SCI. Wv: waves; PVr: robust peak-to-valley. C.A: clear aperture; C1,2,3: Channels 1, 2, & 3. Courtesy of Sydor Optics and Apre Instruments Inc.
Right-angle prisms (micrometer and larger). Isolating surfaces and electronically phase-measuring blocked parts can now be done while isolating the surface of interest.
Cellphone cover glass. These micro-meter-thick plates influence image quality and can be measured for the first time with an interferometer.
Ultraparallel windows. Flat surfaces with
minimal wedge can now be measured accurately without internal reflection from the backside surface.
SCI capabilities are still being explored, and applicability and performance will certainly widen with future discoveries. Even now, in its infancy, SCI is advancing optical manufacturing.
Meet the authors
Robert Smythe is president of Äpre Instruments and has more than 30 years of experience designing, developing, and applying
interferometry to optical manufacturing process control. He has a bachelor’s degree in physics; email: [email protected].
Zachary Hobbs is engineering manager at Sydor Optics Inc. and has over 18 years of optical manufacturing and process development experience. He has a bachelor’s degree in electrical and mechanical engineering technology; email: [email protected].
References
1. J. Schwider. (March 1, 1997). White-light Fizeau interferometer. Appl Opt, Vol. 36, No. 7.
2. C. Salsbury and A. Olszak. (2017). Thin Optical Window Measurement with a Spectrally Controlled Interferometer. Presented at ASPE Interferometry Topical Meeting, Tucson, Ariz.
3. U.S. and international patents; other patents pending.