Optical components consisting of cylindrical surfaces require special measuring techniques, and a specific combination of test methods can help overcome errors so that “error free” data can be stitched together to cover larger areas.
Chris Hellwig, Marek Läger, Thomas Oberdoerster and Matthias Bischoff, Berliner Glas KGaA, Berlin
Interferometric metrology is the standard process for topographic measurements in the optical shop environment as well as in quality assurance laboratories. In all interferometric instruments, the tested wavefront is compared with a reference, with the latter typically generated using a reference element with the same base shape as the sample under test.
As with all comparative tests, measurement accuracy depends on the quality of the reference with which the probe is compared. In optics, planar, spherical, aspherical or cylindrical reference elements traditionally are high-quality surfaces made of optical glass or, more lately, optical elements combined with computer-generated holograms. It is worth noting that the quality requirements of the reference elements depend on their shape. For example, a wavefront distortion of less than λ/30 typically is required for flat references, but a wavefront distortion of 1⁄20 of the wavelength is sufficient for most spheres. In addition, error-eliminating techniques such as the two-sphere or ball-average test can be applied to improve the accuracy and/or to compensate for least-accurate-reference surfaces.

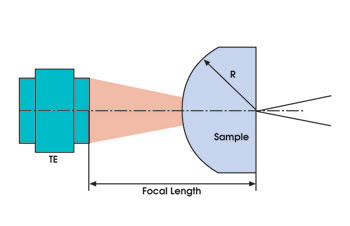
Figure 1. The sample (gray) is placed in front of the cylindrical transmission element. Because of the aperture available, only a portion of the sample can be tested. TE = transmission element; R = radius.
Size matters
Cylindrical elements, however, are well behind in this respect. The surface errors of their reference elements — and, hence, their accuracy — are currently in the range of only λ/5 and, so far, error-eliminating techniques are not widely used.
For planar surfaces, the gap (or path difference) between the reference flat and the sample can have any length, in theory. This means that the maximum sample size is limited only by the area that can be captured by the interferometer — which is given by the aperture of the beam expander and the reference flat.
For spherical and cylindrical samples, however, the sample must be placed in a confocal position — where the center of curvature of the sample coincides with the focal point along the focal line of the reference element. Each lens or spherical surface is described with its f number — the ratio of the focal length to the diameter of the entrance pupil. To measure an entire surface, the f number of the reference element must fit with the f number of the test surface. If the f number of the reference element is higher than that of the sample, it means that the aperture of the reference element is smaller than that of the sample and that only a portion of the sample surface can be tested.

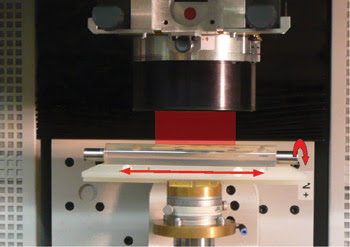
Figure 2. An overaperture cylindrical sample, mounted on a translation stage, is moved via rotation and translation. All individual subaperture measurements (illustrated by the red ray bundles in the figure) are stitched together subsequently to obtain the surface information for the entire object.
To overcome this, stitching technologies can be used, whereby the sample is moved with respect to the interferometer to cover all regions sequentially. However, this technique is commercially available only for plano, spherical or aspherical samples, which created the demand to develop a solution for cylindrical surfaces.
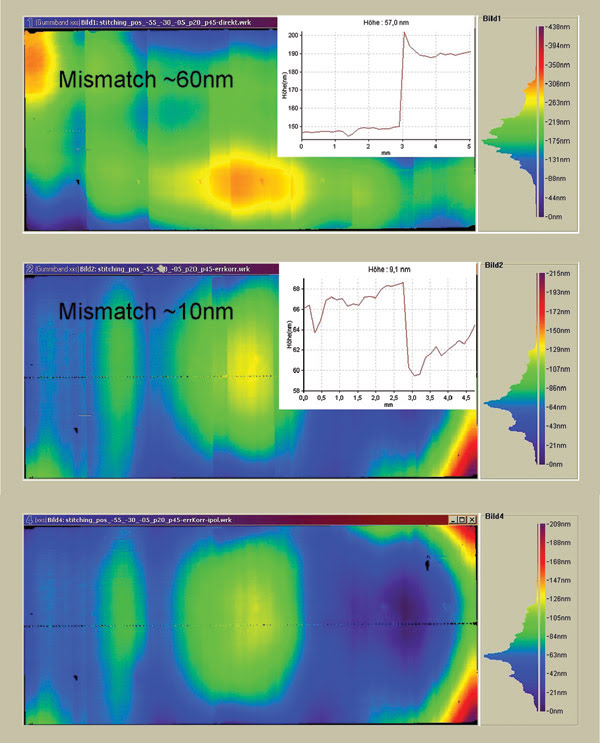
The solution developed by Berliner Glas of Berlin uses QED Technologies’ Subaperture Stitching Interferometry and a new cylinder-stitching algorithm. Simulations showed that the overall shape of the stitched surface is driven by the shape of the cylinder reference element. Consequently, most of the stitched results had the same shape and came with additional stitching artifacts.

Figure 3. A stitched cylinder surface is shown before and after error correction. The mismatch is clearly visible in the top profile plot and driven mainly by systematic reference element errors. After correction (middle), the remaining stitching error is <10 nm. This is a reduction by a factor of 6 compared with the initial 60-nm stitching mismatch. Averaging at the overlap regions further reduces remaining tangent errors (bottom).
To overcome these stitching errors, an error-eliminating technique usable for cylindrical reference elements was needed, but without the time-consuming alignment steps previously proposed.
Spatial wavelength errors
Most calibrating techniques are based on rotationally symmetric reference elements. Because these cannot be applied to cylindrical elements, a possible alternative is given by a simple subaperture averaging test, which is used widely and accepted in optical roughness metrology — with some using this test for spheres as well. The test method now has been applied to cylindrical surfaces using a semiautomated test stand. A cylindrical sample with an oversize aperture is shifted and rotated along the interferometer aperture. To determine the right step size, the waviness — spatial frequency — must be considered, and alignment errors as well as the remaining power of the infinite axis must be removed from the data before all data sets are averaged (subaperture averaging). The resulting data file represents the high spatial frequency “error map” of the reference element under test.
The remaining error — FR — can be calculated by FR < FT • (√n)–1 where FT is the error of the test part and n the number of movements. This means that, if a 25 × 25 data set and a test part with a remaining peak-to-valley error of approximately –λ/5 at each subaperture is used, the “virtual” reference element will have a surface quality of >λ/20 peak to valley.
The remaining power — long-wavelength error — of the infinite axis of the cylinder was removed in the subaperture averaging step. To measure the power, a plano sample is placed near the focal line position. The profile deviation is measured at different Z-positions and different angles, and the power is calculated using a quadratic fit of the averaged profile lines.
Overcoming the mismatch
Finally, the short-wavelength error map is combined with the long-wavelength error. This way, it is possible to remove the reference element error from each measurement. Nevertheless, remaining errors can produce steep tangent errors in the stitched surface. To reduce this effect, an additional averaging step in the overlapping region is used. Because data with an unknown error contingent is considered, this allows the remaining error to be “averaged out.”
In conclusion, error correction techniques have been developed and applied to measure and facilitate production of high-quality cylindrical surfaces. As a result, it is possible to reduce the error of cylindrical reference elements down to ~λ/20. The procedure can be applied not only to standard “direct” measurements but also to stitching analysis. This enables verification of the quality of polished surfaces and the finishing using deterministic fine correction technologies.
Meet the authors
Chris Hellwig and Thomas Oberdoerster are research and development engineers in optical metrology, Matthias Bischoff is a working student and Marek Läger is a process engineer, all at Berliner Glas KGaA, Herbert Kubatz GmbH & Co. in Berlin; e-mail: [email protected].