John McCauley, Ophir-Spiricon
The amount of time and energy needed to invest in the setup and use of an untried, but useful, piece of equipment can be daunting. But once some of the basics are explained, the initial effort seems far more palatable. Here is a look at how one company implemented beam profiling to improve its manufacturing processes.
Applying beam profiling data isn’t as difficult as new users might think. But the best answers often come from those who have applied beam profiling practices in their own day-to-day operations. So, to help me answer these questions and address the stigmas related to the applications of beam profiling, I traveled to beautiful Lake Geneva, Wis., to see the engineers at Medicoil, a division of R&L Spring Co., a supplier of precision springs and wire forms to a wide range of OEMs. Medicoil is a highly specialized manufacturer of microprecision coiled and formed wire products for the medical device industry.
On a typical day, Medicoil manufacturing engineer Ben Zimmerman ensures that production is running smoothly. He takes the lead on any new projects that come through the door, working with customers throughout a product’s life cycle, from R&D to production, to make sure it is manufactured correctly. Lead production technician Joel Bryant works on the floor with R&D and production laser operations, and with the maintenance of the lasers that they use.
Historically, Medicoil has been involved in manufacturing springs, coils and windings, primarily for the medical device community. As time has gone on, the company has gotten more involved with providing assembled medical components. Its early use of lasers included glove box spot-welding laser systems, which are single-pulse Nd:YAG lasers that use conventional optics and are housed in a small single-user workstation.

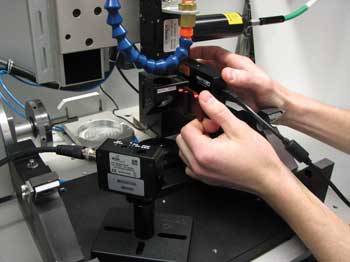
A camera-based beam-profiling system, a thermopile energy sensor and a photodiode sensor for capturing temporal pulse shapes. Images courtesy of The Ophir Photonics Group and Medicoil.
Today, Medicoil employs glove box and computer numerical control welding machines. Its laser processes include the use of pulsed Nd:YAG lasers for micro spot welding; however, cutting, drilling and other laser processes are in the near future. In addition, the company eventually will design and apply its own automated workstations for its laser processes. Depending on the process specification, each part will be run through a setup and validation procedure to ensure that all settings and ranges are documented and controlled.
Medicoil also is working toward International Organization for Standardization (ISO) and American Welding Society (AWS) standards compliance. These standards are not currently required, but Bryant and Zimmerman both realize that as laser processing grows as a niche, the medical community will be faced with additional compliance standards from the Food and Drug Administration and ISO. “We took the step forward [implementing a laser validation program] before the customers were requiring it, as we want to know where our processes are,” Zimmerman said.
Medicoil has been conducting laser power measurements for some time now – but Bryant said the company had not been using power meters to their full potential. “We did a check every morning, wrote down what the power was, and that was about it,” he said. “We didn’t really monitor that because we didn’t know what to do with it.”
Eventually realizing that these lasers had far greater potential than their current usage, they decided to educate themselves on other laser manufacturing applications and on how best to develop measurement practices and processes to help in meeting forthcoming industry standards.
Hands-on measurement
Representatives from Medicoil attended one of a series of laser beam processing courses conducted by Simon Engel, president of HDE Technologies Inc. Engel is an independent consultant who conducts courses on laser beam diagnostics as well as laser systems and process validation, among other topics.

A laser user adjusts the Z height of the laser to image the focused spot.
“That class was a huge eye-opener,” Bryant said. “Before, we just plinked along with our little welders and our power meters, and we thought everything was good. Then we went to Simon Engel’s class on beam diagnostics and beam profiling and realized that there is so much more out there, not only in terms of what lasers can do, but also what we should be checking on the lasers.
“A simple power check is a small fraction of what you need to be looking at with your laser beam to validate your process and your equipment. We came back from that class armed with a lot of knowledge but also afraid, thinking, ‘We don’t do any of that! We had better start!’ That’s what broke us into laser manufacturing on a larger scale.”
Working closely with production, Bryant was now armed with knowledge about how to set up the laser and monitor its current process and performance. Zimmerman took the knowledge and applied it as someone working more closely with customers, ensuring that the lasers would be doing exactly what the company said they would be doing – and providing proof.
Learning on the fly
Zimmerman and Bryant still needed to discuss which laser measurement products could best help them achieve these aggressive new goals. An on-site demonstration of different beam profiling systems helped them to determine the best solution for their laser processes and workstations. They then acquired a spatial beam profiler and a temporal pulse measurement system, which they use in conjunction with a laser power and energy measurement system.
It turns out that, as soon as they purchased the equipment, a door opened for them when a client asked for laser validation – what a happy coincidence that they had been working on their laser validation program; otherwise, they would have missed that opportunity.

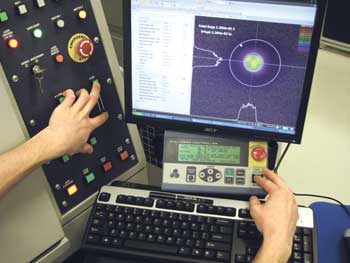
Beam profiling software shows a focused laser beam (left), an out-of-focus beam (center), and a focused beam, the energy in that pulse, and its temporal shape (right).
Laser end users must understand the importance of gathering, documenting and analyzing all obtainable information about their laser systems. During discussions and on-site demonstrations, it is sometimes difficult to help potential customers make the connection. Sometimes they say, “That sure is a pretty picture of my beam. Now what am I supposed to do with this?” or “That looks like it’s pretty difficult and cumbersome to use. I’m not sure I want to get into any science experiments,” or “Aren’t those beam profilers expensive?”
The laser jocks at Medicoil have made that connection. “You can take the information that you’re getting off these [laser measurement] products,” Zimmerman said, “and you can establish a validated process so that every time you’re going to run a certain part, or every time you need to do a new setup, or every time you get a new machine, you’ll be confident in knowing that the machine or process is running at the appropriate parameters. Every time you run or use the laser, you’re sure that it’s set up the exact same way.”
“Now some places it might not be as stringent as in the medical device field, but for us, it is definitely a huge priority. The more proactive you are, the better. Take this data, and set things up so that every time you can say that process is validated. That covers your company so your customers know, ‘We are here. We know that we are validated. We can prove that our process is the same every single time.’ ”
Ease of use
Zimmerman explained the ease of use of a beam profiling system: “At first it may seem big, a lot of things going on. It may seem out of this world to be measuring laser beams. But, really, when it comes down to it, once you take the steps, it’s actually pretty easy.”
They plan to apply their relatively new knowledge and laser measurement products to their laser validation program. “We’ve been very happy with it,” he said. “We just started doing our first process validation, and we’re excited to actually use it for its intended purpose. This will be a major stepping-stone for our company, and hopefully it really gets us out there, showing that we are compliant.”
It seems that beam profilers are still viewed by a lot of industrial laser users as high-level scientific equipment, more luxuries than necessities, difficult to set up and operate and – worse – expensive. These arguments may have been valid in the past, but today, because of advances in laser measurement technology and because of input from customers, providers of laser measurement solutions can confidently say that there are now products that are simple, easy to set up and use, and nowhere near as expensive as expected.
Anyone who works with lasers knows that no two lasers are created equal. Even with today’s high-quality industrial lasers, simply plugging in a duplicate set of process parameters – even into a duplicate laser system in a duplicate workstation from the same laser manufacturer or system integrator – does not mean that those two lasers are going to perform the exact same way every time. The only way to know for sure that your lasers are performing consistently from system to system and from day to day is through a comprehensive laser systems and process validation program using the latest laser beam measurement solutions.
Meet the author
John McCauley is Midwest regional sales manager at The Ophir Photonics Group in Indianapolis; email: [email protected]. For information about the laser system and process validation classes discussed in this article, contact Simon Engel of HDE Technologies Inc.; email: [email protected].