
Aspheres Deal with Bigger Deviations
New tools and the integration of measurement capabilities into design software are helping to solve problems – and scientists in academic and government laboratories are researching tomorrow’s solutions.
Aspheres are increasingly used for a variety of applications because they offer more performance than spherical lenses. Also, the asphere boom has been fueled by the availability of precision computer-controlled machining and surfacing tools.
“More and more vendors have the capability to manufacture aspheres than they had in the past,” said John F. Filhaber, director of special programs at the Middlefield, Conn.-based Zygo Corp. The company supplies optical metrology instruments, precision optics, and associated design and manufacturing services.
Once upon a time, surfaces rarely departed from the spherical, and if they did, it was by a few hundred microns at most. Today, 800-µm deviations are becoming common – and even larger numbers loom.
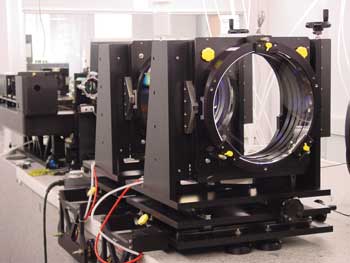
The XCaliber interferometer enables NIST researchers to do surface metrology of precision optics, including aspheres. Courtesy of NIST.
One measurement option is to use some version of a laser interferometer, with a wavefront from an asphere interfering with that of a reference. The resulting fringes illuminate how the actual surface differs from the reference. If the difference is large, the density of fringes will be high and the fringes perhaps unresolvable.
A Fizeau interferometer overcomes this by scanning the reference wavefront along the surface and collecting data only where the local fringe density is low. Consequently, such instruments are accurate and quick, and they can measure deviations >800 µm with a high data density. For instance, Zygo’s laser-based Verifire Asphere typically requires only minutes to capture and process the data from up to 700,000 points with a surface measurement repeatability of less than 10 nm, Filhaber said.
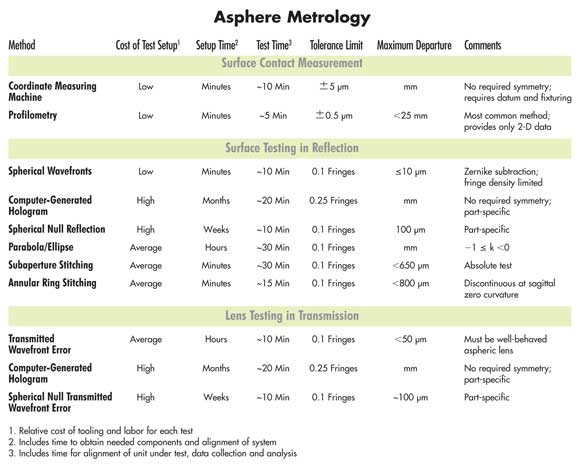
Another asphere metrology technique is profilometry, in which a probe traces out the surface profile. Advantages include the ability to handle a variety of slopes and shapes. Disadvantages involve speed and data density, which are related because more data can be extracted at the cost of a longer scan time. Another drawback is that the Z-resolution will not be as fine as it would be with an interferometer.
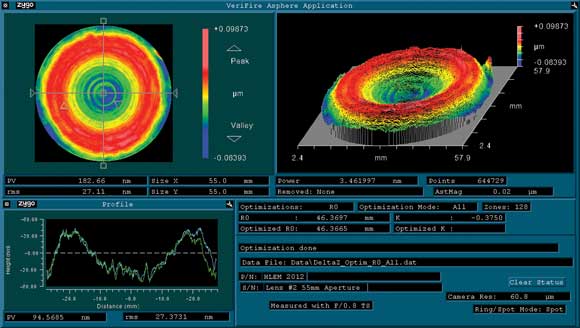
Data from asphere metrology systems show 3-D information (top) on form deviation from design parameters and a base radius. Below are 2-D slices, such as might be provided by a stylus moving across the surface. Courtesy of Zygo.
Shape and resolution
For its part, optics manufacturer Optimax Systems Inc. of Ontario, N.Y., uses both interferometry- and profilometry-based methods, said engineer Brandon Light. The choice between the two comes down to asphere shape and the required resolution, as well as to the cost and time needed to do the test.
The latter can involve much more than what the test itself requires. For instance, computer-generated holograms can enable interferometry of very complex aspheres, with deviations in the hundreds of microns. In this case, the reference wavefront is generated from a carefully constructed hologram. The technique is part-specific, and the hologram can take months to fabricate. It also can cost tens of thousands of dollars.
Interferometry in general has benefited from technological advances, Light said. “One of the big revolutions was the rise in a much more densely pitched focal plane array.”
For example, he noted that 640 x 480 arrays have been replaced by ones measuring 1000 pixels on a side, leading to a more than threefold pixel-count increase. This greater density enables finer fringes to be resolved, increasing the amount of deviation from the spherical that can be handled. Further advances in this area could provide still more improvement.
There are other innovations that could have a significant impact. In particular, design software is beginning to incorporate provisions for metrology capabilities. This will constrain what can be designed to what can be built and measured, Light said. QED Technologies International Inc. of Rochester, N.Y., extends the capabilities of interferometers through a divide-and-conquer approach. Its instruments segment an asphere into subapertures. These cover the entire surface, with enough overlap so that errors resulting from the interferometer, alignment or other sources can be corrected out or, at least, quantified.
In theory, any shape can be measured by dividing the surface into small enough subapertures. Measurement time considerations limit what can be done in practical terms, as does the computing power required to align the various subapertures together.
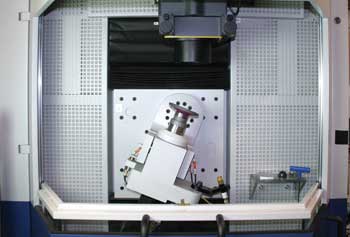
A stitching interferometer can measure a steeply curved asphere surface precisely by segmenting it into subapertures. Courtesy of Optimax Systems.
In its original stitching interferometer, QED Technologies used a spherical wavefront for its source, which has implications for the size of subapertures. They must be small enough to keep the fringe density manageable. However, the latest iteration of the technology changed that and thereby increased the instrument’s asphere measurement capability, said Andrew Kulawiec, company president.
“We introduced what we called the Variable Optical Null device, or VON, which is basically an optical null lens that is configurable to nearly match the shape of each subaperture in the asphere,” he said.
The company recently announced its own interferometer, which is optimized for stitching. This enables measurements with higher fringe densities and greater contrast.
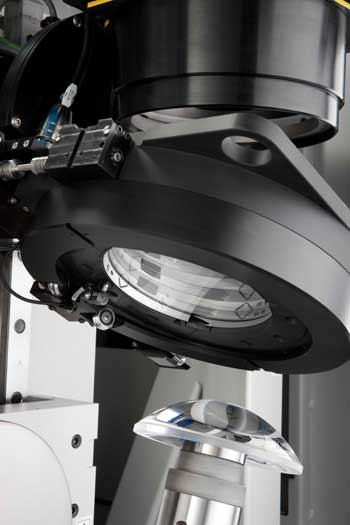
Using a variable optical null enhances interferometric metrology by allowing a reference wavefront to more closely match a surface. Courtesy of QED Technologies.
QED Technologies also is working to get metrology and other constraints into design software. This is being done through the use of polynomials that better describe an asphere’s shape. Investigations have shown that this approach can lead to better overall system performance and looser assembly tolerances, Kulawiec said.
An example of an advance in profilometry comes courtesy of OptiPro Systems LLC of Ontario, N.Y. Originally developed to meet a US Navy requirement to measure very steep surfaces, the company’s UltraSurf is a noncontact profilometer with five axes of motion, which allow it to make 3-D measurements by tracing over an asphere. This is done while maintaining the probe perpendicular to the surface.
That last item is important because it enables an optical probe using low-coherence interferometry to measure near and far sides as well as thickness of a component simultaneously. The material must be transparent to the wavelength used and of uniform thickness. Also, keeping the probe at right angles to the surface means that almost any shape can be measured.
This optically based profilometer has an advantage over interferometers. It works with a bright probe that sits near the asphere and doesn’t illuminate the entire surface at once.
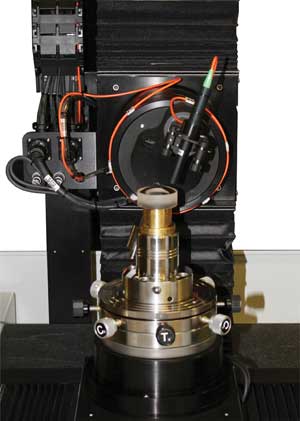
Five axes of motion allow this profilometer to measure almost any asphere shape. Courtesy of OptiPro.
“You can measure parts in a ground state or a polished state,” said Edward Fess, an OptiPro senior research engineer. “It’s a focused spot, so there’s enough light intensity so that it can get reflections back even from a ground surface.”
The scan of a surface is done at 100-nm accuracy, which is close to that from an interferometer. Scans take from 30 s to 30 min, depending upon the density of collected data points. Measurements must be spaced closely enough to capture periodic surface fluctuations that arise from grinding and polishing, which generally means points spaced from 100 µm to as much as 5 mm apart, Fess said.
Looking ahead
As for the future of asphere metrology, one place to keep an eye on is the University of Arizona in Tucson. There, a group led by James H. Burge, a professor of optical sciences and astronomy, pushes measurement technology to the limit. It has to so as to build the big mirrors and other optics that power advanced telescopes.
Burge has worked with interferometers and profilometers, often pioneering techniques. One example is the swing arm optical coordinate measuring machine, a profilometer with a distance-measuring interferometric probe.
The group’s latest method involves screens, such as those found in large monitors or televisions. These form what Burge calls a software configurable optical test system, or SCOTS, which can be used for metrology of various surfaces.
“To measure a mirror, all you do is take a computer screen and put images on that screen. You look at that screen in reflection off the mirror. Basically, the distortions that you see have the information on the mirror surface irregularity,” Burge said.
The method works by modulating what is on the screen, such as by shifting shapes around or altering their color. The test must be carefully designed and the detector properly calibrated. The payoff is a flexible approach that can be used to test an optical component, achieving the same accuracy as computer-generated hologram interferometry at a cost of a few thousand dollars. The technique can even measure the performance of an entire optical system by placing the screen at one end and the detector at the other.
Finally, at the National Institute for Standards and Technology in Gaithersburg, Md., physicist Ulf Griesmann and others are working on the metrology of precision surfaces, such as those found in high-performance optics, disk drives and artificial joints. Recently, they have been delving into holograms for interferometric asphere metrology to understand what the limitations are. They also want to develop methods that will improve hologram manufacturing and complex surface metrology. One challenge is micron or smaller placement errors across distances of tens of millimeters.
Successful technology development will be transferred to industry, and asphere metrology will benefit. But Griesmann doubts that whatever is devised will lead to a single measurement technique.
“In metrology,” he said, “there’s never a one-size-fits-all solution.”
(Asphere metrology chart provided courtesy of Optimax.)
/Buyers_Guide/Optimax_Systems_Inc/c11021