The promise of machine vision — greater efficiency through automation — can be best realized with systems designed for ease of use, responsiveness, repeatability, and user control.
HOWARD CHUNG, PIA BÖTTCHER, AND ERIK KLAAS, 8TREE
Machine vision systems, however automated, do not exist in isolation. They must augment and intelligently interact with human operators. Workflows can benefit from 3D optical vision systems. In particular, vision systems technology shows significant promise to improve aircraft inspection efficiency while providing operators with a better understanding of airframe integrity and safety. However, to deliver these gains to an airline’s bottom line, the vision system must coexist with and empower the technician/engineer.

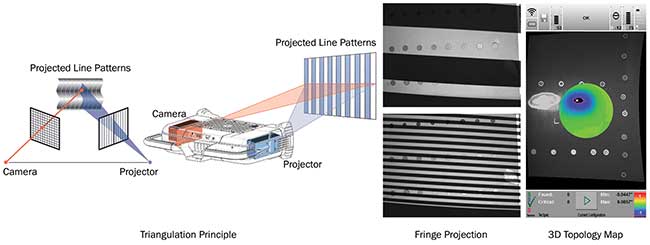
Triangulation principle of operation: A series of typical 12-line patterns is projected on the surface and recorded under a triangulation angle. For each point, a 3D coordinate is calculated. Courtesy of 8tree.
The aviation maintenance industry has a singular focus: to return aircraft to service as efficiently as possible while ensuring unrelenting standards of safety. One of the most common maintenance tasks is to inspect an aircraft for dent damage resulting from events such as hailstorms, bird strikes, and ground-support equipment collisions. A dent must be within allowable tolerance limits for the aircraft to continue flying until the next scheduled major maintenance cycle.
Dent damage typically is inspected using manual tools or 3D optical metrology equipment.
Manual tools, such as dial gauges or dial-test indicators, are low-cost and simple to use. But measurement with them can be highly subjective and yield inconsistent and even dubious results.
In contrast, 3D optical metrology equipment is accurate. Typically used in the form of a general-purpose 3D scanner, it is also extremely complex and time-consuming to learn, use, and maintain. In addition, the equipment is prohibitively expensive.
As a class of machine vision systems, 3D optical metrology equipment can deliver valuable dimensional information about a surface under inspection. Traditional 3D optical metrology equipment is valuable for assessing manufactur
ing tolerances, nondestructive testing, and structural health monitoring because it allows noncontact and precise inspection of a surface.
Although reprogrammable, traditional metrology equipment has several challenges. First, it requires a long learning curve for an operator, most often a seasoned engineer, to effectively program and operate.
Second, it requires a significant amount of time for the experienced operator to interpret measurement data, which typically is made up of millions of points of 3D point cloud data per scan.
Finally, there are significant limits to the accessibility of the object of interest.
The alternative is to design equipment to solve for only one clearly defined problem, instead of attempting to solve for a vast array of surface measurement problems. Such an application-specific approach allows complex metrology theory to remain hidden from the operator since no user-programming or postprocessing (data interpretation) is needed. As a result, the user interface is significantly simplified and operates with just one button.
Real-time analysis
Ease of use is further enhanced by designing a fully self-enclosed system that includes an integrated power source and CPU. This enables real-time analysis in a completely hand-held portable form factor that can transfer seamlessly from the workshop to the hangar and onward into the field. Coupled with augmented reality (AR), such real-time analysis can drive efficiency gains as well as a more productive and enjoyable operator experience.
Ease-of-use also extends to the operator’s ability to handle and maneuver the system in a manner that is comfortable, convenient, and safe. This becomes especially important when inspecting very large surfaces that cannot be transported to the measurement equipment.
Keeping in mind these considerations, the challenge is to create a portable form factor that doesn’t compromise accuracy and precision. The dentCHECK 3D surface inspection tool from 8tree is an application-specific system.
The tool uses the principle of triangulation, which is often called structured light scanning, white light scanning, or fringe projection. Triangulation has become well established for applications such as 3D inspection, 3D digitizing (turning real-world objects into 3D models), and 3D measuring (comparing scan data to CAD models). The technology is being applied in a variety of areas, including automotive, aerospace, archaeology, cultural heritage, life sciences, and medicine.

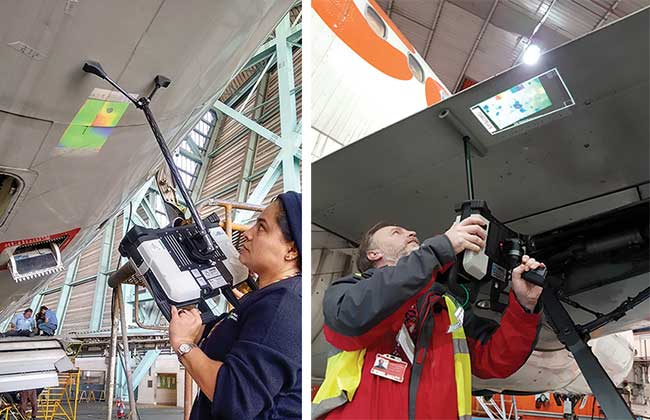
Point-and-click operation coupled with AR representation of results is now used at TAP M&E and easyJet. Courtesy of TAP M&E and easyJet.
With triangulation, a digital camera records a series of patterns that are projected from a pattern projector. Camera and projector are arranged to enclose a triangulation angle. The series of patterns consists of linear, parallel line patterns. Scanners from 8tree employ a combination of gray-code and phase-shift patterns. The recorded image sequence generates a 3D topology map of the surface. From this, a valid 3D point can be generated at each camera pixel location that receives light from the full sequence of the image. In aggregate, 2.3 million individual 3D coordinates are created per scan.
Points might be invalid because of underexposure, overexposure, or difficult surface properties, such as shiny or transparent surfaces. To improve the reflective properties of the surface, different color patterns can be used.
With the measurement of a dent on an aircraft wing skin, the topology information is visualized with a color scale — in this case ranging from purple (-1 mm) to red (+1 mm). Additional information can be calculated from the 3D map, including the deepest point of the detected dent. The system architecture follows a modular design so specific applications can be addressed.
Most commonly available scanning systems that use triangulation are designed according to the traditional approach of addressing a broad range of applications with a general-purpose system design. All such systems are operated through dedicated software that runs on extremely powerful standalone computers. The scanner itself is connected through a cable to that computer.
While connected to the external computer, general-purpose system setups cannot easily be moved on the shop floor or in difficult-to-access areas where measurement is required. Also, these systems often require additional software to interpret the generated 3D data and obtain actionable results. Results are delivered on a computer monitor that can be situated far from the place of measurement. Operators need to focus on their computer screens and align the results mentally to the actual surface that was measured elsewhere.
Because of the inherent drawbacks and challenges of traditional measurement systems, they are rarely used for the daily routine of maintenance and quality-control jobs in the hangar. Instead, these systems are relegated to use by engineering departments and highly trained operators.
Accuracy and speed
A great deal of attention is placed on the accuracy and repeatability of results delivered by a measurement system, and for good reason. But often this necessary accuracy comes at the expense of speed, simplicity, and meaningful feedback.
The 8tree system makes use of usability engineering principles to correct these drawbacks. Among other things, usability engineering states that there are three important limits to device response times:
The limit for immediate response is 0.1 s. If a response is faster than that, the user doesn’t perceive any delay and experiences immediate response.
The limit for uninterrupted user workflow is 1 s. For more involved operations, a user will typically allow up to 1 s before shifting the attention away from the task at hand.
The limit for keeping the user’s attention is 10 s. When response times approach that, it becomes important that the user receives feedback on the progress of the process. Displaying a progress bar can serve this purpose. Delays in response time greater than 10 s increase the risk that the user will be distracted, which can negatively affect continuous workflow and the quality of work.

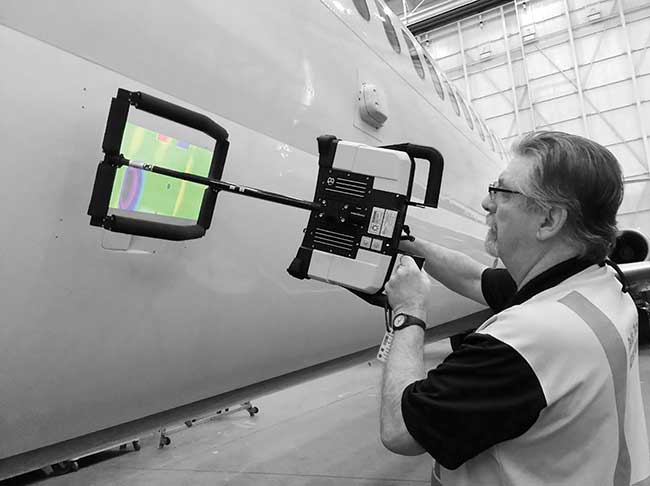
Real-time augmented reality (AR) overlay for aircraft dent damage measurement is in operation at Delta Airlines. Courtesy of Delta Airlines.
In the context of a measurement tool, speed relates to scanning time and the time taken to analyze and represent results. Because of the targeted nature of the problem being evaluated, an application-specific system can significantly shorten analysis time, while AR can project the results back on the surface that has been measured. Results can include numerical values as well as simple color codes that mark features relative to tolerance settings. Additionally, status information about the measurement tool, such as battery load level and Wi-Fi connectivity, can give operators real-time feedback.
The goal of design simplicity is to produce results that are meaningful, readily understood, and immediately actionable in the form of a pass/fail or go/no-go decision.
Reaching this goal means achieving the right balance between functionality and ease. The factors that can make a critical difference include fewer mouse clicks, no complex menus, immediate response, little latency, and hard-wired buttons instead of complex software configuration options.
For the optimal experience, it also is important that the user is in control. Besides making the process short, providing feedback, and keeping the user informed when progress is slow, user control means always allowing the user to interrupt the process.
Case studies from TAP Maintenance & Engineering (M&E) and easyJet illustrate the practical benefits to the aviation maintenance industry of application-specific tools that follow a user-centric design. The measurement tools these companies used were packaged in a self-contained design with a zero learning curve and one-button operation.
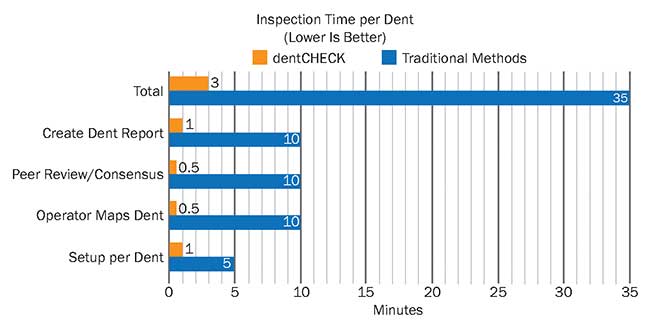
TAP M&E is a global provider of heavy-check maintenance, repair, and overhaul services. It is part of the TAP Group, which operates Portugal’s national carrier, TAP Airlines. After a year of using dentCHECK, an application-specific tool designed to empower operators in the hangar, TAP M&E witnessed a more than 90 percent improvement in time taken to map and report dent damage.

This graphical summary shows efficiency gains at TAP Maintenance & Engineering (M&E) when using dentCHECK. Courtesy of 8tree.
Meanwhile, in a separate study, easyJet, a pioneer of low-cost aviation in Europe, realized a more than 80 percent time savings to disposition dents with the aid of dentCHECK.
Applying lessons from usability engineering has a positive impact on quality and repeatability of results and efficiency. Gage R&R analysis of the measurement data from user- and workflow-centric design has demonstrated that the variability attributed to the operator is small even for a complex metrology instrument.
Meet the authors
Howard Chung is an applications engineer at 8tree in Germany. His research experience is in the development of smart materials, particularly in the applications of structural health monitoring and energy harvesting. He currently focuses on optimizing workflows for human operators of complex vision systems. He holds two aerospace engineering degrees from Virginia Polytechnic Institute and State University; email: [email protected].
Pia Böttcher is vice president of operations at 8tree. She has held a variety of project management, sales/marketing, and business management roles in the machine vision and life sciences sectors. Her current research involves the practical implementation of usability engineering theory in the design of application-specific 3D scanners. She is a graduate of the University of Applied Sciences Konstanz and Warwick Business School, with emphasis in computer science and business; email: [email protected].
Erik Klaas is CTO of 8tree. His two decades of work in 3D optical metrology include some of the earliest intellectual property development for structured light scanning. His current research focuses on the integration of gesture-based techniques and AR in application-specific 3D scanners. A senior member of SPIE, he is a graduate of the Cologne University of Applied Science, with an emphasis in optical 3D metrology and color topometry; email: [email protected].