Analyzing 3D Data for AI-Powered Robotic Automation When robotic 3D scanning systems start making autonomous decisions, their application will go beyond dimensional quality control.
Mingu Kang AND Hyejin Kim, ARIS TeCHNOLOGY
There’s increasing interest in deep learning for 2D images, from facial recognition to manufacturing, spurred by the promise of the IIoT. And today, a growing faction believes employing relatively inexpensive cameras to capture 2D images and then performing deep learning is the secret to a quality assurance.
While there’s some truth to that assumption, relying on data to make decisions is not so straightforward in real life. Applying analytics to large amounts of data, especially legacy data, may not be productive. Often, historical data has not been collected with the intent to analyze it — at least to the extent needed to meet today’s standards.
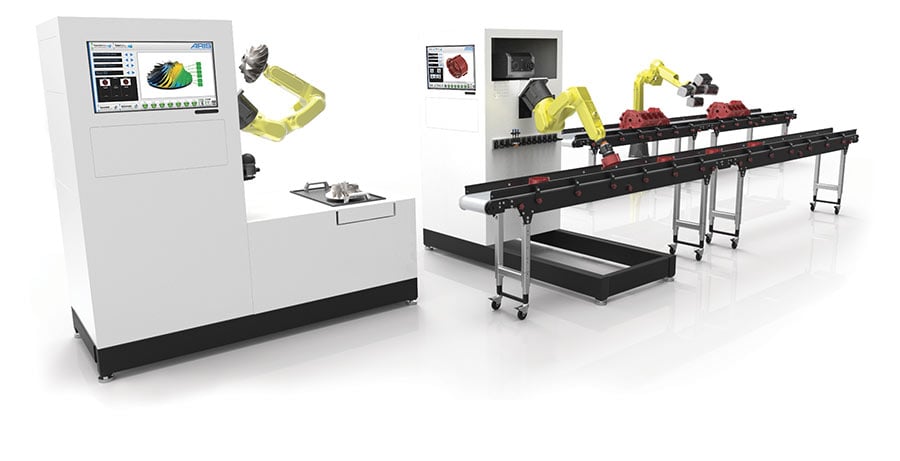
Robotic 3D scanning can be deployed in factories in-line or near-line to collect high-resolution 3D measurement data. Courtesy of ARIS Technology.
Consider 2D vision. When 2D images
are taken without knowledge of the location and the orientation of the camera and without controlling for the external variables — lighting, background objects, and colors — the quantity of data may not directly result in meaningful insights. Of course it’s true that a robust data model may be developed once all the external variables are labeled over time and cross section — for instance, a model predicting whether or not a scratch identified during a cosmetic inspection is acceptable. However, does every manufacturer or integrator really have the time, money, and resources to label large amounts of data — data that was not collected in a repeatable manner? What can be done to make vision-data-driven decisions accessible at a reasonable cost and timeline, while making sure the decisions are reliable?
The answer may lie in collecting higher-quality data to reduce the need for guessing. And one way to do this is by collecting high-accuracy 3D data using industrial 3D scanning devices. Broadly speaking, 3D data contains a depth of information beyond what 2D vision sensors capture. There are algorithms capable of reconstructing a 3D map from multiple 2D images, but the resulting 3D map tends to have lower accuracy. In consumer or retail settings, individuals cannot carry around a 3D scanner nor afford one. However, this is not true for industrial applications, particularly when automated 3D scanners are a superior option, factoring in a
lower cost of ownership and opportunity cost. But there’s a reason 3D scanning has not been adopted more widely and rapidly: Many facilities have purchased a 3D scanner or two, but they are often sitting on a shelf because of how onerous and expensive they are to operate.
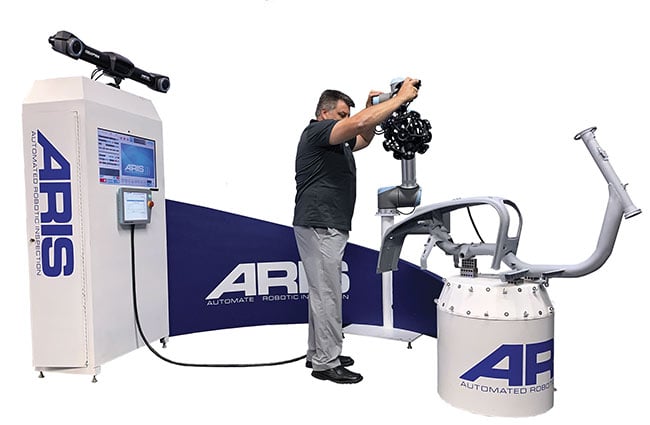
Using a collaborative robot, an operator can more intuitively program automated 3D scanning. Courtesy of ARIS Technology.
For easier use, some have mounted them on robotic arms. Bear in mind that robotic arms were invented to repeat motions based on programming, not to make decisions on behalf of humans. Once you deploy robotic automation, an operator has to learn not only how to use 3D scanning but also robotic arms. Here is the good news: With advancements in software and hardware, robotic 3D scanning is becoming more accessible and affordable.
Robotic 3D scanning
Even without new software and hardware tools, robotic 3D scanning can be effectively applied to quality inspection of mass-produced parts. High-volume inspection can occur in-line or near-line, and before the parts are sampled and sent to a quality lab for metrology. For this application, cycle time has to be short; therefore, the barrier in deploying 3D scanning instead of 2D is speed.
A conflict of interest between the manufacturing team and the rest of the
company may play a role here as well. The manufacturing team’s primary interest is making higher-price parts at a lower cost. For this reason, as long as certain key performance indicators are met once (process capability index, for example), until there is a failure that may influence the per-part pricing, the manufacturing team would hand off quality problems to the metrology team.
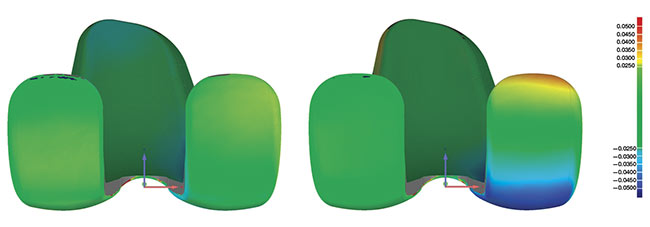
Millions of 3D data points are collected for each object measured by a 3D scanner, and the deviation between different scans can be calculated to analyze the trend in production and prevent unpredicted error. Courtesy of ARIS Technology.
As a result, when the metrology team samples parts for final qualification, risk aversion has to take priority — not productivity or innovation. Therefore, even though new technologies such as high-resolution 3D scanning become available to the market, the metrology team may shy away from adopting this faster, more robotically automatable, higher-resolution measurement approach, despite the fact it helps resolve the metrology bottleneck. When the metrology team has an opportunity to evaluate the benefits and costs of using robotic 3D scanning as opposed to traditional contact-based coordinate
measuring machines (CMMs), the quality mindset is still needed for the risk aversion. Moreover, it is true that touch probes on CMMs can be more accurate when measuring certain features, whereas 3D scanning brings other complementary values by collecting higher-resolution data in a shorter period of time. This results in more insights in qualification, such as being able to detect warping or datum shift, and furthermore, training data collection for analytics. As it may not be very intuitive for traditional quality control operators to perform 3D scanning and high-resolution 3D image processing, a simple user experience empowered by human-robot collaboration could reduce the burden.
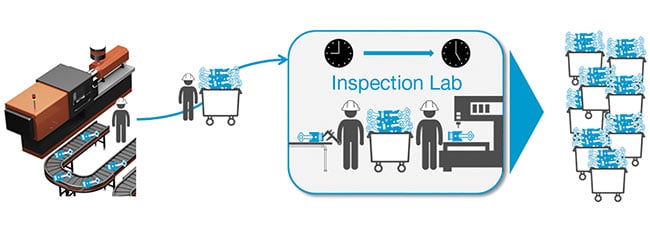
When parts are produced, an operator takes them to a lab and inspection is performed using slow contact-based devices, leading to a quality backlog. Courtesy of ARIS Technology.
Preventing robot collisions
Traditionally, industrial robots were designed to repeat preprogrammed motions. The rise of collaborative robots (cobots) is now enabling workers to safely interact with robots in a shared workspace. Cobots enhance the human operator’s user experience by offering flexible and intuitive robot manipulation away from having to operate a teach pendant. However, there is a trade-off between the convenience of collaborative robots and motion planning. Collaborative manipulation of vision applications seems very intuitive,
as an operator only has to hold the robotic arm with two hands and move it to a desired location. Traditionally, trained robotic experts would move each joint to go from one position to the other, naturally making the human think about collision-free motion planning. So in this case, the intuitive and simpler user experience in operating a cobot may make the programming more risky.
The immediate response to this problem would involve integrating real-time sensors (e.g., 2D or lidar) on the robot to prevent the robot from collisions. Collision control using IR sensors is common in various fields. For example, self-driving cars use them to sense pedestrians and oncoming vehicles. This is a suitable solution because there generally is a fixed angle of navigation within which the car should sense the obstacles, and the car moves only horizontally on the ground. Risk aversion in this case is more about how responsive the detection is, not necessarily how accurate and precise the 3D mapping of the space is. Such real-time sensing-based collision control is trickier to implement for factory robotic automation, particularly because of increasing demand for high-mix low-volume production. There are more new designs, design changes, and a larger inventory of parts that must be maintained, repaired, and overhauled. It’s difficult to determine where the IR sensors should be deployed and how often parts must be changed. As an example, what if a manufacturer is 3D-printing a new design every couple hours and uses the 3D scanner mounted on a robotic arm to measure them?
If a digital twin of the robotic cell is created in a simulated Cartesian coordinate system, simulated robot motion planning is possible to avoid collision. Undesirable spatial coordinates and joint motions can be defined through multibody dynamics, and by simulating the feasible workspace of tool center point (TCP), a more optimal motion path can be generated. Here the TCP is the origin in the coordinate system of the end effector. For this approach to work, though, a somewhat accurate 3D representation of the part must be located and oriented in the Cartesian coordinate. High-resolution 3D scanning can make this accessible. When point cloud or mesh data of a part is measured using a 3D scanner, this data can be compared to a CAD model to precisely locate and orient the part in the simulated Cartesian coordinate system.


Segmentation of laparoscopic surgery image using a deep CNN. Courtesy of M.H. Kim et al./DGIST robotics signal processing lab.
For a robotic 3D scanning system to run autonomously, the identity of the part being measured has to be known. This could be accomplished by automating the barcoding or connecting the system to the manufacturing execution systems (MESs). However, what if an entirely new part has to be programmed? Machine intelligence using 2D and/or 3D vision can potentially be a good solution.
The limits of 2D image analytics
2D image analytics is already used in many applications, from recognizing a 3D part to identifying the location and orientation of the part.
Identifying a part and finding its rough location and orientation is possible with object detection techniques applying a convolutional neural network (CNN). Object detection is a widely used deep learning technique that classifies an object and, at the same time, defines the location with a bounding box.
Another 2D analytics technique — segmentation — can be used to analyze specific features of the part. Segmentation classifies each pixel of 2D images and is used for tasks that require high-fidelity features. For example, segmenting surgical instruments and diseased areas in 2D anatomical data using CNN is an actively researched topic for computer or robotics-assisted surgery.
However, both object detection and segmentation require supervised learning for each set of training data. To achieve superior results in identifying the unknown part and its location, a large number of images of the part taken from multiple angles and distances is necessary. Furthermore, labeling of each image is necessary
for training. This process is very time-consuming, which limits the practicality
of 2D vision.
The benefits of 3D image analytics
As opposed to supervised learning, unsupervised learning doesn’t require labeling. It finds unknown patterns from data without preexisting labels. Using 3D scan data, one can classify features of an unknown part with clustering. Clustering is a task that identifies data points with similar features into the same group. It is used in various applications such as market segmentation, text mining, and pattern recognition.
2D image analytics techniques can be applied to locate or identify unknown parts, but there are some challenges in applying 2D image analytics in automating 3D vision as opposed to collecting and analyzing high-resolution 3D scan data. First, we need to define orientation of an unknown part to measure it. The shape and features of the same manufactured part vary in 2D images according to the angle and distance from which each image is taken. With a reasonable amount of data, it can be difficult to train the correlation between the data taken from the same part oriented differently. Moreover, a machine cannot understand which object is closer or farther away based purely on a 2D image. This adds more complexity in identifying features of the part.
With advancements in software and hardware, robotic 3D scanning is becoming more accessible and affordable.
Researchers are working to overcome the limitations of 2D image analytics. Several 3D reconstruction methods produce 3D models from 2D images. This can be done in two different ways: A mathematical approach can be applied for 2D registration between two images using a linear-algebraic process. Alternatively, a deep learning-based approach can be applied using CNN. Moreover, leveraging the depth map of the images or bilateral symmetry information may improve the quality of reconstructed 3D data.
However, deriving 3D data from 2D images has multiple limitations. First, it is hard to extract feature points from 2D images alone, and there is a heavy reliance on the data analytics. Second, 3D reconstruction is very sensitive to the noise from the data acquisition and so extra image processing, such as edge smoothing, is required.
Lastly, this method requires high computation power. Performing 3D scanning and acquiring accurate and precise high-resolution 3D image data from the beginning can overcome these limitations.
Eyes for the brains
Human-robot collaboration enables a manufacturer to collect training data to perform machine learning to make the measurement and qualification more “autonomous” while an operator is simultaneously performing actual inspection. Advancements in machine learning in both 2D and 3D data are making robotic 3D scanning extremely powerful. Ultimately, when robotic 3D scanning systems can start making autonomous decisions, their application may not be limited to dimensional quality control. Basically, 3D scanning becomes the “eyes” for the “brains.”
Meet the authors
Mingu Kang is CEO of ARIS Technology, a developer of robotic 3D scanning
solutions.
Hyejin Kim is a student researcher in the Information and Communication
Engineering Department (ICEI) at Daegu Gyeongbuk Institute of Science
and Technology (DGIST) in South Korea. Her primary research area has been deep learning and machine vision based on 2D image data, while she also participated in ARIS Technology’s 3D scan data-based AI research.