An optical solution manages machine tool wear.
Brent Bartlett, Confero Solutions Inc.
For years now, computer numerical control (CNC) machines have been producing parts for a variety of industries. An important element in the process is an experienced machinist who knows that, to meet stringent tolerances, machine tool wear must be monitored.
Traditionally, an operator could rely on his own senses to deduce tool wear. As the tool becomes worn, the metal removed from the part changes shape and color. Even the noise made by the machine changes; this indicates that a tool change is needed. Unfortunately, different operators interpret these signs in various ways and may not choose the same time to change tools.
In a search for consistency, a variety of methods have been tried for assessing wear in situ to the machine tool – including monitoring cutting forces or motor current, utilizing touch probes or even analyzing the sound produced during the milling process. Although each approach has its pros and cons, optical systems hold the most promise because they potentially offer consistent wear discrimination without physically interacting with the part. As the cost of digital machine vision systems has decreased, the push has increased to create robust algorithms to utilize digital imagery (see sidebar: How it Works).
Parts inspection
When a part is made from a piece of steel, the tool on the CNC machine – in this case an end mill – leaves behind telltale signs of the part’s condition. When an end mill is sharp, the grooves formed on the part’s surface are strikingly dissimilar from those generated by a dull tool. At the start of a milling process, the edges produced will have a well-defined structure. As milling progresses and the end mill becomes worn, the edges on the part’s surface begin to lose their definition, as shown in Figure 1. This lack of sharpness can be seen quite well when viewed with the right vision system.
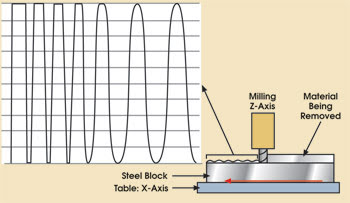
Figure 1. The surface finish present after a milling operation tells the story of the tool’s condition. The conceptual side profile of the part’s surface as demonstrated by the graph indicates that, as the tool wears, grooves begin to take on a more sinusoidal shape.
The system we devised was tested using a 3/4-in. hardened end mill performing a face mill on a rectangular cold-rolled piece of steel: (ASTM) 1018. Using several passes, this operation removed 1/4-in. of material from the steel surface. An image was captured of a portion of the end of the first path and of the beginning of the second pass. Figure 2 shows the path followed by the end mill, seen in Figure 1, as well as the regions of interest used in the analysis.
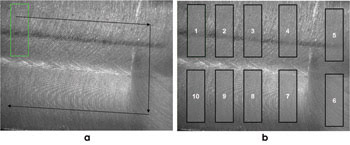
Figure 2. This image of the part’s surface was acquired after the milling operation. Arrows indicate the tool’s path during operation (a). Regions used to generate tool wear metrics are shown in (b).
The wear metric was calculated for each region; a lower number indicates a decrease in edge quality. A plot of the tool metric vs. region number is shown in Figure 3. Although the region-to-region comparison of the wear metric shows significant variation, the overall trend along the path of travel of the end mill shows that the data is indeed indicating tool wear. A linear fit showing that a large change in magnitude of the tool wear metric for this relatively short path can be performed on the data.
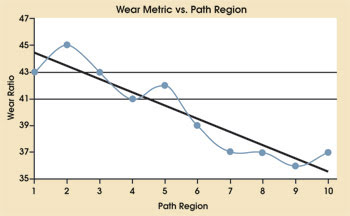
Figure 3. As the tool travels through the material, the surface texture changes, producing a lower wear ratio along the tool path.
This technique, based on the part’s surface texture produced during milling operations, shows promise for assessing tool wear. Most milling machine tools last for many hours of operation, and because this method produced a large change in the wear metric over a short region, it shows promise for providing many levels of wear analysis over the lifetime of a tool.
It is important to account for the fact that this approach depends on the type of material used, because different materials that are milled with the same tool will exhibit varying surface textures. Even so, this technique should yield good results in an operational environment because its processing speed is relatively fast compared with other methods.
To successfully implement this vision-based wear-determination system, further work will be needed to investigate the impact of environmental factors such as coolant contamination, illumination changes and chip obscuration.
Meet the author
Brent Bartlett is an image processing engineer for Confero Solutions in King of Prussia, Pa.; e-mail: [email protected]
How it Works
The vision system we used consists of a camera, a lens and a dark-field illumination ring. The camera is a Prosilica GE1380 CCD Gigabit Ethernet paired with a 0.3× Melles Griot telecentric lens, resulting in a pixel resolution of 21.5 μm. The lighting is generated using an RL1660 dark-field illumination ring from Advanced Illumination Inc. of Rochester, Vt. While allowing for a 29 × 22-mm field of view, which is reasonably large, this system provides sufficient resolution for observing changes in the part’s surface. Because the camera system is mounted within a Feeler FV-600 milling machine (a conventional three-axis vertical mill), positioning and focusing can be accomplished using the three axes of motion available in the device, as seen in Figure S1.
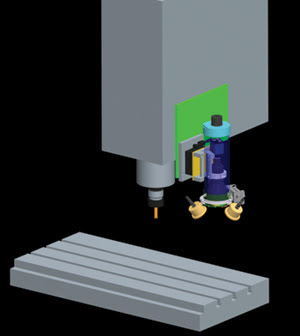
Figure S1. The camera is housed inside a custom fixture that is mounted directly to the side of the milling machine’s Z-axis. The table motion generates the other two axes of movement.
Several approaches, such as column projections and Hough transforms, have been developed to make use of the changing edge profile or surface texture. Our method transforms the data from the spatial to the frequency domain using the image’s fast Fourier transform. Because the grooves on the surface of the part become less well-defined as the tool wears, the energy in the frequency-domain image of the part surface shifts toward the DC component (increase in low-frequency content). Although the dark-field illumination helps to highlight the edge content present in the image of the part, the analysis yields the best results when the transform is performed on the output of an edge-detection algorithm of the image. In this case, a Laplacian detection algorithm is used to generate the edge image.
The fast Fourier transform of this image is used to determine a wear metric for the tool. This is accomplished by dividing the image into two parts. The first contains all low frequencies below a predefined threshold, while the second contains the high frequencies. Each part is integrated separately to produce the total energy in each. The wear metric (W) is then defined as a ratio of the high-frequency energy vs. low-frequency energy as seen in the equation below, where M and N are the image dimensions, T is the chosen threshold and x is pixel intensity.
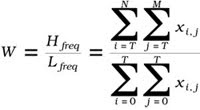
In experimental tests, this process has provided good discrimination between wear levels. Because the energy in the lower frequencies will increase as the tool wears, the metric will decrease in magnitude during a milling operation. Figure S2 shows a flowchart outlining the algorithm.
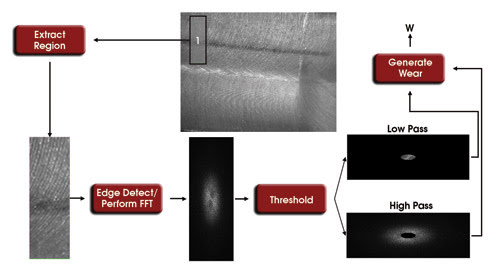
Figure S2. After the region of interest is extracted from the image of the part’s surface, a Laplacian edge detection kernel is applied to the region. The fast Fourier transform reveals the frequency content, which is filtered into two portions. Each portion is integrated to generate the final wear metric.