The light scattering of translucent materials means that two sources are needed for the best transmission measurements.
Alan Tirpak and Dr. Richard Young, Optronic Laboratories Inc.
Unlike transparent materials that transmit light with no appreciable attenuation or absorption, translucent materials often possess certain properties and physical structures that cause incident light to become scattered as it passes through, which poses some interesting challenges when attempting to measure the transmission of translucent materials.
Depending on the application, scattering may be an essential property of the samples being tested for transmission. This is especially important for optical diffuser manufacturers, who require highly uniform diffusing samples. Such uniformity is important in radiology or photography applications, for example, where colloidal silver particles cause scattering within the sample, and where regular transmission measurement setups are not applicable.

Figure 1. A regular transmission measurement setup is simple and straightforward.
When light strikes an object, it can be either reflected, transmitted or absorbed. Other processes that can occur (such as fluorescence) will not be discussed in this article. The measurement setup is fairly straightforward in normal or regular transmission measurements where the angle of the transmitted beam can be calculated, if the incident angle is known, using Snell’s law:

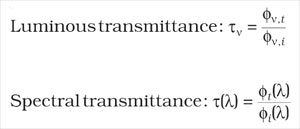
A stable source provides illumination; depending on the information required, a radiometer, photometer or spectroradiometer detects and processes the signals (Figure 1). To calculate transmittance, a measurement of the source (incident flux, fi) is acquired by placing it in line with the detector without the sample in place. The sample then is placed between the source and detector, and the transmitted light, ft, is measured. The ratio of these two measurements is the transmission of the sample and can be reported as either radiant, luminous (photometric) or spectral transmittance.

No special considerations are needed because the incident beam diameter is roughly the same as the transmitted beam diameter; therefore, all of the transmitted light is received by the detector.
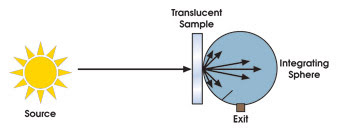
This is not so with translucent materials. Incident light impinging on a translucent material tends to scatter and diffuse; therefore, the angle of the transmitted light no longer obeys Snell’s law (Figure 2). This results in much of the transmitted light’s missing the detector, which requires special attention and proper selection of detection optics to ensure that all transmitted light is collected and processed.

Figure 2. For a translucent material, much of the transmitted light would miss the detector if the setup from Figure 1 were used.
To effectively collect all diffusely and nondiffusely transmitted light, it becomes necessary to select a large-angle collection optic. By virtue of their design, integrating spheres are perfect for this type of measurement (Figure 3). Placing the sample up to the input port allows the collection of even the highest-angle rays. It is not, however, a straightforward measurement, as it is with transparent samples.

Figure 3. Integrating spheres are an important part of the setup for measuring diffuse transmission.
Integrating sphere response
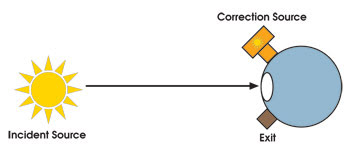
At first glance, it may seem as though the spectral transmittance could be gauged simply by taking a measurement of the light incident on the input port (fi) and by taking another measurement of the transmitted light, ft, by placing the sample up to the sphere port. Although this sounds logical, it does not take into account the fact that placing the sample up to the sphere port effectively changes the response of the sphere. Without a sample in place, it is clear that some of the incident light can escape back through the input port. Placing a sample against the port also allows some of the transmitted light to escape through the input port, however in a proportion different from that when no sample is in place. In addition, light also is re-reflected into the sphere from the sphere side of the sample and is spectrally dependent on the composition of the sample (Figure 4).

Figure 4. The light path is shown with and without a sample. When a sample is placed against the port, some transmitted light can escape through the input port and be re-reflected into the sphere from the sphere side of the sample.
To account for the changes in integrating sphere response as a result of sample placement, it becomes necessary to use two sources, one for irradiating the sample and the other for determining the spectral response changes. This is referred to as the “double beam” method and is absolutely necessary for obtaining accurate results. It is important to note that, when one uses a photometer as opposed to a spectroradiometer, both sources must have the same spectral distribution when the double-beam method is used for transmission measurements. This will help to avoid any gross errors in transmission measurements from spectral mismatch of the sources. A representative setup for measuring total transmission, τT, is shown (Figure 5). The regular transmission is τR, and τD is the diffuse transmission.

Figure 5. The two sources used in the double-beam method help take into account changes in integrating sphere response as a result of sample placement.

The double-beam method for measuring diffuse transmission of translucent materials consists of four steps:
1. Taking the measurement of the incident source without the sample in place and with the correction source off.
2. Taking the measurement of the correction source without the sample in place and with the incident source off.
3. Keeping the incident source off, installing the sample against the port and again taking the measurement with correction source.
4. Taking the measurement with the incident source on, with the correction source off and with the sample in place.
Steps 1 and 2 provide a general calibration for the system, which is calculated by dividing the flux obtained from the correction source (fCS) by the flux of the incident source (fi). Step 3 is essential for the spectral and intensity correction of the system because of the presence of the transmitting samples at the integrating sphere port. This generally is referred to as the sample calibration (fcal) and is specific to the individual sample under test. The measurement is recorded as 1/fcal. If the spectral characteristics, inherent diffusivity or transmission of the sample changes, a new sample calibration must be performed. A final measurement of the sample is obtained with the incident source (fS). The total spectral transmission (τT) of the sample can then be calculated.

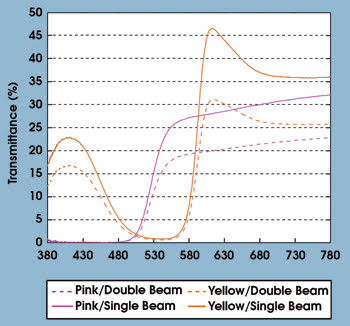
When this approach was used, test results showed a marked difference between measurements made using the single- and double-beam methods. As seen in Figure 6, it is clear that the differences obtained using a spectroradiometer (single-beam method) and the double-beam method are not simply a constant shift but rather are spectrally dependent on the color and composition of the samples being tested.

Figure 6. Two diffusely transmitting colored samples (pink and yellow) were selected for comparison of single- and double-beam analysis.
Meet the authors
Alan Tirpak is an applications engineer, and Richard Young is vice president of science and technology, both at Optronic Laboratories Inc. in Orlando, Fla.