Walter Pastorius, LMI Technologies
For quality control, measurements must be absolutely precise: Many systems, processes and parts affect the quality of the final product. In assembly operations, many inspection points must be monitored to ensure that components fit properly and that connecting features are aligned correctly during installation. In final assembly, the product must be inspected for proper geometry. An inspection solution that provides accurate data offers assurance that consistent product quality levels are met while in process and at final product assembly.
Inspection for automotive assembly applications has its own set of challenges. An automotive assembly line typically has hundreds of inspection points, including in-process monitoring, individual subassembly monitoring and critical inspection of many points on the assembled bodies in white (the assembled body prior to painting).
A typical body in white may have 80 to 120 measurement points of a variety of complex features, including surfaces, holes, slots, nuts and studs.
The first implementations of in-line inspection for automotive bodies were large frame structures with an individual laser sensor for each measurement point, requiring a complex setup of parameters for its specific measurement. Such large systems not only were costly, but they also required physically moving sensor locations and reconfiguration for a model change, and were completely impractical as assembly lines became flexible, gathering a mix of different models.
The next generation of inspection systems introduced flexibility, with laser sensors mounted on industrial robots that sequentially moved the sensors to each measurement point. A body-in-white measurement system typically used four robots, one on each corner of the body, while subassembly inspection stations required one or two robots, depending on component size. With robotic inspection, flexibility for mixed models was provided, and model change only required reprogramming the robots’ paths.
The standard sensors used for both the fixed and robot inspection stations typically have a hybrid design that uses a projected laser line to measure surface profiles and an area illuminator with 2-D image analysis to measure locations and sizes of holes, slots and nuts. Surface profiles from the laser line essentially are limited to single profiles along the laser line because automotive assembly inspection positions have components located in a stationary fixture. The 2-D analysis of hole, slot and threaded components is challenging because of the complexity of issues, such as extracting features in multiple layers of material and measuring locations of threaded components. A further issue with hybrid sensors was their ability to measure only a single feature per frame. Often, several features appear within a sensor’s field of view, with standard industry solutions typically requiring multiple images to be taken for different features, extending overall measurement cycle time. Inspection solutions that require complex setup for each type of measurement feature can make installation a time-consuming and expensive operation.
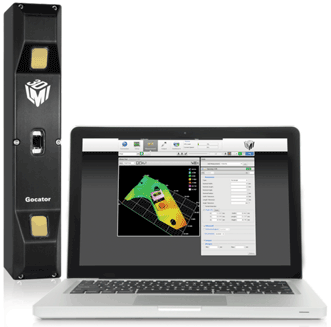
To address the issues with standard sensors for assembly monitoring, a new, all-in-one “smart snapshot” sensor quickly acquires high-resolution, full-field scans for inspection of multiple part features with full 3-D visualization. What makes the sensor “smart” is its ability to make 3-D measurement and control decisions (sorting, pass/fail, alerts) all within a single precalibrated device. This “intelligence” enables easier, more economical and more successful deployment of inspection solutions in the automotive and other assembly processes. It makes 3-D measurements of multiple features in just one scan, at a higher level of simplicity than with standard industry solutions (Figure 1).

Figure 1. All-in-one 3-D ‘smart snapshot’ sensor.
The sensor simplifies automated noncontact inspection using blue LED projection and stereo scanning technology to produce accurate 3-D point-cloud data from stationary components using structured light patterns. Ambient lighting can vary significantly in an open factory environment. LED illumination provides excellent ambient light immunity and flexible exposure modes to accommodate variable surface conditions. In contrast to laser-illumination-based sensors, LED lighting eliminates concerns often expressed regarding laser safety issues. Stereo-based sensors with stable thermal design are insensitive to errors induced by ambient temperature changes. As a result, reliable and repeatable measurements are provided, even in an uncontrolled plant environment.
An additional challenge is the need to accurately measure features of different materials, from stamped steel and aluminum to plastic and composites. This makes the setting of proper exposures critical for capturing accurate data for inspection. The snapshot sensor provides both single- and multiple-exposure modes. The multiple-exposure mode provides accurate 3-D images when the target surface has a varying reflectance within a single profile (e.g., white and black).
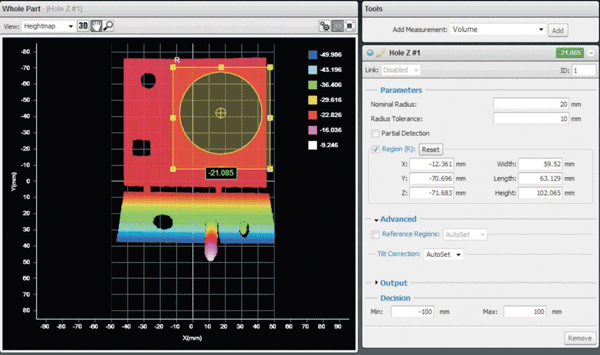
Implementing a 3-D inspection system can be a challenge, with componentry and controllers often disguised as hidden costs. In contrast, the snapshot sensor makes setup simple with a built-in Web server GUI and flexible measurement tools all inside the sensor (Figure 2). No external computers or software is required to derive 3-D point-cloud data. This provides users with flexible, simple setup, configuration and integration of critical sensor parameters, such as exposure, and selection of measurement parameters.

Figure 2. Browser-based user interface.
Entering parameters for specific feature setup is done by drag-and-drop regions of interest – much simpler than conventional sensors that require a complex number of individual parameters, which is time- consuming and requires considerable expertise. The dynamic data viewer visualizes 3-D data to provide a better understanding of the feature’s shape so that users can set a better output decision than with raw numbers alone. Simplicity of setup, with all functions contained inside the sensor, also enables in-process diagnostics and troubleshooting. Sensors can be moved to different locations in the assembly line to collect data and determine which operations are introducing variations.
The sensor has a comprehensive set of built-in, intuitive measurement tools for automotive assembly features, including surfaces, holes, slots, nuts and studs. Each feature includes decision-making ability to determine a pass/fail condition. In addition, it enables inspection of more than one feature in a single frame, a capability not provided by standard solutions. Accurate stud measurement has proved problematic with laser line sensors because of limited data availability. With full 3-D point-cloud data of stud geometry, an accurate determination of stud location is ensured.
Where multiple sensors are required for an application, snapshot sensors include the capability to easily synchronize multiple-sensor operation and combine multiple-sensor data into a single 3-D point cloud. Master hubs can provide power distribution, laser-safety interlock, I/O handling and microsecond-level data synchronization.
Because assembly plants often have their own specific requirements for programmable logic controllers (PLCs), station controls and robot selections, the snapshot sensor has a comprehensive suite of built-in, user-selectable Ethernet, digital, serial and analog outputs, including configurations for common PLCs and robot controllers.

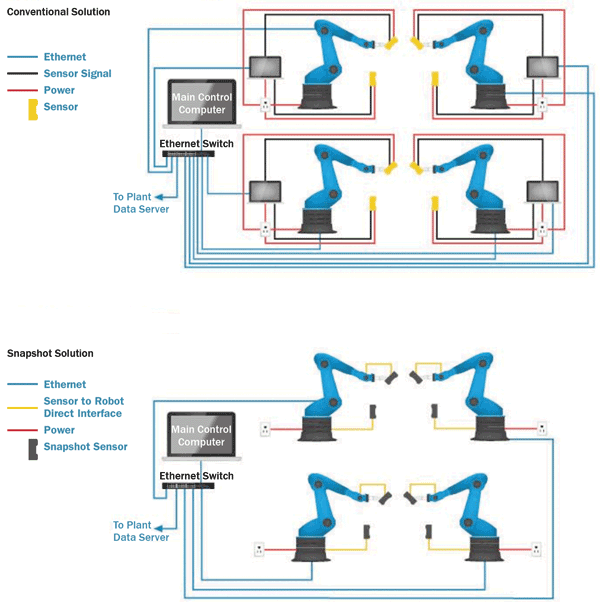
Figure 3. Conventional and simplified cells.
It also enables easy interfacing with a growing number of popular machine vision processing packages (HexSight, Halcon, LabView and more). Direct communication of data and results to PLCs and robot controllers makes single-sensor implementation fast and cheap. The costs of engineering plant-specific communications are eliminated.
Today’s flexible assembly lines, capable of manufacturing a mix of models, require robotic inspection stations. Compact, lightweight sensors are shock- and vibration-resistant and are easily mounted on industrial robots for such cells. Rugged IP67 construction is dustproof and water-resistant, and is built for the harshest industrial environments. Current robotic inspection stations can be complex, with multiple PCs distributed throughout the cell for processing and analysis and with multiple communication chains. With all-in-one measurement and control, the cell configuration is simplified. In Figure 3, the bottom diagram illustrates a cell with snapshot sensors – a simpler, more robust solution than conventional ones.
Meet the author
Walter Pastorius is technical marketing adviser at LMI Technologies in Delta, British Columbia, Canada; email: [email protected].