Focused ultrashort laser pulses can produce shape changes that result in extremely accurate alignment.
Peter Bechtold, Stephan Roth and Dr. Michael Schmidt, Bayerisches Laserzentrum GmbH
The trend in manufacturing today is to make everything smaller. Electronic gadgets, mechanical devices — everything is shrinking. Examples that come to mind are tiny microelectromechanical systems accelerometers built into automotive seat belts, into miniature medical diagnostic labs-on-a-chip or into 1-in. hard disk drives.
At the same time, there is a demand for increased functionality, so more and more components must be positioned precisely relative to each other. It is, however, impractical to achieve in a single manufacturing step the precise alignments needed. Instead, the prevailing technique, especially for nanometer-scale manufacturing, is to assemble parts in approximately the correct position and then to make high-precision adjustments to achieve the positioning within tolerances.
Many adjustment processes, such as the laser-based temperature gradient mechanism — which we describe below — often can meet the demands of nanomanufacturing. Unfortunately, there are also cases where these processes are far from ideal, and sometimes they fail altogether. Thus, it is crucial to develop new micro- and nanoscale adjustment processes to meet the demands of current and future products.
In this article, we will describe such a process that we have developed at the Bayerisches Laserzentrum. We use ultrashort laser pulses to induce a micro shock wave in the workpiece, resulting in a highly controllable, subnanometer deformation of the piece. The process is effective in a wide variety of materials, and the interaction mechanism is almost nonthermal, which means that the thermal impact on the workpiece is negligible.
Today, there are fundamentally two approaches to making precision adjustments in the position and angle of assembled components. The first is mechanical, involving setscrews and similar techniques. However, these methods are of limited utility in making adjustments on a microscale and nearly useless for nanometer positioning. The other approach is noncontact adjustment, usually via a laser.
Laser adjustment
The laser can deliver a highly controllable amount of energy — usually thermal — to the piece being adjusted, with the energy inducing workpiece deformation in various ways. The temperature gradient mechanism is the most common of these.
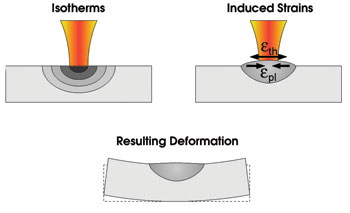
Figure 1. The temperature gradient mechanism is based on a flow stress and strain asymmetry between heating phase (left, middle) and cooling phase (right). It results in a bending toward the irradiated area.
The temperature gradient technique involves three steps (Figure 1). The laser irradiates the surface of the workpiece, building up a temperature gradient and subsequently a stress gradient in the workpiece because of the thermal expansion. The heated material close to the surface starts to expand, which results in a distinct plastic deformation from the rather high temperature. When the irradiation ends, the temperature gradients slowly disappear as the heat is conducted into the workpiece. During this phase, the already deformed zone begins to contract again, but the plastic deformation of the material in the cooling phase is not as distinct as it is in the heating phase because the material temperature is lower. As a result of the difference in plastic deformation between heating and cooling phases, a permanent bending of the actuator toward the irradiated surface results.1,2
The temperature gradient mechanism enables precise control of angular deformation and is widely used in industrial manufacturing. In reed contacts (that is, devices widely used in process automation that are similar to switches but that are activated by a magnetic flux instead of through a mechanical force), the distance between both electrical contacts — defining the magnetic flux to which these devices will react — is nowadays aligned by a temperature gradient process as a last production step.
In addition, laser thermal adjustments are used repeatedly in manufacturing hard disks, where the read/write head must be positioned precisely above the surface of the spinning disc.3
Although these laser thermal techniques are widely accepted, they do have inherent drawbacks. For one thing, the final deformation is reached after the workpiece has cooled to ambient temperature. Depending on the material and geometry, this cooling can take up to 30 seconds, adding significantly to the overall processing time.
Secondly, thermally induced residual stresses remain in the workpiece after the adjustment is finished. These stresses can approach the scale of the material’s yield stress, leading to certain risk of impaired thermal and mechanical long-term stability.
Yet another drawback is the possibility of thermal damage to nearby components. Crystal silicon and fused silica are widely used substrates in the semiconductor and photonics industries, and these brittle materials are especially sensitive to temperature gradients. As the devices get smaller, this drawback becomes even more serious because there is less temperature-alleviating distance between components.
Nonthermal deformation
The nonthermal technique we have developed avoids all these drawbacks. The ultrashort pulse we use creates a shock wave in the workpiece, and it is the shock wave, rather than the temperature, that causes the change in the workpiece shape.
Focused ultrashort laser pulses can turn material into a plasma almost instantaneously, provided that the intensity is high enough and the pulse duration is short enough — typically less than 100 ps. The extreme pressure in the plasma, more than 10 MPa, causes it to expand rapidly.4,5 This high acceleration of mass induces recoil and mechanical forces in the substrate, and these mechanical forces, in turn, can generate a shock wave — if they are great enough — which propagates in the material with supersonic velocity, causing permanent deformation of the substrate’s atomic structure.6 However, the shock wave is quickly attenuated, becoming a normal acoustic wave. The permanent deformation is confined at or near the surface, so the process results in a permanent bend in the workpiece, as illustrated in Figure 2.7 Because the process relies on an ultrashort laser pulse, little thermal energy is transferred to the workpiece, and the thermal load is reduced to a negligible amount.
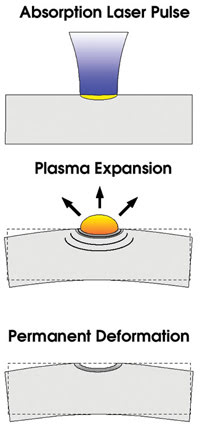
Figure 2. The micro-shock-wave process is induced by the ablation of material with focused ultrashort laser pulses of high intensity. The shock wave, resulting from the recoil during the expansion of the ablated volume, permanently deforms the material near the surface and causes a bending away from the irradiated surface.
Experimental results
We carried out a series of studies at the Bayerisches Laserzentrum to confirm the viability of the micro-shock-wave process. The setup for all experiments is schematically depicted in Figure 3. We tested workpieces of various materials, in all cases with dimensions of 35 × 6 × 0.5 mm. The interferometric sensor in Figure 3 measured displacements as small as 20 nm. We translated the laser’s focused spot across the width of the workpiece at various speeds, and from the measured displacement of the free end of the workpiece, we calculated the bending angle (Figure 4).
We gathered the data in Figure 4 using a femtosecond laser (800 nm, 150 fs, 1 kHz, 750 μJ) focused to a 14-μm-diameter spot on the workpiece. Our results with silicon are especially interesting because that crystalline material is too brittle to be bent by normal adjustment processes.
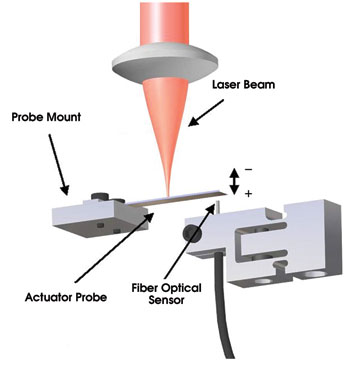
Figure 3. The focused laser beam is translated across the width of the workpiece, and the micro-shock-wave process causes the downward (defined as positive) bend of the workpiece.
Also of note is the way that the bending effect diminishes sharply at low feed speeds. Because the beam is translated more slowly across the workpiece, thermal effects are no longer negligible, and the temperature gradient mechanism described in Figure 1 starts to become significant. This produces a negative bending in the sense defined in Figure 3, while the micro-shock-wave process produces a positive bending. Thus, at low feed speeds, the two tend to cancel out each other.
To gain higher bending angles, the same area may be irradiated more than once, as long as hardening effects do not occur and the resulting damage to the substrate is acceptable (it must be kept in mind that the process is based on the ablation of material). Otherwise, a new area must be irradiated to achieve further bending. It was thus possible to achieve bending angles of 12.3 mrad (0.7°) in 300-μm-thick monocrystalline silicon by irradiating an area of 5 × 6 mm with 600 partially overlapped lines at a feed speed of 25 mm/s.
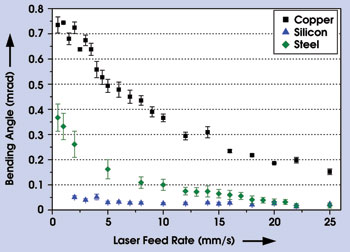
Figure 4. The dependence of the bending angle on the laser feed speed shows that silicon, copper and steel all can be deformed by the micro-shock-wave process.
By calculation, it can be shown that one single pulse (800 nm, 150 fs, 610 μJ) induces a bending angle of approximately 0.2 μrad in copper samples of 500-μm thickness and a bending angle of 0.1 μrad in silicon samples of 300-μm thickness. If the pulse energy were lower, this value would be even smaller. A bending accuracy of 0.1 μrad means that one could displace the free end of an actuator of 10 mm in length by an accuracy of 1 nm. Thus, this process mechanism is more accurate than most distance sensors available, and a closed-loop control is possible. The limiting factor most likely is not the process mechanism itself but the acquisition accuracy of the adjusted parameter.
Although these experiments show that the micro-shock-wave process can make small adjustments in the workpiece shape successfully, the femtosecond lasers we used are expensive and could make the technique impractical in many cases. To address this concern, we conducted similar experiments with a picosecond laser. We used the fundamental output of a mode-locked Nd:YVO4 laser, as well as its second and third harmonics.
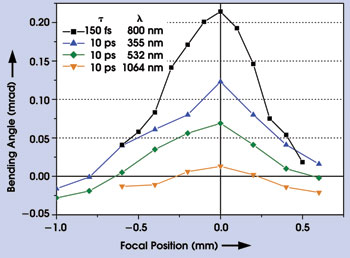
Figure 5. Although resulting in lower bending angles, micro-shock waveadjustment can be induced by using picosecond lasers. Shorter wavelengths lead to higher bending angles.
Figure 5 shows the results obtained with a picosecond laser at a basic wavelength of 1064 nm along with the double (532-nm) and triple (355-nm) frequency conversions. In these experiments, a planoconvex lens with a focal length of 20 mm was used instead of the 25-mm best-form lens. The parameter “focal position” determines how far away from the surface the focus position is and whether it is above the substrate surface (positive focal position) or below (negative focal position). The pulse energy of the picosecond laser is 178 μJ for a 1064-nm, 78 μJ for a 532-nm and 67 μJ for a 355-nm wavelength at a constant repetition rate of 33 kHz and at a laser feed speed of 10 mm/s. For easy comparison, the same experiment was carried out using the above-mentioned femtosecond laser with a pulse energy of 571 μJ.
The results confirm that micro-shock-wave adjustment can be realized with picosecond lasers of short wavelengths, although the bending angles are a bit lower compared with those of the high-energy femtosecond laser pulses as a result of the wide difference in achievable intensity (the peak intensity of the focused femtosecond pulse is about 40 times greater than that of the 355-nm picosecond pulse).
The wavelength dependency can be attributed partly to the higher intensity at lower wavelengths because of the smaller focus diameter. But there is another result, which can be explained by the so-called multi-photon absorption effect, occurring during the interaction of ultrashort laser pulses with matter: Several photons can be absorbed by one electron at the same time. The electron is thus ionized, i.e., transferred into a plasma state, even though the energy of a single photon would be too low. A shorter wavelength leads to higher photon energy, which means that the number of ionized atoms in the same material volume becomes higher because fewer photons are needed for ionization. Doubled frequency results in doubled photon energy and, therefore, about half the photons are needed to ionize a single electron.
The results of the studies presented in this article and in other publications show that micro-shock-wave adjustment with focused femtosecond or picosecond laser pulses can achieve bending angles of up to 1° at an accuracy of 0.1 μrad on highly dissimilar materials. Some questions still remain regarding the reaction of the deformed actuator to long-term mechanical and thermal load, for instance. Nevertheless, micro-shock-wave adjustment is a sophisticated and most promising method to meet current and future demands for adjustment processes in micro- and nanotechnology.
Acknowledgments
The authors are grateful for the financial support from the Bavarian Research Foundation (BFS Az. 665-05). Furthermore, we would like to thank Coherent GmbH, Lumera Laser GmbH, Leoni AG, Sill Optics GmbH & Co. KG, and Tetra GmbH for their continuing support and collaboration. We also would like to thank the Erlangen Graduate School in Advanced Optical Technologies (SAOT) for educational support.
Meet the authors
Peter Bechtold is a member of the scientific staff at the Bayerisches Laserzentrum, Erlangen, Germany; e-mail: p.bech [email protected].
Stephan Roth is group leader of medical technology at the Bayerisches Laserzentrum;
e-mail: [email protected].
Michael Schmidt is managing director of the Bayerisches Laserzentrum;
e-mail: [email protected].
References
1. F. Vollertsen (1996). Laserstrahlumformen Lasergestützte Formgebung: Verfahren, Mechanismen, Modellierung. Meisenbach, Bamberg.
2. K. Kitada and N. Asahi (2003). Laser adjustment of beryllium copper sheet using temperature gradient mechanism. PROC SPIE, Vol. 4830, pp. 30-35.
3. P. Gurinder et al (2005). Review of laser-based applications advancing magnetic recording hard disc drive technology. PROC SPIE, Vol. 5713, pp. 417-431.
4. M. Squires, C. Lik Chan (2006). Modeling of ultrafast laser ablation into vacuum. ICALEO 2006 Congress Proceedings, pp. 154-159.
5. P. Solana et al (2001). Time dependent ablation and liquid ejection processes during the laser drilling of metals. OPTICS COMMUNICATIONS, Vol. 191, pp. 97-112.
6. J. Meijer et al (2002). Laser machining by short and ultrashort pulses, state of the art. Annals of the CIRP, Vol. 51, pp. 531-550.
7. M. Schmidt et al (2005). Laser micro adjustment: from new basic process knowledge to the application. ICALEO 2005 Congress Proceedings, pp. 96-105.