Photonics HandbookTest & Measurement
Interferometry: Measuring with Light
Long applied to optical shop testing, interferometry is now used to measure many different types of parts in a variety of applications, such as optical system performance, surface roughness, surface form, and displacement of moving surfaces.
Zygo Corporation
An interferometer is an instrument that compares the position or surface structure of two objects. The basic two-beam division of amplitude interferometer components consists of a light source, a beamsplitter, a reference surface, and a test surface (Figure 1). The beamsplitter creates the reference and test beams from a single light source. When the two beams recombine, the observed intensity varies depending on the amplitude and phase of these beams. Assuming the two beams are equal in intensity and are perfectly in phase at the point at which they are recombined, the resultant intensity is four times that of either beam individually. This is known as constructive interference. Destructive interference occurs when the two beams are exactly out of phase when they are recombined. The beams cancel each other out, and the resulting intensity is zero.
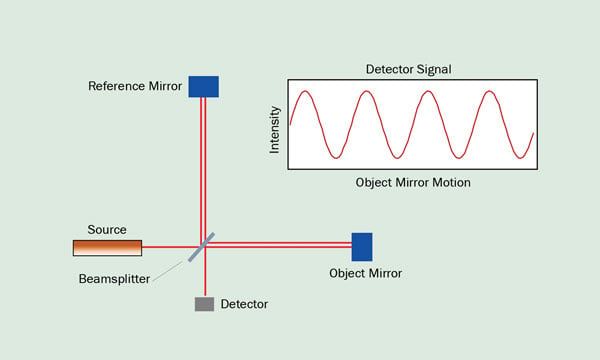
Figure 1. Components common to all interferometers.
If the two beams are spatially extended, we can observe the variations over a surface area in the relative phase of wavefronts comprising the two beams. Alternating regions of constructive and destructive interference produce bright and dark bands commonly called interference fringes (Figure 2). Phase differences between the two wavefronts result when the beams travel different optical path lengths, resulting in part from the differences in form and texture of the test and reference surfaces. By analyzing interference patterns, it is possible to determine the path length differences at any point in the field of view of the instrument. Differences in path length are caused by differences in shape and tilt between the test and reference surfaces of the interferometer. Usually the reference surface is chosen such that it is significantly better than the surface under test. Therefore, the fringe pattern indicates any imperfections in the sample under test. With practice and knowledge of the interferometer setup, fringe patterns can be recognized with ease. Modern computerized interferometers perform this analysis automatically, resulting in a display of the surface topography.
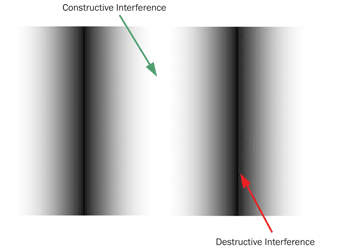
Figure 2. Bright and dark fringes indicate regions of constructive and destructive interference.
Advantages of interferometry
Interferometry has several advantages over other surface-measurement techniques. It has very high sensitivity to surface topography, typically measured in nanometers. It also does not require mechanical contact with the surface under test. Therefore, there is no risk of damage or deformation of the surface, as can sometimes result from using test plates or contact probe methods. In addition, interferometers can cover large areas with high lateral resolution, gathering up hundreds of thousands of data points per measurement. The lateral resolution is limited only by optical diffraction and the numbers of pixels in the camera.
Laser-based interferometry
There are many different types of interferometers, and they differ in the arrangement and nature of the basic components outlined above and whether or not they have additional components to route the test and reference beams to desired locations.
Laser-based Fizeau interferometers most often measure the surface form or transmitted wavefront quality of individual surfaces or complete optical systems. They incorporate the reference surface and beamsplitter in a single component known as the transmission element (Figure 3). The narrow linewidth and high coherence of a laser allow fringes to be visible even for large path length differences, allowing placement of the test surface at virtually any convenient location in the test beam.
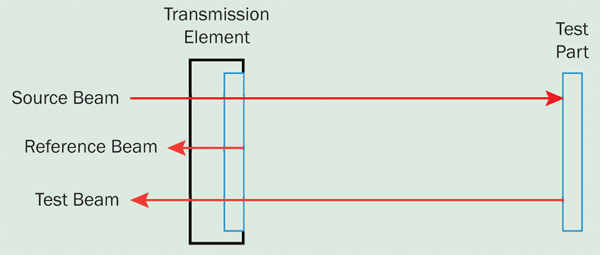
Figure 3. Fizeau interferometers combine the beamsplitter and reference surface into a single transmission element.
Commercial interferometers typically employ helium-neon lasers emitting at 632.8 nm. However, Fizeau interferometers are available for use at a variety of wavelengths without major changes in configuration. The main considerations are finding a suitable laser source and detector, fine-tuning the system’s optical design and selecting optical coatings for the new source wavelength.
Interferometry has evolved from simple instruments that produced static images of fringe patterns for manual interpretation to computerized systems that digitize and analyze static fringe patterns to sophisticated phase-measuring instruments. By capturing several frames of intensity data as the spacing between the reference and test elements is modulated, phase-shifting interferometers (PSIs) calculate the phase at each point on the surface, allowing more accurate data analysis and higher measurement resolution.
Laser interferometers typically require that the surface under test be smooth enough that there are no local height variations greater than one-quarter of the wavelength of light. For lightwaves, phase repeats itself every half wavelength without any distinguishable change in intensity. Therefore, in a double-pass interferometer, an abrupt (pixel to pixel) height change that is greater than one-quarter of a wavelength will show up in the measurement as a discontinuity. This condition is known as a 2π ambiguity. As a result, laser-based interferometers are best suited to measuring optical components and other smooth, polished surfaces.
Interference microscopes
Interference microscopy today most often makes use of extended white-light sources such as light-emitting diodes. The low coherence of these light sources means that the interference fringes are visible over only a very short distance, on the order of microns, requiring a different style of interferometer that achieves a near-equal path length for the reference and measurement beams. The interferometer itself is built into the microscope objective (Figure 4), and it is common to work with a system having several of these interference objectives on a rotatable turret offering various magnifications and optical resolving powers as required for the application.
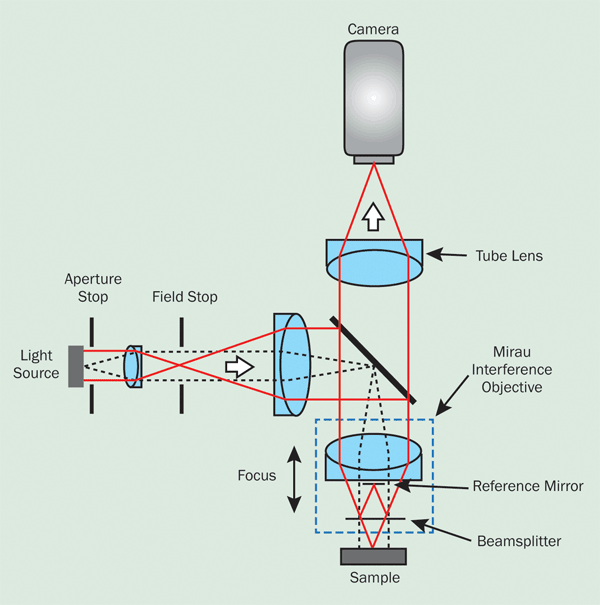
Figure 4. Many interferometric microscopes use spectrally broadband light sources and an equal-path interferometer design integrated into the microscope objective.
The requirement for near-equal path is fundamental to the measurement principle of most modern-day interference microscopes, which take advantage of this phenomenon to perform areal topography measurements on surface textures that would otherwise be too rough, complex, or disorganized for laser-based interferometry. Coherence scanning interferometry (CSI) systems scan the objective in the vertical direction in Figure 4 while collecting frames of intensity data at regular, closely spaced intervals. As each point on the surface under test comes into focus, the fringe contrast peaks for that point. Software analysis of the peak contrast position combined with information about the interference phase results in a high-sensitivity surface topography image of the test part. Measurement noise for topography data is subnanometer for single measurements on smooth surfaces. The CSI measurement principle is not subject to 2π ambiguities of conventional laser-based PSI systems, and is compatible with much rougher surfaces and larger discrete step heights than would be possible with systems that do not use extended white-light sources.
Advances
More recent advances have extended the capabilities and reliability of interferometers even further. For example, minor dust particles or imperfections in the internal optics of a Fizeau interferometer can produce extraneous fringe patterns that may be present, along with the desired surface data acquired. One manufacturer’s interferometer uses a patented ring-shaped light source to minimize the appearance of these extraneous fringe patterns, thus minimizing their impact on the desired measurement results. The ring-shaped source acts as an extended source to reduce the otherwise high spatial coherence of the laser source while maintaining the temporal coherence. The reduced coherence eliminates the spurious interference patterns from the data, which ultimately yields lower-noise, higher-quality measurements.
In some situations, the test object has two or more reflecting surfaces; for example, the front and back of a semitransparent optical flat. Multiple reflections result in overlapping fringe patterns that can be difficult or impossible to interpret in conventional interferometers. A modulated laser source can be used to perform phase shifting via wavelength shifting. In this configuration, each interferometric cavity modulates at a different rate or frequency. By scanning through a broad range of frequencies and using Fourier transform analysis on the phase-shifted data, each fringe pattern can be individually distinguished and analyzed. Samples with nearly parallel surfaces can be measured quickly, accurately, and simultaneously without any special sample preparation. These systems offer additional capabilities based on multiple surface testing, such as the simultaneous measurement of physical thickness profile and material homogeneity.
Interferometry in unstable environments
Phase-shifting laser Fizeau interferometry provides the highest-performance, lowest-uncertainty measurement available for optical testing. Traditional PSI acquires data over a series of camera frames. Unfortunately, since the total acquisition time can be up to one-half second, the acquisition can be adversely influenced by vibration and turbulence. This is often the case in production environments, as well as when testing large optics or optical systems. Maintaining an environment suitable for PSI in these situations may be impractical or even impossible.
When measurements are required under these conditions, options are available to minimize the environmental effects.
For severe vibrations, or for situations that require dynamic measurements of objects in motion, it becomes essential to acquire all data within the time span of a single camera snapshot. In the presence of air turbulence and extreme vibrations using a technique known as spatial phase shifting, combined with a high camera shutter speed, vibration effectively “freezes”. The technology offers unique capabilities, including real-time Zernike feedback for active monitoring of the alignment of an optical system (Figure 5).
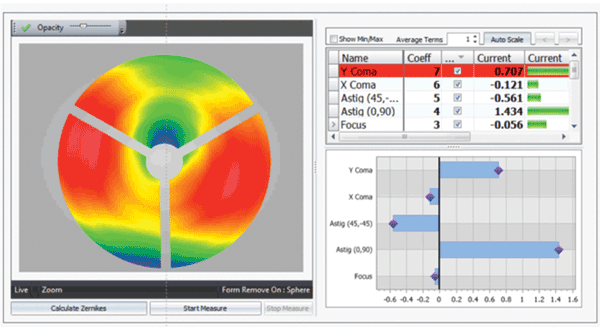
Figure 5. DynaPhase™ Carrier fringe instantaneous interferometry offers real-time topography and surface-parameter analysis, including dynamic reporting of parameters related to alignment, greatly simplifying part setup.
The ability to measure in nearly any environment does not come without some cost. Regardless of the method used, all instantaneous interferometry techniques sacrifice measurement certainty and lateral resolution for the ability to determine phase instantaneously.
Displacement measurement
Interferometers can also be used to measure displacement, i.e., how far something has moved. A displacement-measuring interferometer (DMI) measures linear motion over ranges from fractions of nanometers to meters while meeting the most stringent accuracy and precision requirements. DMI systems can also be used to measure angular displacement or changes in the refractive index of air.
The two primary methods used for DMI are homodyne and heterodyne interferometry. The advantages of heterodyne interferometry include insensitivity to source intensity fluctuations, unambiguous direction sense, multiaxis synchronized measurement capability, and high-dynamic accuracy. The primary advantage of the homodyne method is lower cost; however, this is accompanied by some compromise in dynamic range, speed, and precision.
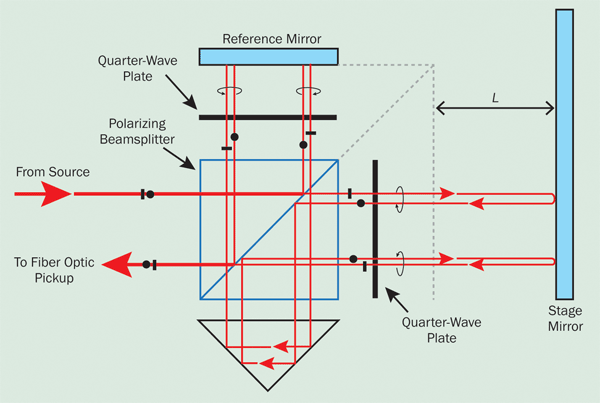
Figure 6. Displacement-measuring interferometer optics for monitoring the relative position L of a stage.
In heterodyne displacement-measurement interferometry, a two-frequency laser is used as a source. Each frequency has a unique linear polarization. Using a polarizing beamsplitter and quarter-wave plates, the beam is split into measurement and reference components (Figure 6). The reference path length is fixed, while the measurement path includes the moving target. As the target moves, the frequency of the reflected measurement beam is Doppler shifted up or down depending upon the direction of travel. The reference and measurement beams are recombined and mixed with a polarizer. The mixed optical signal is carried by a fiber optic pickup to measurement electronics, where it is converted to a displacement.
Summary
Interferometry can address a wide variety of metrology applications with high precision and high resolution and without risk of damage to the sample under test. New applications can be tackled by combining techniques. For example, PSI and CSI can measure form, roughness, thickness, and parallelism of fuel injector components simultaneously. Further advances in interferometry, data acquisition, optical design, and camera electronics promise to extend interferometric measurement capabilities dramatically in the near future.
/Buyers_Guide/Zygo_Corporation/c16395