As astronomy projects look deeper into space, polishing the optics becomes more and more critical.
This past summer, there was a go-ahead to go big. The European Southern Observatory member states declared support for the billion-plus-euro ($1.3 billion or more) European Extremely Large Telescope. The project will put a 39.3-m-diameter main mirror atop a mountain in Chile for visible and near-infrared observation. It is expected to be operational around 2022.
Key to fabricating this and other large new telescopes are advances in manufacturing, including polishing. A measure of the challenge can be seen in how much glass will be processed.
“ELT [Extremely Large Telescope] segments will represent more optical area than that of all optical astronomy telescopes built so far on Earth,” said Roland Geyl, vice president of sales for Sagem-Reosc. A member of the Safran group, the Paris-based Sagem’s Reosc department is among those vying to produce those segments.
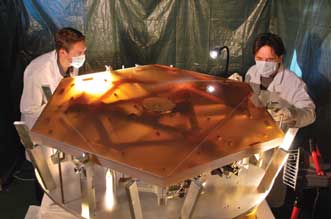
Advances in optics manufacturing, such as improved polishing, are vital for fabrication of new large-scale telescopes. Here, polished to within nanometers of its specified shape, the first Extremely Large Telescope prototype segment is installed on its support at Sagem-Reosc.
Another indication of the magnitude of the task is that the surfaces must follow the desired shape to fractions of a wavelength. What’s more, those shapes are more aspherical than in the past, presenting problems for metrology and manufacturing. A final issue is that the segment edges must adhere to tight specifications because they will be in the viewing aperture.
In all, it will be necessary to grind, polish and smooth more than 800 separate 1.45-m hexagonal segments before they can be assembled to form the Extremely Large Telescope. The goal is to have all those segments produced in three years, requiring a tenfold increase in throughput with respect to what was done a decade ago, Geyl said.
The process is iterative, cycling between material removal and measurement. The latter provides the error map that guides the former, which involves robotic polishing techniques. After cutting the glass into hexagonal segments, an ion beam mills it into the final shape.
“The key is therefore to reduce the number of iterations from several tens,” Geyl said of plans to speed up the process, “to just a few for these segmented optics. That’s the real challenge. The manufacturing process must be adapted.”
Sagem-Reosc has so far produced seven segments and evaluated three different glass materials from as many manufacturers. It is ready to begin producing segments at the required rate of one a day, Geyl said.
Other companies also seek to supply segments. One such is the St. Asaph, UK-based OpTIC Glyndwr, a spinoff of Glyndwr University. Tony Fox-Leonard, managing director, noted that the small company has taken an approach that eliminates ion beam milling, the last and slowest step in the traditional process.

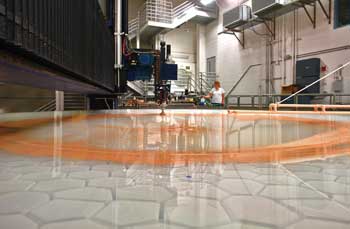
A robotic polisher removes material from a glass segment (bottom center)
using a moving head that dwells for a specified time in a small spot,
converging on a desired shape as seen in the graph opposite. The tower
above is used for metrology and testing.
“We’re attempting to – and we’re pretty close to demonstrating that we can – polish hexagonals,” he said.
The allowable surface error is 7.5 nm root mean square, and OpTIC Glyndwr has shown that it can get within a factor of three or so of that number. Further advances should allow the process to hit the spec, and the result will be a segment popping out of a production cell every four days, Fox-Leonard said. Running several of these in parallel will yield the necessary segment-a-day output.
Better tools and techniques make it possible to polish finished formed hexagonal segments out to the edge without degradation, said Richard Freeman, managing director of Zeeko Ltd. in Coalville, UK. The company makes intelligent robotic polishers, with a seven-axis version being used in the Extremely Large Telescope work.
The head of the machine moves across the glass, polishing a small spot; a longer dwell time at a location leads to more material being removed. The head lifts as it approaches the edge.
A key advance is that the polishing head can be moved out of the way, allowing full-aperture metrology of the surface, Freeman said. The part is placed on the machine, polished and measured without having to be moved.
This avoids the difficulty of registering the generated error map to the coordinates of the polisher, which would be necessary if the part had to be moved between stations. When coupled with process development and sophisticated control algorithms, the result is the ability to rapidly converge on the specified surface geometry, Freeman said.
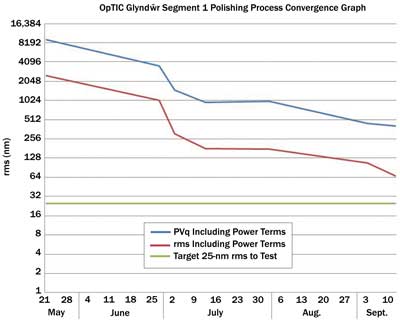
The desired shape of a glass segment is determined via computer, and a
robotic polisher (opposite) removes excess material (PVq 5
peak-to-valley error parameter).
Edges present a particular polishing challenge, said Michael Tuell, optical research engineer at the Steward Observatory Mirror Lab at The University of Arizona in Tucson. Steward is fabricating the primary mirror for the Giant Magellan Telescope, which consists of six off-axis nearly paraboloid mirrors, each measuring 8.4 m in diameter. There also will be a seventh, on-axis, segment of the same size.
Together, the seven will form a single optical surface with a collecting area of 24.5 m. The telescope will be located in Chile and is projected to start observations from the ultraviolet at 320 nm to the mid-infrared at 25,000 nm beginning sometime around 2021. Leveling of the mountaintop for site construction began in 2012.
An edge presents a problem because any material removal tool with weight or force behind it will tend to droop as it moves out over open space. If uncontrolled, the result will be a surface that can vary quite a bit from what is desired.
Rigid-conformal lap polishing of the first of six off-axis segments
of the Giant Magellan Telescope. Polishing is done using an orbital
motion and dwell-time control for preferential removal of high regions.
A related issue involves highly aspheric surfaces, which demand that tools maintain their local ideal shape despite distorting forces. This is an increasingly important requirement, given the specification of larger and larger aspheric departures. Greater aspheric deviations lead to lower f-stops and larger viewing apertures relative to focal length. The Giant Magellan Telescope, for instance, will have a 14 mm deviation per off-axis segment from the best fit sphere and an overall f-stop of 0.7. By way of contrast, f-stops of traditional telescopes might be 2.5 or more, and if they were aspheric at all, it was to the tune of a few hundred microns.
At Steward, the solution to these polishing challenges is to use both passive and active systems. In contrast to the former, the latter tend to maintain shape over a polishing orbit. As with another non-Newtonian fluid, Silly Putty, the resistance of the backing to deformation is dependent upon the shear rate or shear rate history, and that yields the desired performance.
“During the period of an orbit, the ‘silly putty’ maintains its shape,” Tuell said. “It’s a rigid system. But over the long timescales of moving around the mirror and the different radial zones, it changes shape appropriately.”
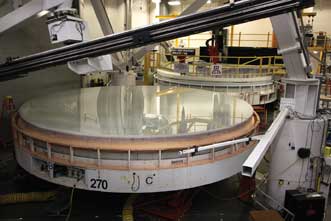
A segment of the highly polished Giant Magellan Telescope mirror.
Going forward, such locally stiff but globally compliant materials and methods will play an ever more important role, he added. In general, the tricky part is getting the final smoothing right without adversely affecting the overall shape.
Manufacturing an asphere requires careful control of the polishing process because two surfaces rubbing together have no natural tendency to create such a contour, noted Hubert “Buddy” Martin, Steward project scientist for mirror polishing. In making the mirror for the Giant Magellan Telescope, the team at Steward found that computer-controlled polishing, in conjunction with stressed-lap polishing, worked well.
Coming up with the process involved some trial and error, but the technique is in place now, and the first off-axis segment for the telescope has been produced. At the same time, scientists developed several independent measurement methods, which required building a 28-m-tall tower. The effort was necessary for the metrology required to guide the polishing and smoothing process to completion.
Multiple tests serve as checks against potential errors that might otherwise go undiscovered until the telescope sees first light. Devising the tests and carrying them out with certainty wasn’t easy because the individual mirrors resemble saddle-shaped potato chips. Testing them required the creation of a wavefront with the same unusual shape, Martin said.
“We now have a better appreciation for the challenge of making large off-axis aspheres, and we have all the tools and techniques in place,” he said of the successful fabrication effort.
Meanwhile, on the final frontier
Besides new instruments on Earth, there is also the James Webb Space Telescope, slated to fly around 2018. It will observe from about 600 to 28,000 nm. Because of what it is attempting to see, it will operate below 50 K, which means that its primary mirror – about 6.5 m in diameter – must be made of beryllium.
The mirror is made up of 1.5-m asphere segments, totaling 21, counting spares. Each has a surface roughness, 4 nm and periodic variations ,20 nm. The project also has a secondary mirror and a spare, a tertiary mirror and a steering mirror.
All have been delivered and are ready for assembly. Manufacturing was done with computer-controlled optical surfacing machines developed over the past four decades by L-3 Integrated Optical Systems. Nine machines were used at the company’s Richmond, Calif., facility for fabrication of more than 30 m2 of beryllium mirrors, said Clay Sylvester, general manager.
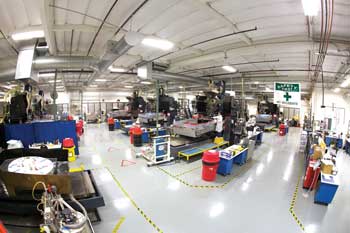
Beryllium mirrors created by a large computer-controlled optical surfacing operation, as is seen here, will fly aboard the James Webb Space Telescope.
The technology allows exceptional control of aspheres and off-axis optical designs, including departures measured in millimeters on optics as small as only a few inches, he added. Some of the applications being developed by the company include metallic mirrors of visual quality.
“CCOS [computer-controlled optical surfacing] is agnostic to the material being processed and can be applied to virtually all manner of refractive and reflective materials, and virtually any shape which can be measured,” Sylvester said.
Scientifically complementing the new space telescope will be the Thirty Meter Telescope. Located at Mauna Kea in Hawaii, it will observe light at 310 to 28,000 nm when completed around 2020.