Dr. Maitreyee Roy, University of Sydney
Recently there has been much interest in various noncontact methods for measuring surface profiles.1 One new technique, based on low-coherence scanning interference microscopes, offers several advantages over monochromatic interferometric techniques.
The most promising property of the system is that it can overcome the ambiguity problems inherent in monochromatic interferometric systems. In addition, it offers an optical sectioning property similar to that used with confocal microscopy techniques that, instead, uses coherence effects to enhance the lateral and longitudinal resolution rather than the physical apertures.
In the low-coherence scanning interference microscope, scientists can construct an interferometer using a tungsten-halogen or arc lamp as the source. Interference takes place only from the section of the sample within the coherence length relative to the reference beam. Using this technique for profilometry of surfaces, it is possible to record a series of two-dimensional images using a CCD camera, as the sample is scanned axially through focus. For each pixel, the system records an interferogram that can be processed to extract the location of the surface either from the peak of the fringe visibility or from the phase of the fringes.
Digital filtering techniques are often used to recover the fringe visibility curve as well as to locate the visibility peak, but they require measurements with increments of the optical path that are less than a quarter of the shortest wavelength and that are numerically intensive.2
An alternative method is based on phase shifting, in which the visibility at a particular axial position can be determined by three or more measurements for different values of reference beam phase.3 This eliminates the need to scan through the complete depth of the image, which can be advantageous for thick structures. One potential problem is that laser illumination is common with phase shifting. Use of a broadband source, however, can cause variations of the phase shift of the different spectral components when reflected from a mirror.
One solution is geometric phase shifting, which relies on polarization components to effect an achromatic phase shift.4,5 Conventional geometric phase-shifting techniques based on wave plates are not practical in many applications because of the relatively slow speed associated with the process. However, retarding plates based on ferroelectric liquid crystal may be suitable for high-speed geometric phase switching.

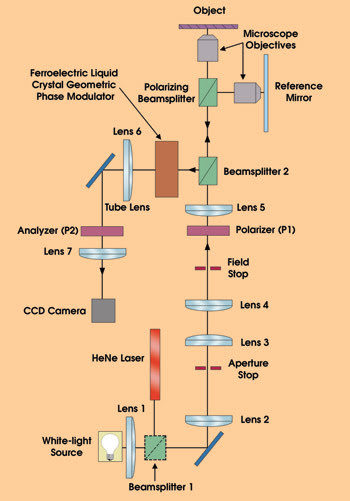
Figure 1. With the low-coherence-interference technique, a linearly polarized beam divides at the beamsplitter into two orthogonal polarized beams that are then focused onto a reference and a test surface by two identical microscope objectives. The reflecting beams travel through a second beamsplitter to a CCD array camera. The output polarizer produces the interference.
At the University of Sydney in New South Wales,?Australia, a computer-controlled low-coherence interferometric microscope has been developed, based on a Linnik interferometer configuration that can quickly and accurately profile the micromachined surfaces to show steps and discontinuities (Figure 1). The instrument is unusual in that it uses a pair of ferroelectric liquid crystal devices that operate on the principle of geometric phase to evaluate the fringe visibility directly for each point on the object.6
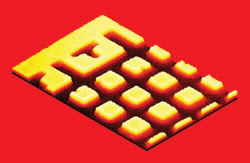
In test surfaces such as an integrated circuit, surface height measurements are made by moving the sample in incremental steps along the Z-axis. At each step, researchers obtain the three or more required measurements of the intensity at each point in the fringe pattern. For each pixel, they locate the position of the peak of the visibility curve along the scanning axis and can obtain accurate values of the fractional interference order from corresponding phase data (Figure 2).

Figure 2. An integrated circuit illustrates the complex microstructure that can be mapped with a microscopy technique developed at the University of Sydney. Image dimensions are 170 × 100 × 1 μm.
The technique offers several advantages over alternative measuring schemes. Although the piezoelectric translator that is used and the available computer memory set limits on the range of surface heights that can be profiled, the method still requires fewer steps to cover the same range of depths as other techniques. This is because steps between height settings at which the data must be taken can correspond to changes in the optical path that are greater than a wavelength.
Acknowledgment
The author would like to thank Parameswaran Hariharan at the University of Sydney and Colin Sheppard at the National University of Singapore for their work on this research project.
References
1. M. Davidson et al (1987). Integrated circuit, metrology, inspection and process control, Proc. SPIE 775, pp. 233-247.
2. B.S. Lee and T.C. Strand (1990). APPL. OPT. 29, pp. 3784-3788.
3. T. Dresel et al (1992). APPL. OPT., Vol. 31, pp. 919-925.
4. M. Roy and P. Hariharan (1995). Proc. SPIE 2544, pp. 64-72.
5. M. Roy et al (2002). OPT. AND LASERS IN ENG. 37, pp. 631-641.
6. M. Roy, C.J.R. Sheppard and P. Hariharan (2004). OPTICS EXPRESS 12, pp. 2512-2516.
Meet the author
Maitreyee Roy is with the Physical Optics Laboratory at the University of Sydney in Australia; e-mail: [email protected].