Pushing the Limits of Interferometric Testing
Tighter specifications have made producing pristine, high-performance optics challenging. Today’s Fizeau interferometers deliver precise measurements, even in less-than-ideal environments.
ERIN MCDONNELL, AMETEK
Laser interferometers have come a long way in the last 40 years. At 76 million independent surface image points per second in phase-shifting mode, the latest in laser interferometer instrumentation delivers extreme levels of surface characterization. By comparison, the first phase-shifting interferometers in the 1970s measured at a rate of only 512 points per second. These advances in surface visualization capability coincide with ever-increasing metrology requirements.
High-performance optics production is being driven by the demand for accurate process feedback for deterministic polishing and secondary polishing to improve surface form-based interferometric measurements. Tighter and additional specifications for pristine optical surfaces and production qualification in vibration-prone environments is another driver. These factors have also pushed advances in interferometry.
State-of-the-art camera technology, light sources and computing capabilities have led to impressive metrology system specifications. Yet despite common assumptions, a massive number of camera pixels alone doesn’t guarantee high-quality metrology. Obtaining precise measurements is often more dependent on the environment and the stability of the part fixturing, underscoring the importance of understanding the real requirements of metrology instrumentation.
Here, we consider the key aspects of modern laser Fizeau interferometer design that reflect the advances in capability, functionality and performance. For each individual measurement, only a subset of these capabilities may be required; high-end resolution performance is not needed for surface form measurements with only low spatial frequency characteristics, and dynamic performance is not necessary in a controlled environment. It is important to know the options available and which are needed to meet different metrology requirements.

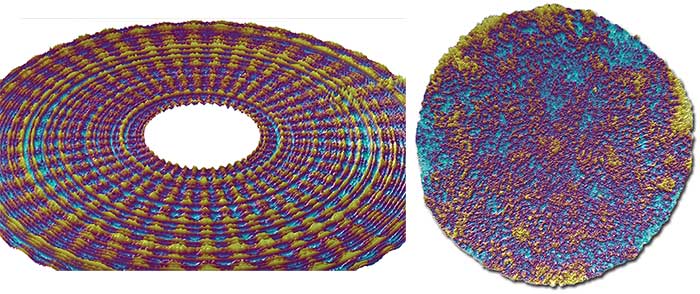
A variety of high-spatial frequency data sets captured by an advanced laser Fizeau interferometer. Courtesy of Ametek.
The camera sensor is key to enabling high-resolution interferometry. However, obtaining the required level of spatial resolution goes beyond retrofitting a new camera into an older-generation interferometer. If proper attention is not given to the internal optical design, the higher-resolution camera may yield “empty pixels” where the increased number of pixels don’t correspond with equally increased lateral resolution. Careful instrument design, modeling and testing is an imperative part of maximizing the camera resolution to achieve optimum results. Tracking the coherent phase transfer function (CPTF) is a good way to do so. The CPTF of an interferometer can be affected by defocus, spherical aberration and coma in the optical path, so it is important to keep tight control on all these aberrations during the design process1.
Instrument transfer function
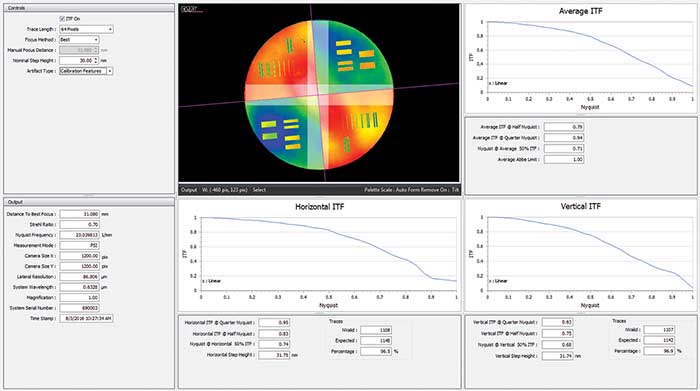
Instrument transfer function (ITF) has been used to experimentally characterize laser interferometers for many years; it is the modulus of CPTF. Measuring the ITF is a good way to characterize the true instrument resolution of an interferometer2. The ITF is defined as the surface height response as a function of frequency, which makes it a better way to describe interferometer performance than a simple “lateral resolution” number that describes only the size of a pixel, not the feature size that can be resolved. The ITF quantifies the ratio of the measured surface height features to their actual height and range in extent from low spatial frequency form to fine-scale waviness. A reliable ITF measurement requires a specialized test part with known step heights and focus features. The artifact must be free of waviness and super-polished to minimize extraneous spectral power. The physical step contains infinite spatial frequencies, and since an interferometer will attenuate surface information as a function of spatial frequency, the measured step will always have less than infinite frequencies. ITF makes a measurement of how much less the instrument can resolve by measuring how far the measured step is spread. By using an artifact with this known step stretched across its entire height and width, ITF can be classified over the full aperture of an interferometer.

Instrument transfer function (ITF) measurement report of a Fizeau interferometer. Courtesy of Ametek.
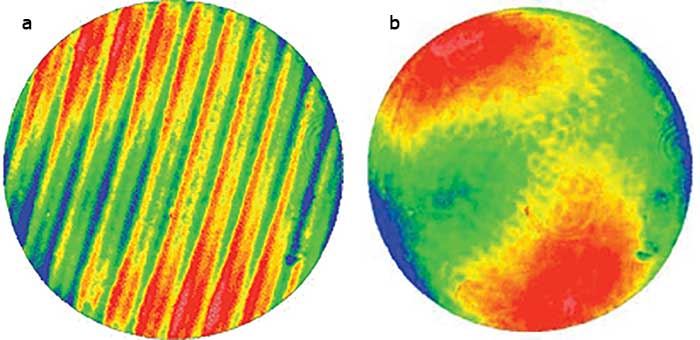
A high-resolution interferometer does not benefit the user if environmental instability due to vibration or air turbulence limits the ability to successfully acquire data. Data acquisition takes time, and as the measurement time increases, so does the sensitivity to vibration and air turbulence. This is especially detrimental when trying to use a traditional mechanical phase-shifting interferometer outside of a controlled laboratory environment. A phase-shifting interferometry (PSI)-based Fizeau interferometer is attractive because its on-axis configuration enables low uncertainty metrology while utilizing the full resolution of the camera, but the confidence in its ability to provide reliable results declines in poor environments. Techniques have been developed to enable interferometric metrology in poor environments ranging from vibration-robust to dynamic acquisition. It’s important to understand what type of acquisition method is required for a specific environment, as there are trade-offs between measurability, resolution and uncertainty.

Data taken with phase-shifting interferometry (PSI) acquisition (a) and Ametek-developed QPSI acquisition (b) of the same cavity in the same environment. Courtesy of Ametek.
Dynamic acquisition measurements
In extreme environments — where vibration and/or turbulence cause the fringe pattern to shift more than a fringe — conditions are often so severe that PSI acquisition becomes impossible because of the constant movement. In this case, all information required for interference fringe analysis must be gathered rapidly.
Dynamic acquisition measurements allow for data acquisition in thousandths of a second, effectively “freezing” the environment long enough for the camera to collect data. This is achieved by using dense carrier fringes to create localized spatial phase shifting in a single-frame interferogram3. Having near instantaneous measurements enables expanded capabilities not possible with mechanical phase-shifting. One example is a continuously updated height map that provides real-time visualization of the alignment and aberrations in an optical system. Another is the ability to create movies of the test cavity over time, generated with a simple external trigger for tracking real-time changes in the cavity. With the use of dynamic acquisition techniques, all of this data can be collected across long cavities without optical isolation tables.
While dynamic acquisition is a versatile measurement technique, it is not without its trade-offs. Dynamic interferometers pay for their unique functionality at the expense of the lateral resolution — typically a 4× reduction in the total number of independent 3D image points. Higher-resolution cameras, or true optical zoom for smaller parts, can gain back resolution. However, this may not be sufficient for applications requiring full characterization of the power spectral density and high spatial frequency. If resolution is a primary need of your application, you cannot rely on the “camera resolution” specification to determine if the system will meet your needs. An interferometer with a 1K × 1K sensor and an on-axis acquisition method will enable full resolution (1M pixels). Switching to a dynamic acquisition technique reduces the resolvable pixels to 500 × 500 (250K pixels) and, in turn, results in a lower system ITF.

Playback of a 3D movie capturing the phase disturbance of a candle placed inside an interfering cavity. Courtesy of Ametek.
For measurements in less extreme environments, such as a production floor, attempts at PSI-based metrology are often disturbed by the vibration caused by manufacturing equipment and personnel in close proximity to the test cavity. In these situations, a vibration-robust, phase-shifting acquisition method is preferred, allowing data acquisition over multiple camera frames.
This is similar to traditional phase-shifting methods, but uses modern data analysis to achieve reliable surface height data under less-than-ideal conditions. Interferometers based on this technique can eliminate the fringe print-through that is characteristic of phase-shifting interferometric data in questionable environments. Vibration-robust acquisition is most effective with a fast, shutter-able camera. It works by quantifying rigid body motion of the cavity and compensating for the detected vibration in each camera frame. This allows each frame to be validated individually instead of as a complete ramp where all frames must occur in a sufficiently stable environment. Taking more frames than a traditional PSI measurement also helps to stabilize the data.
To achieve high data rates and environmental robustness, an interferometer requires a high-powered laser. Best performance requires this laser to be frequency stabilized. With a commercial Helium-Neon source, this is difficult to achieve, but it can be accomplished with custom lasers designed and built specifically for interferometric use. An unstabilized HeNe laser typically has ~2 mW of power and can exhibit small variations in wavelength and multiple modes as it comes to equilibrium; this can lead to occasional contrast loss at some cavity lengths4. Frequency-stabilized lasers also have a more consistent power level. A high-power laser source enables fast shutter rates, which improves the acquisition speed and reduces an interferometer’s vibration sensitivity. It is also required to reach the ideal signal-to-noise ratio when performing dynamic measurements. Custom lasers accommodate all of these specialized needs to maximize both performance and lifetime.
As is evident by these examples, metrology capabilities have improved significantly in recent years. Manufacturers of laser interferometers continue to develop in an attempt to keep up with the growing needs of the optics industry. The newest, state-of-the-art interferometers include high lateral resolution (up to 3.4K × 3.4K), environment robustness and high-quality accessories. It is important to understand how the specifications and capabilities of an instrument align with your needs, as the “best” interferometer will be defined by the metrology requirements for your specific application. Today there are numerous Fizeau laser interferometers available to address a wide range of performance and budget requirements.
Meet the author
Erin McDonnell is the associate product manager for laser interferometers at Zygo Corporation, a subsidiary of Ametek. She’s been with the company for six years; email: [email protected].
References
1. Q. Wang (2017). Fourier analysis of phase-shifting algorithms for amplitude measurement of interference fringe. Appl Opt,
Vol. 56, pp. 4353-4357.
2. P. de Groot et al. (2012). The meaning and measure of lateral resolution for surface profiling interferometers. Opt and Photonics News, Vol. 23, pp. 10-13.
3. D.M. Sykora and P. de Groot (2010). Instantaneous interferometry: Another view, in International Optical Design Conference and Optical Fabrication and Testing, Optical Society of America, paper OMA1.
4. D.M. Sykora and M.L. Holmes (2011). Dynamic measurements using a Fizeau interferometer, in Optical Measurement Systems for Industrial Inspection VII, edited by P.H. Lehmann et al. Proc SPIE, 8082, 80821R.
Considerations When Selecting an Interferometer
1. What is the spatial resolution requirement of the measurement (what is the range of size of the features that need to be resolved)?
2. What type of parts will be measured (shape, size, reflectivity, roughness)?
3. Are the reference optics of suitable quality to make these measurements?
4. What is the environment in the facility that the metrology will be performed (temperature set point, stability, vibration and acoustic noise)?
5. Can the interferometer enable the user to obtain the required measurement uncertainty?
6. Is there sufficient laser power for this measurement bandwidth?
/Buyers_Guide/AMETEK_Aegis_Inc/c17523