Selecting the right method for measuring high-power fiber lasers — whether with a camera, a scanning-slit system, or Rayleigh scattering — requires knowledge of the benefits and constraints of each.
KEVIN KIRKHAM, OPHIR
Fiber lasers are used in ever-increasing numbers across a range of applications. In the 2- to 20-kW-power output range, laser applications are growing in materials processing and in finesse applications such as 3D micromilling, microcutting, blind-hole machining, and additive manufacturing. According to Hexa Research, “High-power cutting and welding is a leading application in the [fiber laser] market. This could be attributed to increasing use of the product in tube cutting, flat sheet cutting, 3D cutting, car body scanner welding, power train welding, and tube welding1.”

A 2D beam profile provides comprehensive data sets on laser beam size, shape, and roundness. Courtesy of Ophir.
In 2010, the average high-power fiber laser had an output of ~1000 W. In 2019, the average will be in the range of 6000 to 8000 W. As power levels increase, fiber lasers have also become increasingly reliable, affordable, and easier to implement, thus they have found their way into more applications, including remote welding of vehicles and additive manufacturing in 3D metal powder-bed printing of automotive and aerospace components. Their popularity is reflected in worldwide fiber laser sales, which are expected to grow to $2.7 billion in 2019, a steady increase from the turn of the century when fiber sales were less than $1 billion2.
Regardless of the industrial application, each system requires that the working laser beam be consistent and its performance verified. Process quality is in many ways driven by the quality and consistency of the laser beam that is delivered to the workpiece. In all cases, initial laser characteristics must be maintained.
Power density challenges
As laser power increases, monitoring beam quality and mode stability in multi-kW laser systems becomes a challenge. This is primarily because of the increasing power densities of the beams being tested. Optical sampling components such as beamsplitters and beam-sampling optics that utilize thin-film coatings can be
damaged at energy densities of 50 J/cm2
(20 nS pulse width) or less3. While uncoated optics have damage thresholds that can reach 10 to 100× that of coated optics, they do not provide the low reflections that are needed to attenuate high-power beams in a small beam space.
Fiber lasers have become increasingly reliable,
affordable, and easier to implement, thus they have found their way into more applications.
Many novel beam-profiling products try to meet the need for significant attenuation of these powerful lasers. Scanning-slit and rotating pinhole-based devices attenuate such beams by passing laser light through microscopic openings. The movement provided by scanning systems spreads the laser energy over large areas, and their shiny surfaces reflect much of the laser’s energy, while only a fraction passes through microscopic apertures.
But, just as with optical sampling techniques, there are limits to these approaches; high-power laser physics tends to have its own way. The power densities associated with multi-kW lasers can easily damage sampling optics and scanning-aperture systems alike.
What, then, is the best way to measure high-power beam quality and consistency? Think twice before throwing out the tried-and-true methods. Scanning aperture, camera-based beam profilers, and automated or real-time M2 measurement systems still have a place in assuring the quality of modern fiber lasers. But new noncontact techniques such as beam measurement systems based on Rayleigh scattering offer the ability to measure these higher-power systems without the potential for damage to the attenuation optics.
Rayleigh scattering measurements
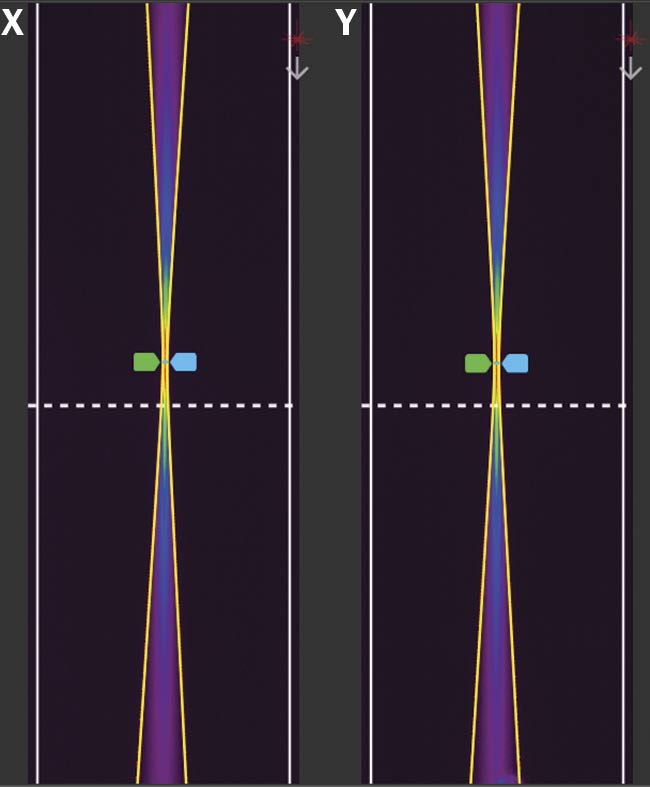
Rayleigh or atmospheric scattering-based systems image the beam orthogonally, without anything actually touching the beam (Figure 1). This sideways view of the beam does not automatically provide a classic 2D beam profile as does a camera or XY scanning aperture system. Instead, each row of the image of the focusing beam is similar to an ISO moving-slit beamwidth measurement (ISO 11106-3 4.4)4. Rayleigh scattering-based systems measure the caustic or focal region of the beam with similar spatial resolution as camera-based and scanning aperture-based systems (Figure 2). Because the beam is not impinged on any surface, power density is no longer a deterrent to measuring laser performance.

Figure 1. Rayleigh scattering-based systems image the beam orthogonally without touching the beam. Courtesy of Ophir.
Whereas atmospheric scattering-based measurement systems image the beam indirectly, scanning-slit and 2D-matrix sensor-based products image the beam
directly. Direct imaging requires many orders of magnitude of optical attenuation, as cameras and single-element detectors saturate at ~1.0 µW/cm2 and fiber lasers can produce power densities in excess of 10 MW/cm2.

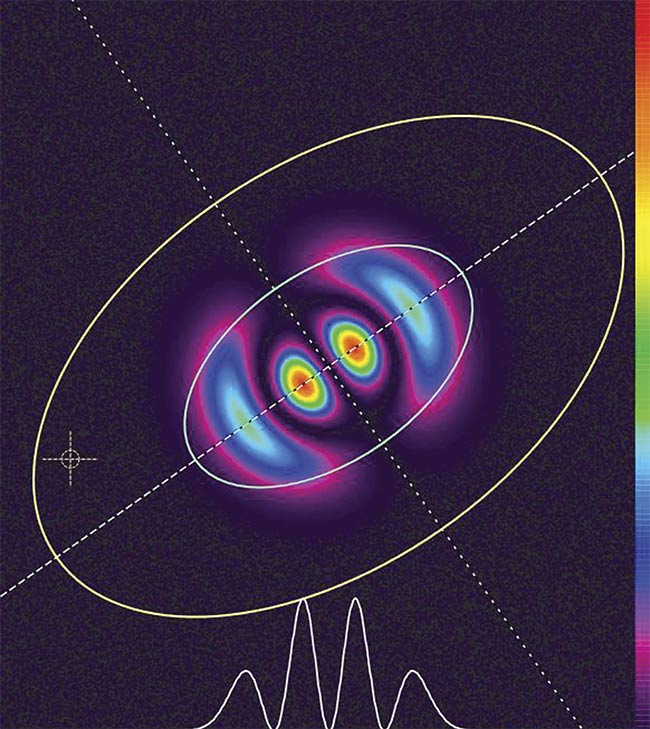
Figure 2. 2D false color image of Rayleigh scattering from a focused fiber laser. Courtesy of Ophir.
Scanning-slit systems themselves provide some of the needed attenuation (up to 100 W for a 1-mm spot, or ~12 kW/cm2), but additional optical attenuation of as much as three to four orders of magnitude of optical density (OD) may be required when monitoring focused or very high-power collimated laser beams.
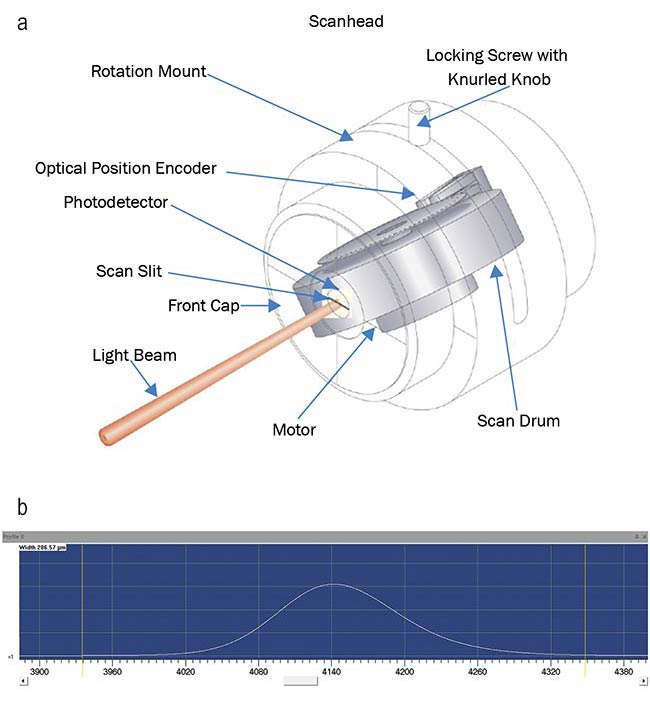
Scanning-slit sensor-based beam profilers work by passing the beam under test through microscopic slits that are mounted on a rotating drum (Figure 3). As the X- and Y-orientated slits pass through the beam, a small amount of laser light is registered on the single-element sensor. An optical position encoder tells the software where in its rotation the drum is at any moment. The decoded rotational location from the rotational encoder and the intensity signal from the single-element detector are then used to define the X and Y beamwidths and their centroid locations. Scanning-slit beam-profiling systems offer measurements with very good signal-to-noise ratios (SNRs). SNRs in excess of 70 dB are often realized5. This allows the software to reconstruct very accurate X and Y cross-section beam-intensity profiles providing both size and location information.

Figure 3. Scanning-slit sensor-based beam profilers pass the beam under test through microscopic slits that are mounted on a rotating drum (a). Integrated intensity profile of a laser measured with a scanning-slit profiler (b). Courtesy of Ophir.
Camera-based measurements
Silicon (250 to 1100 nm) and indium gallium arsenide (InGaAs) (900 to
1700 nm) cameras saturate at ~1 µW/cm2. This means that to measure a focused, 1-kW fiber laser — without distorting the beam under test — an optical attenuation
13 orders of magnitude or greater is required. This is a tall order. A combination of beamsplitters that deliver a very low percentage reflection (~0.1%) of the beam that is produced with each splitter, plus neutral density (ND) filters, can be used once the power densities are less than 5 W/cm2. At >5 W/cm2, thermal effects in the filter material can distort the beam under test. Measuring the profile of focused fiber lasers with this technique requires that the first beamsplitter withstand >10 MW/cm2 power density. This type of optical attenuation is a source of distortion of the beam under test. Optical attenuation also consumes significant beam path (75 to 150 mm), which reduces some of the measurement candidates.
Comparisons
While scanning-slit systems offer the greatest SNRs and measurement accuracies, and camera-based beam profiling systems offer the greatest amount of information regarding the laser beam cross-sectional energy distribution, only laser measurement systems based on Rayleigh scattering can measure the high average power densities of focused fiber lasers without the worry of distortions caused by insufficient optical sampling schemes. Rayleigh scattering-based instruments are not affected by high power densities and have successfully measured fiber lasers with power levels of 100 kW.

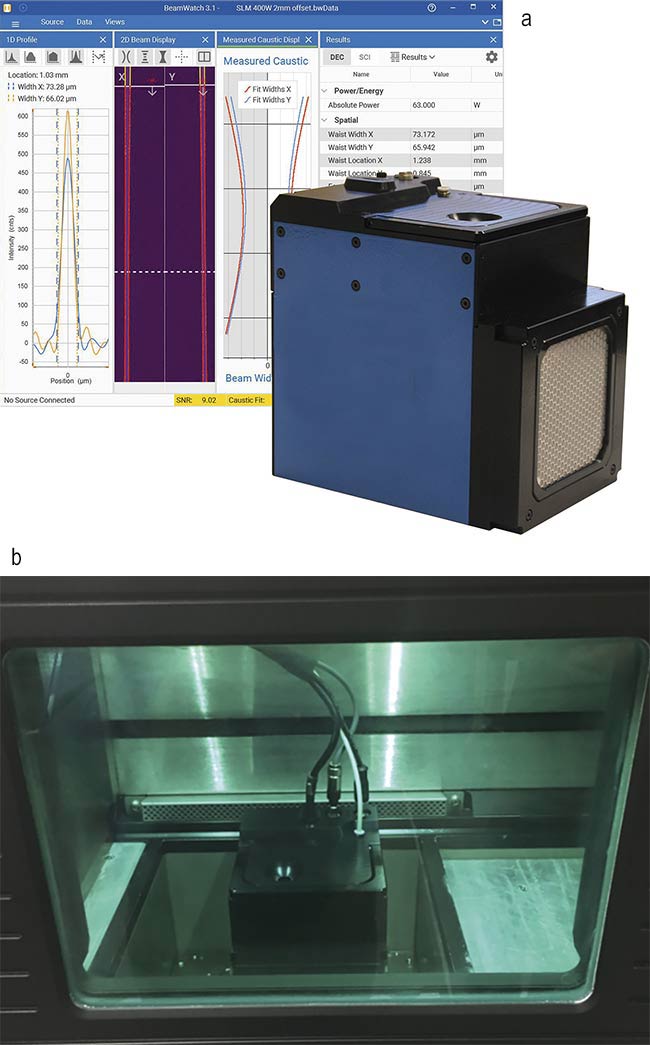
Figure 4. An integrated laser-measurement system that uses Rayleigh scattering to measure the propagation characteristics of additive-manufacturing lasers (a). Measurement system confirming parameters of laser in metal powder bed selective laser sintering (SLS) system (b). Courtesy of Ophir.
As fiber laser output power levels continue to increase, indirect measurement techniques will become the primary method of quality control for these very energetic sources. Laser processes will benefit from the faster, more complete, and easier-to-deploy analysis provided by Rayleigh scattering-based beam profilers.
Meet the author
Kevin Kirkham is senior manager for new business development at MKS Instruments and has more than 30 years of experience with laser diagnostics and quality assessment. Prior to MKS, he was product manager at Coherent Inc. and regional sales manager at Molectron
Detector Inc.; email: [email protected].
References
1. Hexa Research (2019). Global fiber laser market is anticipated to witness significant growth by 2025, www.digitaljournal.com/pr/4151216#ixzz5gIpCnHnf.
2. D. Belforte (2018). 2017 was a great year — for industrial lasers. Industrial Laser Solutions, www.industrial-lasers.com/articles/print/volume-33/issue-1/features/2017-was-a-great-year-for-industrial-lasers.html.
3. R. Siew et al. (2013). Laser induced damage threshold of optical coatings, www.masbonfante.it/download/cvi/CVI_LIDT_WhitePaper_FIN.pdf.
4. Ophir (2019). Beam width measurement as scanning slit, BeamWatch user guide, www.ophiropt.com/laser--measurement/beam-profilers/products/High-Power-Beam-Profiling/BeamWatch.
5. Ophir (2019). Introduction to scanning-slit profilers. Saturation of the Pyro NanoScan, www.ophiropt.com/laser--measurement/sites/default/files/NanoScan2s_2.pdf.