ERIK NOVAK AND MIKE ZECCHINO, 4D TECHNOLOGY CORP.
Small-scale surface features, whether desired — such as laser marking and dot peening — or unintended — such as scratches, nicks, dents, pitting, edge break and local curvature — can greatly affect the value, performance and lifetime of critical components. Portable roughness gages are able to quantify surface roughness on the shop floor. Coordinate measurement machines, stereoscopes and laser line scanners can examine overall shape. But to date, it has not been possible to measure small features with high resolution on the shop floor.
A new measurement technology enables direct, noncontact optical inspection of defects and fine features on precision surfaces. Instruments employing this technology combine the functionality and durability of handheld gages with the resolution of high-end optical inspection systems. This combination gives inspectors in shop floor environments a powerful new option for quantifying components during production and during repair/refurbishment processes.
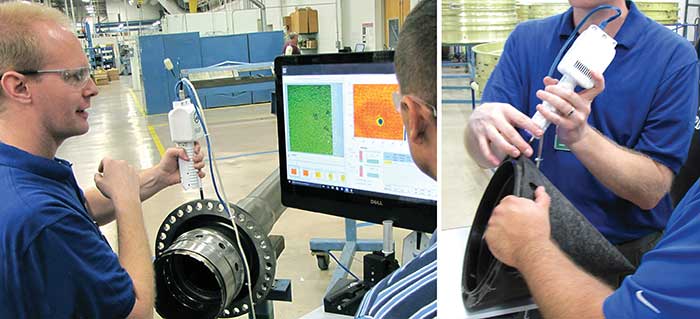
Figure 1. A polarized structured light (PSL)-based gage measures scratches and nicks on a large shaft and voids on the edge of a composite nose cone. Handheld operation and portability makes it possible to measure these components without replication, right on the factory floor. Courtesy of StandardAero.
Determining the height or depth of fine surface features is critical for a variety of reasons. Small-scale defects that are just a few microns deep may be sufficient to cause fracturing, corrosion initiation, excessive wear or other effects that may seriously compromise the lifetime or performance of the component. As such, a company’s inspectors, as well as customers, generally err on the side of caution.
Unless a pit, scratch, nick or dent can be quantified, there is no way to control and improve the production or repair process. There is also no way to effectively challenge the decision of an inspector.
Similarly, fine features such as laser marking, dot peening, blend radii, chamfer angles and edge break all must be measured to ensure proper part performance. Part marking that is too deep can exceed pitting or scratching tolerances and reduce lifetime and performance in the same way as unwanted defects. Part marking that is too shallow can cause the marks to wear away prematurely, losing part serialization and the ability to track components throughout their lifetimes. In addition, proper radius of curvature of small features and edges must be tightly toleranced, since this reduces edge fracturing and stress on components and ensures the proper flow of air or liquids.
Traditionally, inspectors have had limited options for quantifying defects or fine features. The most common inspection methods tend to be qualitative, such as visually comparing a defect to a sample of known quality or using a scribe gage or even a “calibrated fingernail” to determine a feature’s depth.
Qualitative inspections, however, lack precision and repeatability and are highly subjective. They also are limited to assessing areas with a clear line of sight and within easy reach. And since passing a bad part could have far more severe consequences than rejecting a good part — especially in industries such as aerospace, medical and automotive — inspectors will typically reject anything even close to having an excessive defect.
Another method of shop floor inspection typically involves using a rubber-like material to create a negative impression of a defect. This replicated defect can then be cross-sectioned, and the result examined using an optical comparator. This method is more quantitative than mere visual or tactile inspection. But it is time-consuming, and accuracy relies on the inspector having sliced perfectly through the most severe part of the feature.
Highly quantitative results can be achieved from precision metrology systems such as optical profilers and stylus profilometers. These systems are capable of both fine feature and roughness analysis, but they are highly susceptible to environmental noise and vibration. Because of this, they are typically sequestered in metrology labs, and their complexity is such that only highly trained operators can use them.
Profiling systems are also typically designed in microscope-stand configurations, which do not allow measurement of large components, further restricting their utility. Measurements are slow because of the instruments themselves and the need to handle parts multiple times to measure them in a centralized metrology lab. These shortcomings, combined with the high cost of the instruments, make these types of systems effectively inaccessible to a shop floor inspector.
Because of the lack of rapid, accurate shop floor measurement devices, inspectors often lack confidence in their assessments. The overly cautious estimations of feature sizes that result means that rejection rates are typically much higher than necessary. To improve yield and process control, repeatable, accurate high-resolution surface metrology must be accessible on the shop floor.
A gage based on PSL
A new technique, polarized structured light (PSL), has been developed and productized for handheld, three-dimensional measurement of surface defects and features, with micrometer resolution.
The PSL technique is based on a combination of two technologies: fringe projection (structured light) and dynamic interferometry.
In fringe projection, a known pattern is optically projected against the test surface and imaged at an angle onto a detector. Based on the distortion of the projected pattern, the surface shape may be reconstructed. Typically with fringe projection, multiple patterns, wavelengths or angles are necessary to create an accurate three-dimensional representation of the test piece. Because the resulting acquisition time is relatively long, vibration and air turbulence will degrade or destroy measurement results, making handheld operation of the measurement instrument impossible.
The second technology — dynamic interferometry — enables measurement despite vibration. In a dynamic interferometer, polarization is used to encode the measurement light beam. A specialized detector with different polarizers in front of each camera pixel decodes the signals to allow the simultaneous acquisition of all information for three-dimensional reconstruction.
Acquisition takes only tens of microseconds, enabling the instrument to measure accurately in noisy environments — even when handheld.
The combination of structured light and dynamic interferometry creates a new method of vibration-immune, high-resolution 3D metrology. This new PSL technology has been packaged in a handheld device to allow for rapid and accurate metrology that can be employed on a factory floor, replacing less accurate and more time-consuming methods of part assessment.
PSL technology allows features from 2.5 to 2500 microns deep or tall to be accurately quantified. The immunity to vibration opens the way for PSL use in handheld systems for much improved flexibility over profilometers. Further, with no moving parts necessary for measurement and novel mechanical designs made possible through additive manufacturing, system size can be greatly reduced. This results in a final device roughly the size of a flashlight.
The micrometer resolution achievable with PSL is sufficient for imaging defects, part marking and fine-scale geometries, even for the most rigorously controlled machined components. Measurement results are instantaneous, reducing the measurement cycle from minutes or hours to several seconds.
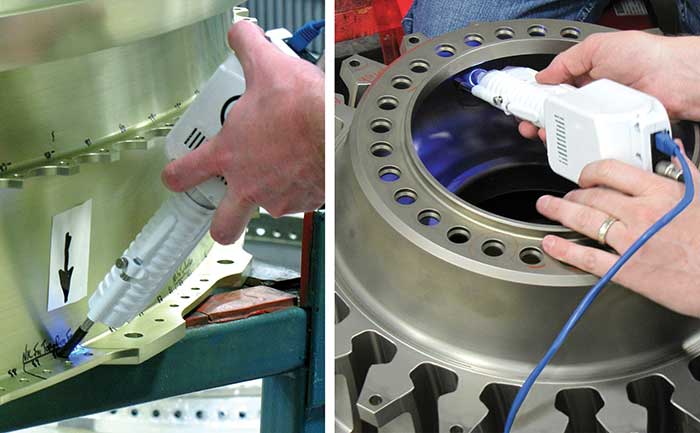
Figure 2. Handheld devices assess damage on an aircraft engine fan disk (left) and on the corner of an engine cowling (right). The black tip is an alignment aid that sets the gage at the measurement distance and helps the operator to align the instrument. Courtesy of 4D Technology Corporation.
A handheld PSL-based gage can inspect both simple and complex part geometries, such as measuring scratches and nicks on an aircraft engine shaft and fine-scale voids on a composite nose cone (Figure 1). Handheld operation and portability make it possible to measure such components in situ, despite noise and vibration.
The highly portable instrument is extremely useful for repair/refurbishing facilities that work on large and complex components. It is also well-suited to new-make facilities that need to quantify surface imperfections prior to assembly or to shipment. The device employs efficient LEDs and CMOS imaging to reduce power consumption. A battery pack on a mobile cart can run the instrument and its computer all day, moving wherever needed on the factory floor. A touchscreen interface makes quantified results as simple and fast for an operator as visual inspection, but with confidence in the accuracy of the result.
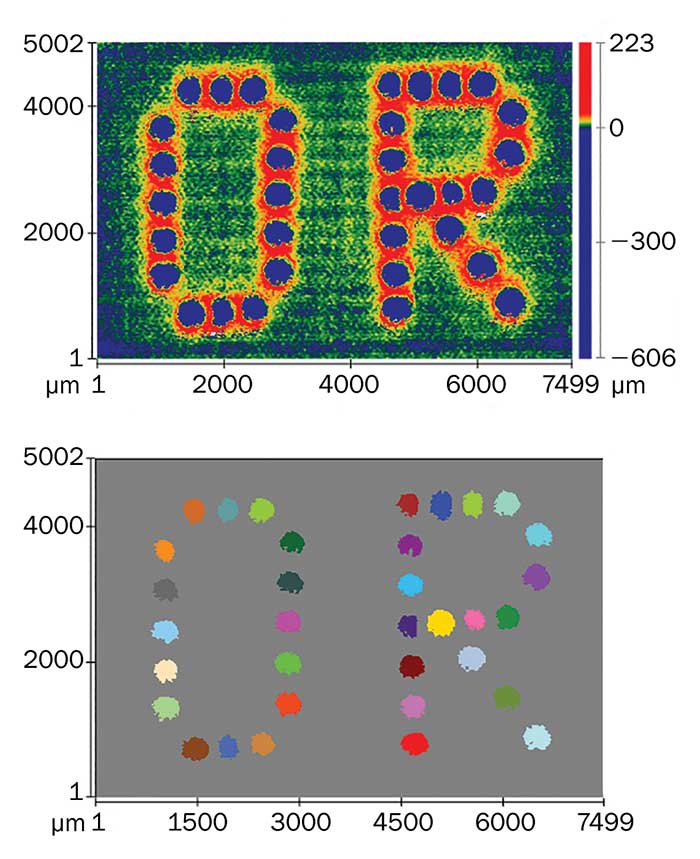
Figure 3. Analysis of a part marked by dot peen determines depth, volume, area and location for each feature. Courtesy of 4D Technology Corporation.
Applications
The handheld PSL-based gage can read fine-scale features on any shaped component, from relatively flat turbine blades to corrosion in corners or nicks on blade edges. With a 2.5-mm measurement range and 35-mm standoff, the device can measure most geometries.
A PSL gage can also be used to assess pitting on the corner of an engine cowling, as well as damage to the underside of a flange (Figure 2). A plastic tip extending from the otherwise noncontact device sets the instrument at the correct distance from the surface for measurement and helps the operator quickly align the gage to the corner region. The tip also can be replaced with a fold mirror to access areas without line-of-sight access, as in the example on the right. This ability, combined with the small size of the instrument, even enables measurement of the sidewalls of pipes and shafts far into their interiors.
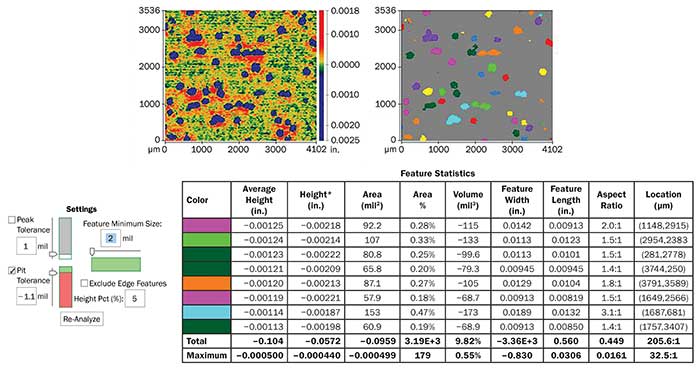
Figure 4. In this data analysis of a corroded sample, the feature-finding options allow the operator to display only pits deeper than a given specification. Features can also be displayed/suppressed based on area or width. Courtesy of 4D Technology Corporation.
In addition to defects, the PSL gage can measure intentional surface features to ensure acceptability. A PSL gage, for instance, can quantify the depth of laser markings or dot peen strikes to ensure compliance with specification. With a dot-peen marked part, each feature can be individually analyzed for depth, volume, area and location (Figure 3). The measurement analysis takes less than two seconds, effectively providing instantaneous feedback to the inspector. Other features that can benefit from rapid quantification are rivet depth and shape, small part radii, cylindricity of shafts, and edge break and feature recession.
Data analysis
An analysis of PSL data can highlight, for example, the individual pits on a corroded sample (Figure 4). The analysis software automatically removes the overall shape of the surface, enabling accurate measurement of the pits despite any part curvature. The operator can set thresholds such that only pits below a certain depth (or peaks above a given height) are analyzed, as shown at the right. Both the divot and protrusion caused by gouging can be assessed simultaneously. The analysis can include the maximum depth, area, volume, aspect ratio and other key metrics for each found feature.
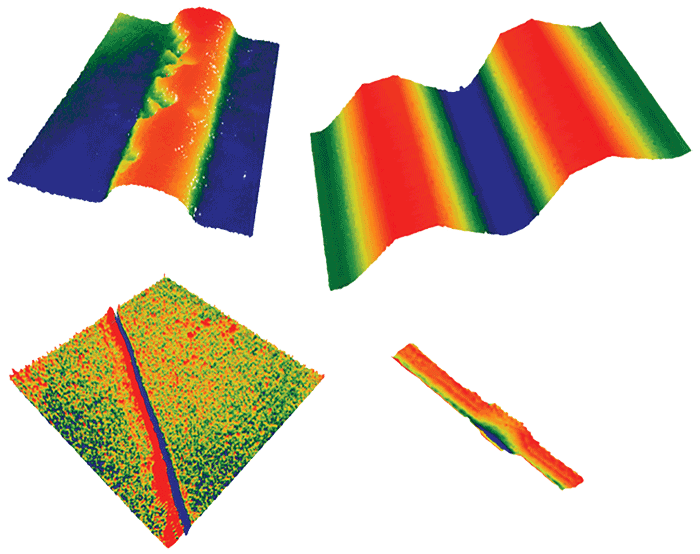
Figure 5. Data images in 3D generated by a polarized structured light (PSL) gage show peaks in red and valleys in blue. Clockwise from upper left: a corroded edge, gear geometry, a dent and a scratch in machined surfaces. Courtesy of 4D Technology Corporation.
Data analysis software such as this provides an inspector with repeatable depth values, without manual estimation, ensuring operator-to-operator repeatability. Single-button report generation provides an easy way to document results.
A PSL gage generates 3D images in which the color spectrum indicated surface height, with red indicating peaks and blue indicating valleys (Figure 5). The ability to view the surrounding area of a defect with high resolution gives important information that can help inspectors determine a defect’s potential impact on component functionality as well as providing clues to its root cause.
Meet the authors
Erik Novak is the director of business development for 4D Technology Corp.; email [email protected].
Mike Zecchino is the company’s manager of technical communications; email: [email protected]