John McCauley, Ophir Photonics
The days of finicky, unstable, high-maintenance laser systems are quickly becoming a thing of the past. Legacy laser systems are being replaced with better sources, components and total systems, bringing more robust laser processes to production environments. It’s an amazing time to be alive when technology rapidly changes and enhances our lives in so many ways. The digitalization of widgets proves there is no doubt that technology has changed the way we work, think and play, forever. And industrial laser systems are part of the incredible leaps and bounds technology is making in this modern age.
CO2, Nd:YAG, fiber lasers
The CO2 and Nd:YAG lasers are mature technologies that still serve several industrial markets. The technology is well established, trusted and relatively easy to manage effectively. However, the fiber laser offers some advantages that legacy systems do not, such as higher-quality beams, higher wall-plug efficiency, relatively lower cost of ownership, and less dependency on frequent routine maintenance schedules. Fiber laser systems are still somewhat limited compared to CO2 systems; for example, the thicknesses of metals that the laser can effectively cut. CO2 lasers are preferred for cutting applications where the material is thick, and cost less for this type of processing. Nevertheless, fiber lasers could possibly replace CO2 two-dimensional cutting systems in the not-too-distant future and are still the current best choice for cutting thinner materials.

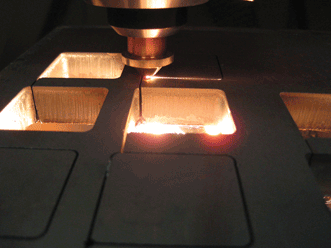
Fiber lasers could possibly replace CO2 lasers for 2D sheet metal cutting applications in the near future.
Application developers have enjoyed the advances in fiber laser technology, especially as power levels continue to climb. There doesn’t seem to be an end in sight, nor does there seem to be a limit to the development of even more applications, especially at high power levels.
Most recently, automotive manufacturers have begun using higher-power fiber lasers in remote welding applications. These applications typically use relatively larger spot sizes to accommodate the long-focal-length optics. The lasers have helped supply higher power densities at the workpiece. High-power fiber lasers are also used in laser drilling systems where high-energy peak powers have historically been provided by Nd:YAG lasers.
The problem of focus shift
Naturally, technology advances have presented some challenges to those developing not only the laser sources but also the components used in the systems. For instance, fused-silica transmissive optics have been used for years to deliver and shape 1-µm-wavelength laser beams.

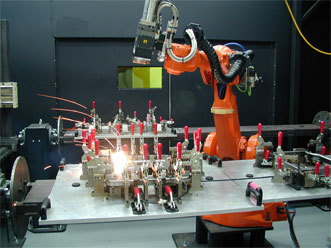
A robot with a remote-welding scan head delivers a fiber laser beam to an automotive welding application.
Some limitations exist when high-power fiber laser light is applied to transmissive optics: Thermal changes to fused silica can cause a shift in the delivered focal plane of the incident laser beam. Focus shift happens when nonlinear heat applied to the optic causes that optic to lose its shape. As optical materials heat up, the index of refraction changes, causing spot sizes to grow and the focus or minimum spot size to change in location along the propagation axis, as well as the lateral X,Y plane. This can cause significant problems in materials processing.
Reflective optics are now being used by some to combat the problem of focus shift, with metal reflective optics already enjoying some success in this application. Most reflective-optics-based processing heads still have a transmissive optic for the protective cover glass. This cover glass can also introduce thermal lensing effects.
Although the high-power fiber laser has solved some problems for industrial laser users, it doesn’t produce a completely problem-free process. In addition to the issues already mentioned, it is subject to aging and eventual failure. Therefore, these lasers require regular monitoring and control to ensure a uniform laser process over long periods and to help prevent catastrophic failure of laser system components.
Laser measurement techniques
Laser users have tried many methods to measure laser systems in an attempt to better understand their behavior, with the goal of controlling the process to which the laser is being applied. Measurement products such as a thermopile power puck and the laser mode plate give an indication of how the laser is performing at a given point in time, but they do not provide the laser technician with a complete understanding of the laser’s characteristics, because the data is incomplete. The power puck provides a single data point describing the intensity, and the laser mode plate provides an image of the cross-section distribution of the laser intensity, which is subject to human interpretation.
Water-cooled thermopile- and calorimeter-based laser-power sensors are currently the best way to verify that the power intended to reach the workpiece is indeed doing just that. The introduction of the first commercially available 100-kW fiber laser allowed those who develop laser measurement technology the opportunity to introduce the industry’s first commercial 100-kW power meter based on calorimetric principles. Measurement accuracy of ±5 percent can be achieved with such a device. By using a system that can measure laser power over a long time, the laser user can better understand how the system is performing and adjust process parameters accordingly.
With respect to beam-quality measurement, even modern technology paints a vague picture of how the laser performs with respect to the problem of focus shift, because these systems typically measure a single pane. Electronic methods of laser measurement that intrude on the laser beam – especially at the high power densities produced by modern fiber lasers – can result in inaccurate measurements, damage or failure of the equipment.
With increasing fiber laser powers, current laser measurement techniques simply cannot supply the user with all the necessary data for control of the laser application. But how can a laser be measured without coming into some kind of contact with the beam?
Noncontact laser-beam measurement
Rayleigh scattering does more than make the sky blue: It can also be used for noncontact laser-beam measurements. Rayleigh scattering from focused lasers produces a signal strong enough, even at around 1-µm wavelengths, to be detected with a silicon-based camera. When the camera is coupled with a telecentric lens that views the laser beam waist from the side, the image produced can be directly correlated to the behavior of the laser. Measurements can correlate the spot size through the laser caustic, providing immediate information about beam propagation and focusing.
This information is available as soon as the laser is turned on, so it allows for real-time measurement of these laser characteristics, including the focused spot location over time. If focus shift occurs, the amount of shift and the rate of shift can also be measured. Because the system does not come in contact with the laser, these properties are not changed in any way by the measurement device. In addition, there is no specified upper limit at which the product can measure these laser properties.
Noncontact laser-beam measurement has resulted in data that, for the first time, is giving users of high-power fiber lasers greater insight when issues arise in commonly used applications, as well as allowing development of new applications. It is quickly being realized as a tool that could help solve many of the problems that higher-power fiber users experience.
Handling focus shift
EWI of Columbus, Ohio, has used the BeamWatch laser measurement system from Ophir to test its patented, high-power reflective focusing optics and received never-before-captured results related to focal shift of its products and other products in the market.

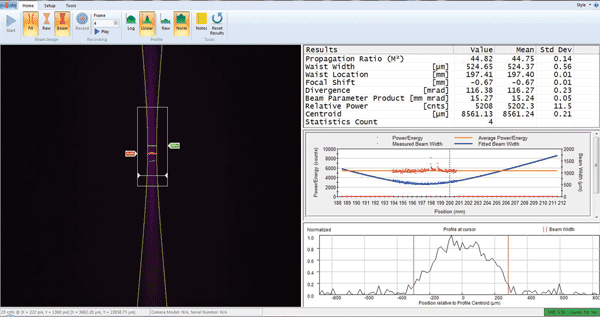
This technician’s interface for Ophir-Spiricon’s BeamWatch beam analyzer shows beam waist location, width and focal shift.
Automotive laser users who employ remote welding techniques know that viewing and measuring the focused spot location in real time allows them to more effectively and accurately develop laser applications with actual power densities ensured throughout the process. This technology can be used to qualify the components being integrated into the laser and work cells, and permits certification of the cell during system runoff – before installation. The technology is also valuable for periodic checks, including laser power checks, to ensure a stable, consistent laser process over long periods of time. Periodic checks can guarantee a stable process over the life of the work cell.

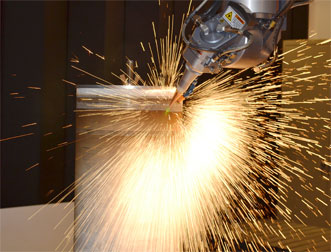
Fiber lasers in aerospace drilling applications require frequent verification of laser power.
Aviation and aerospace users of drilling lasers could use this new data-collection method to help measure focused spot location over time more accurately than traditional methods. The location of the focused spot with respect to the part is critical with drilling applications. Often, the parts being processed will number more than several thousands, and could contain tens or even hundreds of thousands of holes. These holes must be as identical in shape and depth as possible, and the power density applied to the material is critical for this to happen. Frequent verification of laser power is already a standard practice at these drilling facilities, but until recently, verifying the real-time location, intensity and size of the focused spot had not been possible. A noncontact, in-line measurement tool that does not affect the laser beam is the best possible solution.
There is no doubt that the fiber laser has changed the game for industrial laser applications. By helping to provide more reliable, efficient, robust processes, fiber lasers ensure a continued home for industrial laser processes in modern manufacturing.
For many, the concepts behind the control and improvement of the process, regardless of the type of laser employed, remain the same. Process improvement must start with control, and control must start with measurement.
Meet the author
John McCauley is a product specialist for Ophir-Spiricon’s laser measurement systems in Indianapolis; email: [email protected].