W. James Stemp, Keene State College; Harry J. Lerner, Laval University; and Elaine H Kristant, Harvard University
Laser scanning confocal microscopy and relative area are effective tools for surface-roughness analysis of experimental Mistassini quartzite scrapers.
Laser scanning confocal microscopy (LSCM) and relative area (RelA) are effective tools for the documentation and discrimination of surface roughness on experimental stone tools made from Mistassini quartzite. Together, their ability to effectively document and discriminate wear on these experimental tools offers archaeologists another method for studying past uses of chipped quartzite artifacts.
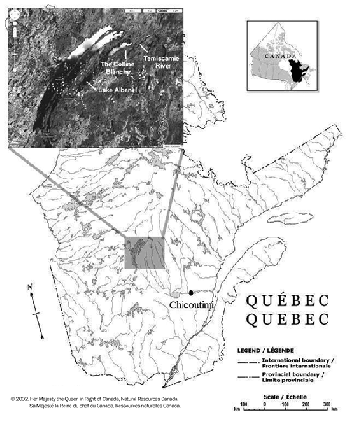
Figure 1. Map of the source location of Mistassini quartzite in the Colline Blanche formation in central Quebec, Canada. Photo courtesy of H.J. Lerner.
LSCM is an objective and reliable method for measuring worn and unworn surfaces on this type of silicate stone. A scale-sensitive algorithm such as RelA not only provides a mathematical characterization of surface roughness over multiple scales, but also allows for direct comparisons of different quartzite surface microstructures such that statistically significant discrimination using the F-test (comparative statistical test) is possible.
The purpose of this case study was to determine the effectiveness of a measurement system to document the surface roughness of experimental Mistassini quartzite scrapers used on two different contact materials (fresh and dry deer hide). The laser scanning confocal microscope used was the Olympus LEXT OLS4000.
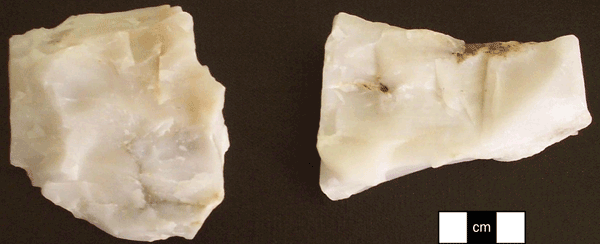
Figure 2. Coarser-grained Mistassini quartzite (left) and finer-grained Mistassini quartzite (right). Photo courtesy of H.J. Lerner.
This study incorporated a mathematical algorithm that permitted the discrimination of surface roughness based on comparisons at multiple scales. This case study specifically employed measures of RelA coupled with the F-test to discriminate used from unused stone tool surfaces, as well as surfaces of quartzite scrapers used on dry and fresh deer hide. Results further demonstrated the effect of raw material variation on use-wear formation and its documentation using LSCM and RelA.
The four scrapers analyzed in this case study were originally manufactured and used as part of an earlier study on the prehistoric use of Mistassini quartzite from a geological formation known as the Colline Blanche, located along the Temiscamie River in south-central Quebec, Canada (Figure 1).

Table 1. One scraper produced from each of the two cores was used on either dry hide (DH1, DH2) or fresh hide (FH1, FH2). Photo courtesy of W.J. Stemp.
Two of the quartzite scrapers used here were made from one Mistassini quartzite core (Core A), while the other two were made from a second core (Core B) (Figure 2). Core A possesses a coarser-grained crystalline structure than Core B, despite procurement from the same outcrop, thus representing the kind of intrasource variation noted above. One scraper produced from each of the two cores was used on either dry hide (DH1, DH2) or fresh hide (FH1, FH2) (Table 1). The scrapers initially were manufactured through straightforward hard-hammer reduction using stone percussors and were unifacially retouched on the distal end to conform to the standard pattern of scraper production at the Chicoutimi site, the archaeological focus of the earlier case study.
The four distally retouched flakes were hafted in straight wooden handles 15 to 18 cm in length. Both the fresh and dry deer hides were extended across sheets of plywood and nailed down to restrict their movement during use (Figure 3).
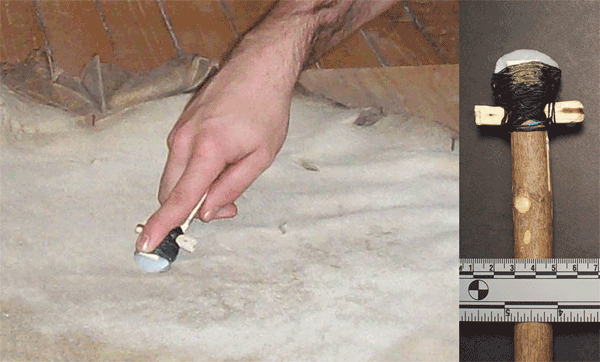
Figure 3. Hafted quartzite scraper (DH1) used to scrape dry deer hide mounted on a plywood board. Photo courtesy of H.J. Lerner.
The hide scraping was performed in as controlled a manner as possible. Although hide-working can involve several different use motions, the original experiment was limited to transverse unidirectional motions (i.e., movement perpendicular to the utilized edge) in which the tool edge was drawn toward the user in a consistent one-stroke movement at a working angle of 45°. The edge was then picked up after covering a distance of roughly 15 cm with each stroke, and the motion was repeated until the experiment time elapsed (Figure 4). Each tool was used at a rate of one stroke per second, a total of 7200 strokes after 120 minutes of use.

Figure 4. Schematic diagram of the setup used to experiment on quartzite scrapers. Photo courtesy of H.J. Lerner.
After each stage of the initial scraping experiments, all tools were subjected to a multistage cleaning regimen to allow for accurate and reliable analyses of wear accrual patterns. This process began with washing each tool in a mixture of warm water and mild detergent to remove all visible residues and debris. This was followed by the manual cleaning of each tool with a 30 percent sodium hydroxide (NaOH) solution. Lastly, each tool was rinsed with distilled water to remove any contamination associated with previous handling of the implements. Prior to measurement using the LSCM, the quartzite scrapers were removed from their handles and rewashed in warm water with a mild, grit-free detergent, and subsequently rinsed and left to air-dry.
As with similar technology, including atomic force microscopy1,2 and focus variation microscopy,3,4 LSCM allows for the visual observation of the actual stone tool surface, similar to a metallurgical microscope,3,5-8 and can produce both 2-D (Figure 5) and 3-D scanned images of the observed surface based on the mathematical documentation of the varied elevations of the surface on a microscale.
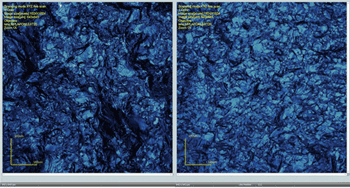
Figure 5. Olympus LEXT OLS4000 screen shots of area scans (20× objective) of the surfaces of scrapers used on fresh hide (UFH1) (left) and dry hide (UDH1) (right). The X- and Y-axis dimensions are 643 × 643 μm (1024 × 1024 pixels). Photo courtesy of W.J. Stemp.
To measure a surface, a laser scanning confocal microscope creates images using reflected laser light from a discrete focal plane. Only the laser light reflected back from the measured surface, from the focal plane through a pinhole aperture in front of a photomultiplier, is used to record topographical structure.9 The LSCM used in this study produces the incident light using a 405-nm laser that is scanned across the measured surface by way of a microelectromechanical resonant galvano mirror. To produce slices of measured sections of the surface, the objective lens on a motorized head focuses the laser onto surface points of variable vertical distance. The microscope used in this work has a vertical-scale (Z-axis) resolution of 0.8 nm and a height display resolution of 1 nm. It includes a range of objectives from 20× to 100×, of which the 20× objective (0.60 NA) was used for this experimental surface documentation. The number of vertical slices the laser takes of the surface varies depending on the peak-to-valley distance on the surface, the objective used and the pitch, which was set at 0.06 (fine pitch) for the measurement of the quartzite scraper surfaces.

Each quartzite scraper was placed on the LSCM’s motorized stage for surface measurement. In each scraper’s used and unused regions, six different area scans (643 × 643 μm) were taken for a total of 48 area scans (12 for each tool). To properly quantify changes in surface roughness, each area-scan location measured on each quartzite scraper was calculated in terms of RelA on a log scale. The effectiveness of the RelA algorithm (see Equation 1) is based on its calculation of surface roughness at multiple scales. This is dependent upon both the order and spacing of a surface’s microtopographical features, such that RelA is the ratio of the calculated area (CA) of the measured surface divided by the nominal area (NA) of that surface.10
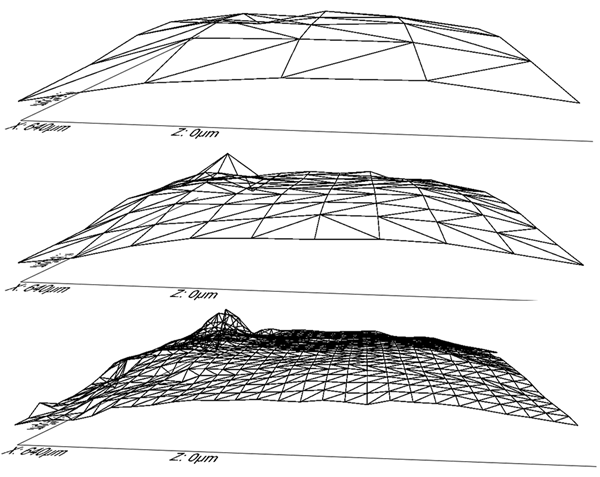
Figure 6. Area-scale analysis using tilings shown on three identical simulated surfaces. The surface areas are covered by 32 (top), 162 (middle) and 1355 (bottom) tiles, giving calculated areas (CAs) of 12,109, 2450 and 282 μm2, and relative areas of 1.0002, 1.0004 and 1.000756.
This algorithm calculates the change in apparent, or calculated, area with respect to the scales of observation, or calculation, by a series of virtual tilings, as demonstrated in Figure 6. For this study, Sfrax was used to process the data. RelAs were compared using the F-test to determine whether discrimination of surface roughness was possible.11 In these experiments, the scales at which the confidence level is high (above 95 percent), as indicated by the mean square ratio (MSR), are the scales at which the tools can be discriminated based on RelA.
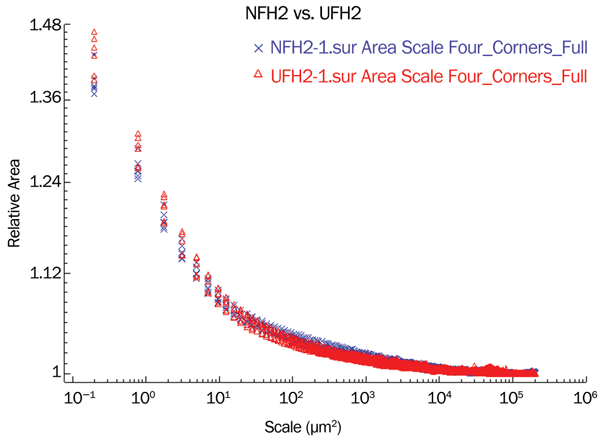
Figure 7. The relative areas vs. scale for the six area scans in the used (? = UFH2) regions and the six area scans in the unused regions (X = NFH2)of the quartzite scraper (FH2) used on fresh hide. Photo courtesy of E.H. Kristant.
Experimental results
The results of this case study are interesting in terms of the ability to discriminate use-wear on quartzite scrapers and the role of lithic raw material in the wear-formation process. The data from the surface-area scans demonstrates that the RelAs for both used and unused surfaces for all regions increase as the scale of calculation decreases, as demonstrated for the second scraper (FH2) used on fresh hide (Figure 7).
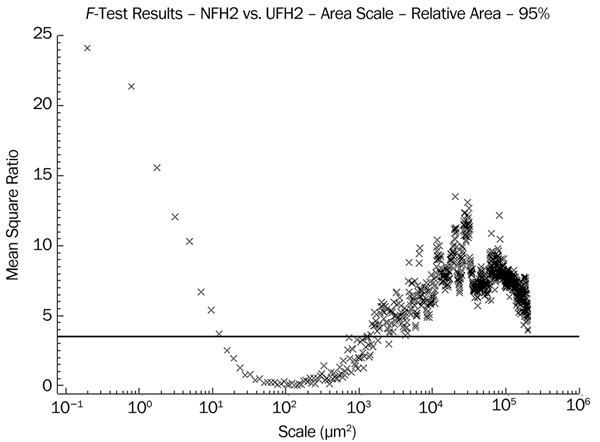
Figure 8. The MSRs for the relative areas of the unused vs. used regions of a scraper (FH2) used on fresh hide. The horizontal line indicates 95 percent confidence level for discrimination. Photo courtesy of E.H. Kristant.
The measures of RelA can distinguish used from unused surfaces on the same tool, and the MSR of these RelAs demonstrates that discrimination of the used from unused regions is possible above the 95 percent confidence level for each of the four scrapers – but that the scales over which discrimination is possible vary by tool. For example, discrimination of the used versus unused regions on scraper FH2 is possible at fine and coarse scales using the F-test (Figure 8), whereas this is possible only at fine scales for scraper DH2 (Figure 9). Discrimination of used versus unused surfaces on each scraper is based on the premise that surface-roughness differences are the result of wear accrual through contact with hide on the used part of the scraper.
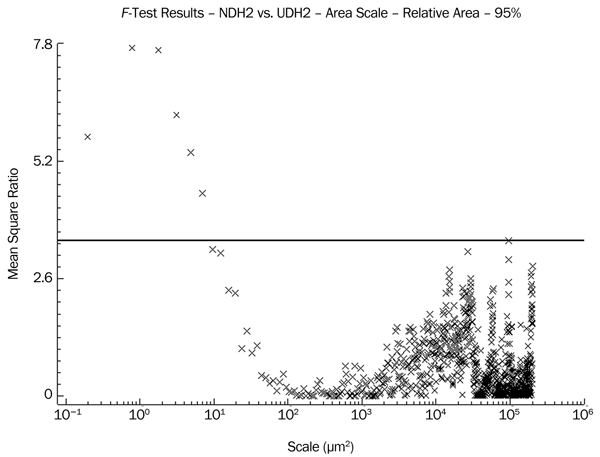
Figure 9. The MSRs for the relative areas of the unused vs. used regions of a scraper (DH2) used on dry hide. The horizontal line indicates 95 percent confidence level for discrimination. Photo courtesy of E.H. Kristant.
The mean RelAs of the six area scans from the used regions of each of the four quartzite scrapers can also distinguish the tool surfaces from each other based on wear. This becomes increasingly distinct as the scale of measurement decreases (Figure 10).
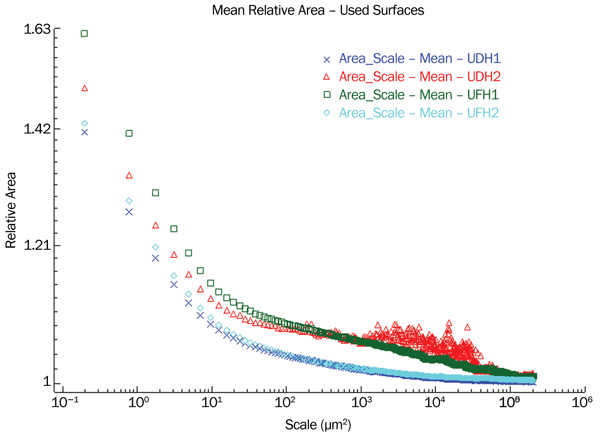
Figure 10. The mean relative areas vs. scale for the six area scans in the used regions of the two scrapers used on dry hide (X = UDH1, ? = UDH2) and the two scrapers used on fresh hide (X = UFH1, ◊ = UFH2). Photo courtesy of E.H. Kristant.
If the MSRs for the comparisons of the worn regions of the scrapers used on different contact materials are considered in terms of the cores from which they were produced, differences can be observed between the tools made from finer-grained and coarser-grained quartzites. The scrapers made from finer-grained quartzite (UDH1 and UFH2) can be distinguished above the 95 percent confidence level at scales of roughly 101 to 100 μm2, with MSRs in the 3.5 to 5 range (Figure 11), but the scrapers made from coarser-grained material (UFH1 and UDH2) are discriminated at scales of about 102 to 10−1 μm2 with a much different MSR range (Figure 12). Since all four scrapers were used for the same length of time, these results suggest that the differences in the structure of the raw materials (i.e., cores) themselves affect wear formation and the consequent surface roughnesses documented using the LSCM.
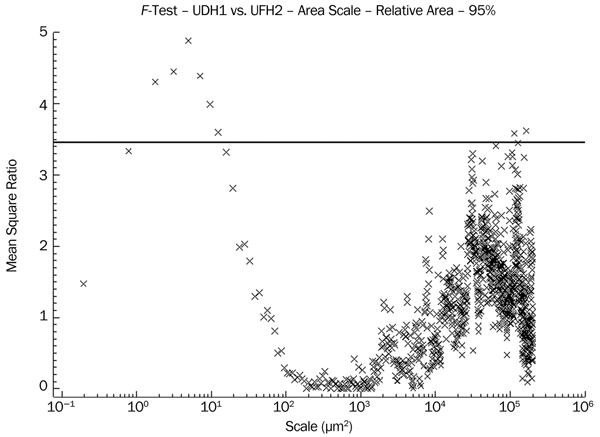
Figure 11. The MSRs for the relative areas of the used region of the quartzite scraper (UDH1) used on dry hide vs. the used regions of the scraper (UFH2) used on fresh hide. The horizontal line indicates 95 percent confidence level for discrimination. Photo courtesy of E.H. Kristant.
Usefulness for archaeology
Given the results of this case study, LSCM and RelA can be considered effective for the documentation and discrimination of surface roughness on experimental stone tools made from Mistassini quartzite. Specifically, these experimental results demonstrated that:
1. The RelAs, as calculated by area-scale fractal analysis, are well behaved with respect to the evaluation area (i.e., sample size).
2. RelAs are capable of discriminating the tools’ used regions at finer scales, whereas unused regions that represent the unmodified fractured surface microtopography of the quartzite scrapers can be discriminated at medium-to-coarser scale ranges.
3. RelAs effectively discriminate the worn surfaces of the quartzite scrapers used on fresh hide from those used on dry hide.
4. The quartzite scrapers used on the two different contact materials (dry and fresh hide) demonstrated the greatest discrimination based on RelAs at the finer-area scales, with the most significant mathematical discrimination occurring between 102 and 10−1 μm2 based on the MSRs.
Although further testing of this method is needed on additional experimental tools made from quartzite, preliminary experiments provide encouraging results that will enable future work focusing on the quantification of lithic use-wear on stone tools recovered from archaeological deposits.
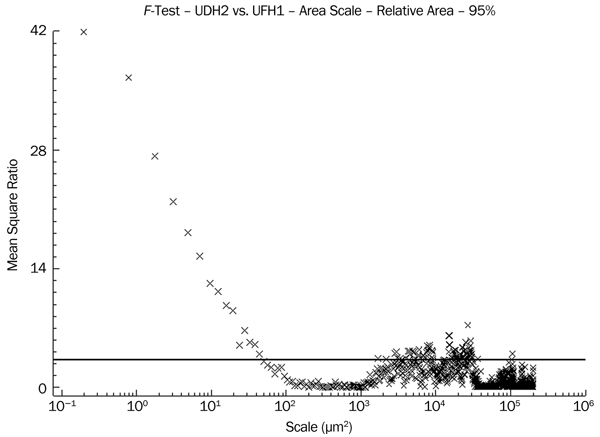
Figure 12. The MSRs for the relative areas of the used region of the quartzite scraper (UDH2) used on dry hide vs. the used regions of the scraper (UFH1) used on fresh hide. The horizontal line indicates 95 percent confidence level for discrimination. Photo courtesy of E.H. Kristant.
Meet the authors
Dr. W. James Stemp is director of the Surface Metrology and Archaeological Research Technologies Project in the department of sociology, anthropology and criminology at Keene State College in New Hampshire; email: [email protected]. Dr. Harry J. Lerner is a postdoctoral research fellow in the Faculty of Letters, CELAT, at Laval University in Quebec City; email: [email protected]. Elaine H. Kristant is a senior mechanical and systems lab engineer, Harvard School of Engineering and Applied Sciences in Massachusetts; email: [email protected].
Acknowledgments
The authors thank the following for their assistance in this research: Dr. Michael Bisson of McGill University in Montreal; Patrick Eid, a graduate student at the University of Montreal; Vincent Rousseau, an undergraduate (now graduate) student at Laval University; and students from Worcester Polytechnic Institute. Special thanks go to Dr. Christopher A. Brown, director of the Surface Metrology Lab in the mechanical engineering department at Worcester Polytechnic Institute, for use of the Olympus LEXT OLS4000 laser-scanning confocal microscope; and to Surfract for use of Sfrax software for calculation of RelA and the F-tests.
References
1. N.R. Faulks et al (2011). Atomic force microscopy of microwear traces on Mousterian tools from Myshtylagty Lagat (Weasel Cave), Russia. Scanning, Vol. 33, pp. 304-315.
2. L.R. Kimball et al (1995). Microwear polishes as viewed through the atomic force microscope. Lith Technol, Vol. 20, pp. 6-28.
3. A.A. Evans and D. Macdonald (2011). Using metrology in early prehistoric stone tool research: further work and a brief instrument comparison. Scanning, Vol. 33, pp. 294-303.
4. D.A. Macdonald (2014). The application of focus variation microscopy for lithic use-wear quantification. J Archaeol Sci, Vol. 48, pp. 26-33.
5. A.A. Evans and R.E. Donahue (2008). Laser scanning confocal microscopy: a potential technique for the study of lithic microwear. J Archaeol Sci, Vol. 35, pp. 2223-2230.
6. W.J. Stemp and S. Chung (2011). Discrimination of surface wear on obsidian tools using LSCM and RelA: pilot study results. Scanning, Vol. 33, pp. 279-293.
7. L.H. Keeley (1980). Experimental determination of stone tool uses: a microwear analysis. Chicago: University of Chicago Press.
8. P.C. Vaughan (1985). Use-wear analysis of flaked stone tools. Tucson: University of Arizona Press.
9. C.J.R. Sheppard and D.M. Shotton (1997). Confocal laser scanning microscopy. Oxford: BIOS Scientific Publishers.
10. ASME B46.1. 2009. Surface texture (surface roughness, waviness, and lay): an American National Standard. New York: American Society of Mechanical Engineers.
11. C. Lipson and N.J. Seth (1973). Statistical design and analysis of engineering experiments. New York: McGraw-Hill.