Printed parts are subject to quality issues, thermal stresses, and distortions that can be closely monitored with IR cameras.
CHRIS BAINTER, FLIR SYSTEMS INC.
3D printing is revolutionizing manufacturing. Also known as additive manufacturing (AM), 3D printing is unlike traditional machining techniques because it uses computerized or digital models to generate simple parts and complex components, and adds material only where it is needed. A growing number of high-tech organizations around the globe are pioneering AM technologies to use in their own applications, which range from product development to specialized manufacturing, in ways as diverse as architectural design, aerospace components, and medical implants. Already, NASA has sent two different 3D printers to the International Space Station specifically designed to operate in zero gravity.
The advantages of 3D printing are numerous; it allows for far greater design flexibility, decreased energy consumption, reduced waste, and shorter time to market. But it is not a silver bullet technology. Printed parts are subject to quality issues, thermal stresses, and distortions that can be difficult to diagnose.
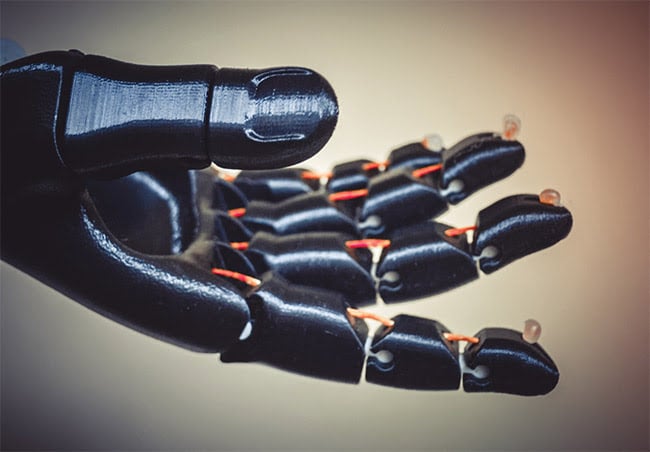
Courtesy of iStock.com/Marina_Skoropadskaya.
By studying the printing process and its thermal properties with IR cameras, manufacturers have been able to make quick corrections with minimal production delays. IR cameras, whether traditional or high-speed, can assist in the discovery and diagnosis of potential problems, and can help manufacturers determine where changes must be implemented to maintain product uniformity and quality.
The advantages of 3D
printing are numerous,
but it is not a silver bullet technology.
While most additive manufacturers today use metal- or polymer-deposition technology, researchers are experimenting with a variety of base materials, from carbon-fiber-reinforced thermoplastics to living cells. These materials have proven to be challenging, and researchers are utilizing IR cameras in an effort to improve AM processes and better understand their potential failure points.
Temperature matters
AM accommodates a vast range of applications, from cars to nanoscale optical components, and a vast range of materials, from thermal plastics to living biofluids — creating numerous challenges to resolve.
Additively manufactured parts can suffer from low quality, which is most often due to an unknown cause-and-effect relationship between a manufacturing process parameter, such as a polymer filament needing to be heated to a specific temperature, and process characteristics, such as part geometry and significant distortion as a result of cooling rate. Too often, process parameters are set using trial-and-error techniques, which are time-consuming, costly, highly subjective, and machine- and/or material-specific.
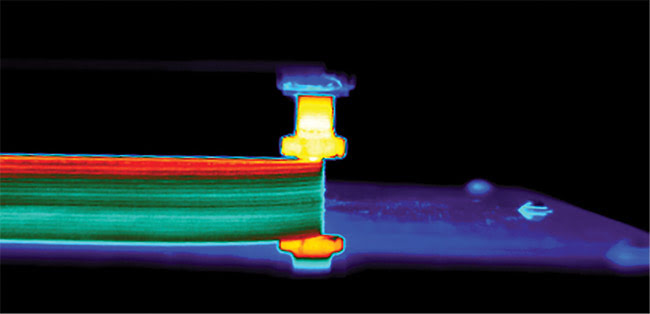
Figure 1. Thermal image of a carbon-based polymer additive manufacturing (AM) process. Shown is the thermal variation in the sidewall of the test piece as it is built from top to bottom. The hot extruder head shows as yellow, which is hotter than the test piece. Courtesy of FLIR.
Independent of the AM technology, heat also is an integral part of the process and must be monitored closely for consistent results. Thermal stress may result from the internal temperature of
the enclosure or the temperature of the material being deposited. Additional thermal considerations include the need to quickly and accurately monitor the rate at which parts cool, the temperature of processing equipment and materials, and in-process part temperatures (Figures 1 and 2).
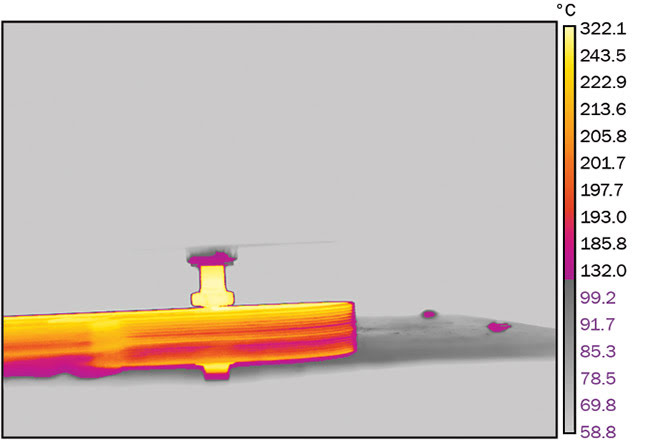
Figure 2. Thermal image of a carbon-based polymer AM process. The higher contrast image helps show a band material that is hotter than the layers above and below it. This uneven temperature distribution can lead to warping. Courtesy of FLIR.
Traditional temperature measurement devices, such as thermocouples, resistance temperature detectors (RTDs), and thermistors, have proven to be unsuited for monitoring in today’s dynamic, high-speed, 3D environments for two primary reasons: They require physical contact with the surface being measured, and they offer only a single reference point of temperature data, prohibiting users from properly characterizing temperatures of either individual parts or the process.
Taking control of the process
IR cameras, because of their high thermal sensitivities (down to 0.018 °C) and small spatial resolution capabilities (as small as 3.5 µm per pixel), are able to monitor the effect of changes to printer settings and base materials. And, because they offer noncontact temperature measurements of up to 1 million points in a single thermal image, IR cameras are capable of identifying sources of quality problems, including part porosity, delamination, shrinkage, poor surface finish, dimensional or form errors, and thermal stresses and distortion.
New high-speed
IR cameras have the ability to run integration times
as fast as 1 µs, providing the necessary frame rates to meet the demands of high-speed applications.
Real-time detection of porosity is a universal challenge faced by manufacturers. If, for example, parts are printed with an electron-beam system and exotic powder-based metals, the electron-beam systems utilize precise melting of powder materials, enabling the creation of complex geometries, similar to those found in a prosthetic hand. If the beam is not focused correctly, a lower-than-expected energy level can result in inadequate melting of the individual particles, which then reduces bonding and increases porosity. An increase in porosity also can occur if the electron beam is too powerful. The resultant high heat will create a quick expansion of localized gases that may well cause material particles to be ejected prior to melting.
In these cases, high-speed IR cameras have been used successfully to detect pores in real time. Since the melted metal powder will have a lower emissivity than the nonmelted powder, the melted powder will appear cooler. The emissivity difference is easily visualized with an IR camera, which assists in the determination of uniform powder material melt or in the detection of voids or pores anywhere within the printed layers. This has proven especially useful for “dialing in” the correct 3D printer processing parameters — including anything from the electron beam size and power, to the melt pool temperature, to the rate of part cooling, to the preheat temperature of the feedstock — needed to prevent pore formation.
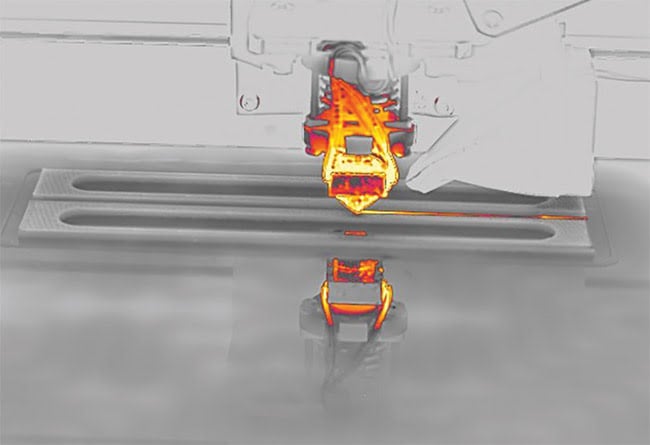
Figure 3. Thermal image of a polymer-based AM process using a FLIR High-Speed X6800sc camera running at 565 Hz. The application of a colorized gray-scale palette enables researchers to better understand the temperature of the extruder head and the cooling rate of the material being deposited on the existing structure.Courtesy of FLIR.
A polymer-based AM process is slightly different. When using polymer-based materials, it is advantageous to be able to measure temperatures of both the extruder head and the material as it comes out of the extruder nozzle. These types of applications are often considered high-speed events since the extruder head can reach speeds of 1800 mm per second or more, and process temperatures can change rapidly. Legacy forms of contact temperature measurement, such as thermocouples or RTDs, are impractical because they cannot provide discrete temperature measurements at the rate necessary to characterize thermal changes (Figures 3 and 4).
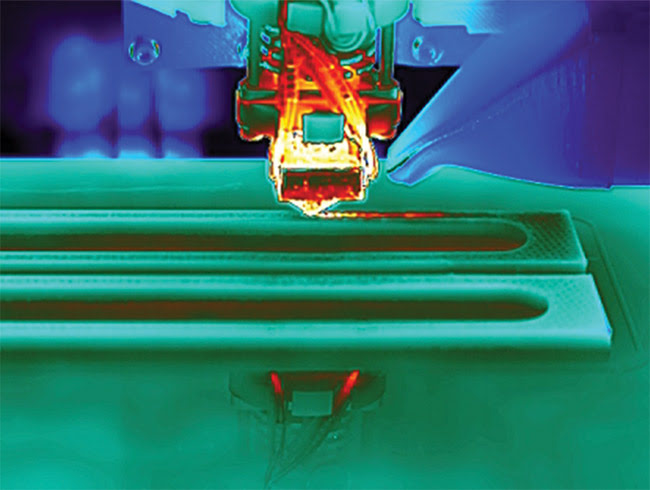
Figure 4. Thermal image of a polymer-based AM process using a FLIR High-Speed X6800sc camera running at 565 Hz. The full-color palette allows researchers to visualize the cooling rate of the entire part being created. Courtesy of FLIR.
The right tools
Not every application requires a high-speed IR camera, and an uncooled microbolometer-based IR camera can offer AM researchers capabilities suitable for specific measurement tasks. With frame rates up to approximately 60 fps, snapshot speeds of approximately 16 ms, and thermal sensitivities of 0.05 °C or better, standard IR cameras offer low-cost, compact, and externally or internally mounted options when monitoring the temperature of a slow-moving extruder tip during manufacturing, or parts after manufacturing.
IR camera accessories matter, too. As materials, parameters, part sizes, and processes can change from one machine or setup to the next, there is high demand for lenses, including telephoto, wide-
angle, standard focal length, and macro- or microscope. The adaptability of multiple lenses to a single IR camera enables system optimization for numerous applications and experimental set-
ups. Additionally, the availability of optional extension rings for the cooled IR camera, and their ability to provide different fields of view and much tighter focus distance when using just a single lens, expands the flexibility of these systems to meet nearly any temperature measurement scenario.
Recent advances in readout integrated circuits (ROICs) and cooled photon detector technologies have spurred the development of a new generation of commercially available high-speed IR cameras. The ability to record temperatures at speeds above 500 fps is often critical to researchers who rely on a camera’s ability to attain faster frame rates through subwindowing. Subwindowing is a technique internal to the higher speed cameras that allows the ROICs to read out a smaller subgroup of pixels on the IR detector, reducing the number of pixels per frame. This allows the camera to send out more frames per second, achieving the required higher frame rates.
New high-speed IR cameras are capable of recording >1000 fps and the ability to run integration times (snapshot speeds) as fast as 1 µs, which provides the necessary image capture times and faster frame rates to meet the demands of high-speed applications (Figure 5).
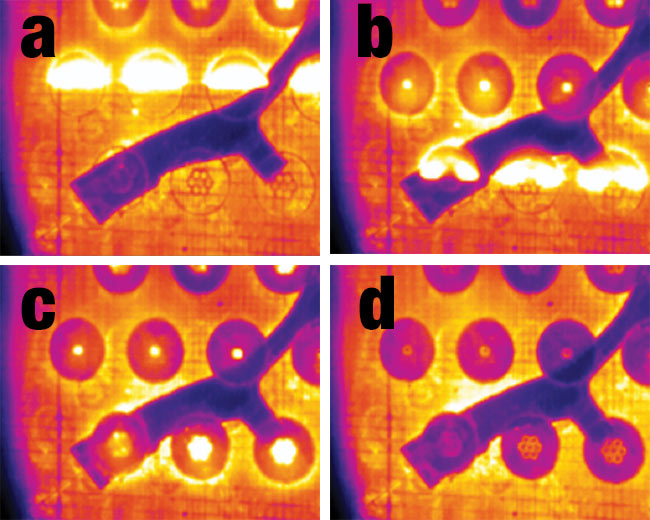
Figure 5. Thermal images of electron beam AM process using a FLIR A6750sc camera subwindowed to run at 1000 fps. The bright areas represent powder material being melted by the electron beam to build the structure. Image d shows that the layers created appear darker due to a lower emissivity value.Courtesy of FLIR.
The payoff
IR cameras can help researchers better understand the role of temperatures in the construction of 3D-printed components. They can be used to measure the temperature of each layer of a part as it is applied, show how the temperature of lower layers affects the bond strength between layers, and detect porosity in real time, allowing for better process control. IR cameras also can be used to measure the temperatures inside the build chamber and monitor the thermal gradients of the parts as they cool, helping to reduce distortion while increasing part uniformity and quality.
IR cameras are proving their value in advancing a wide range of emerging AM technologies by offering researchers and material scientists the accurate results needed to fine-tune materials, equipment, and process parameters while reducing development time and expenses. And, with AM expected to continue its rapid growth and adoption in the coming years, the use of IR cameras will be a key component in ensuring the processes are optimized to provide uniform, quality parts.
Meet the author
Chris Bainter is FLIR Systems’ global business development director for the Optical Gas Imaging, Premium Handheld, and R&D/Science business verticals, with over 18 years of experience in the test and measurement industry. He has a bachelor’s degree in computer engineering from Kansas State University and an MBA from the University of Southern California; email: [email protected].