In intelligence and surveillance applications,superior performance is a must.
Dr. M. Roman Hachkowski, Zygo Corp.
High-precision windows used for intelligence, surveillance and reconnaissance (ISR) applications can be as large as 0.9 m and must be transmissive at various visible and infrared wavelengths, with a significant focus in the IR. End-user applications range from high-altitude identification and surveillance of enemy threats, to naval sensing systems used onboard ships and submarines, to civilian systems used in law enforcement and on commercial aircraft.
Given the expanding capabilities of sensor technology and the increasingly stringent requirements of missions, ISR windows must exhibit superior performance with respect to transmitted wavefront error so as not to negatively affect overall system operation. Furthermore, performance must be maintained while the window withstands harsh environments such as blowing desert sand, high-speed aerial impacts and ocean conditions. The fabrication processes used to manufacture ISR windows will greatly influence the lifetime of the windows and the success of their missions. To maximize window strength and performance while providing extended mission lifetime, critical trade-offs must be considered when selecting the window material, shape and manufacturing process.
Six requirements
In manufacturing an ISR window, six critical requirements that directly influence application performance must be considered:
• Provide a large clear aperture relative to overall part size
• Maintain defect-free edges and optical surfaces
• Manage subsurface damage and window perimeter conditions
• Monitor overall wavefront performance
• Assess material properties: strength, birefringence, transmission
• Determine coating performance and durability
Other important factors include delivery time of specialized materials such as Cleartran, sapphire, high-quality silicon and fused silica. One also may want to include extended fabrication time required for window sizes larger than 0.3 m.

Shown is an 8 × 3-in. sapphire window with polished bevels and edges.
As with any manufacturing process, the first step is inspection of incoming material. Critical delivery risk can be mitigated by using large-aperture Fizeau interferometers ranging from 102 mm to 0.8 m in diameter to qualify the bulk optical material or identify issues that could be problematic during fabrication.
The next step in fabricating ISR windows is the control of edge surfaces during the computer numerical control (CNC) process. During this step, it is necessary to machine-edge surfaces that are free of fractures and chips while producing a fine-ground surface that is close to being specular, which is a measure of being fracture-free. Because windows are fabricated from either glasses or ceramics that have high bulk material strength, the absence of edge fractures enables the window strength to be near the innate bulk material strength. Because many of the IR/VIS materials also have significant birefringence effects, it is necessary that these operations do not introduce additional material stress that will affect wavefront performance.
After CNC operations, both surfaces of the window undergo grinding and polishing. An efficient grinding process must exhibit significant material removal and must not introduce additional subsurface damage or local surface defects. To achieve this, one can employ a multistage process that uses various grinding techniques or a highly refined grinding process that offers significant material removal rates while meeting the subsurface damage criteria.
Because polishing processes have the lowest material removal rates, high-speed polishing can be used to remove any remaining subsurface damage layers quickly. High-speed polishing has limited figure control, so one must include either single- or double-sided polishing and/or computer-controlled polishing as part of the final process to correct the remaining figure errors. It is at this time that the effects of stress from coating or grinding must be compensated for to maintain surface figure. Again, full-aperture high-resolution interferometry is desirable to guarantee overall quality.

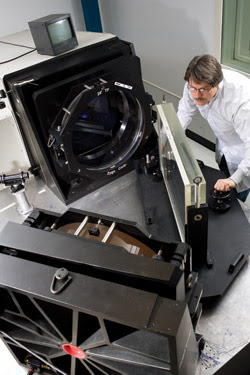
This 2-in.-aperture Fizeau interferometer measures optic wavefront error.
Because optical material costs are often greater than fabrication costs, there is an emphasis throughout the manufacturing process on proper equipment and handling procedures. Any minor damage to the optics affects both the performance requirements and delivery schedule, which will have a detrimental impact on the overall program schedule. Extensive processes and material handling capability are a must to mitigate damage or scrapping of production optics. Throughout all of the fabrication work areas, overhead cranes and lifts as well as specialty tooling are installed to ensure that all optic moves and lifts are operator- and glass-safe.
The final polishing process (preferably deterministic) requires simultaneous solving of three nonlinear equations to satisfy the customer’s physical requirements for thickness, subsurface damage layer and wedge, while ensuring that the surface/transmission wavefront errors are minimized across a range of spatial frequencies. This also ensures that final surface roughness and defect requirements are met. If any of these nonlinear relationships do not converge at the same time, the final polishing process time can be greatly affected.
Gaining control
By implementing deterministic polishing processes, one gains added control of the subsurface damage layer as well as of the subsurface deformation layer within the optics. All of these procedures increase performance in many of today’s most demanding ISR applications.
Another requirement growing in demand is the need to apply complex coatings and/or electromagnetic grids to the optical surface(s). These additional treatments greatly influence the surface/transmissive qualities of the window by introducing shear stresses to the entire surface. These stresses “pull” the optical surface and change the shape and wavefront performance of the window. Analytical tools and fabrication techniques remove these effects by imparting or imprinting the conjugate (or negative) shape into the surface so that it is flat after the coating application.

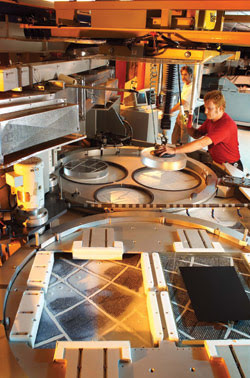
Technicians man a 168-in.-diameter single-sided continuous-polishing work center.
The last critical element in the fabrication of ISR windows is extensive surface inspection. The results from this inspection process support optical specifications as well as the bulk strength necessary to meet the mission dynamic requirements.
By focusing on the various fabrication and metrology issues, manufacturers can deliver optics that not only meet the system’s performance requirements but also expand the mission capability of the payload while providing the benefits of an extended life cycle. If manufactured properly, ISR windows can be exposed to high dynamic loads and extreme environmental conditions whether on the ground, at sea or in the air. These windows will continue to exhibit superior performance with respect to transmitted wavefront error so as not to limit the sensing qualities of the internal payload behind the windows. The windows that are the final result will greatly influence the success and lifetimes of their missions.
Meet the author
M. Roman Hachkowski is optical products and technology director at Zygo Corp. in Middlefield, Conn.; e-mail: [email protected].