Laser-based techniques and precision glass molding bypass time-consuming steps in conventional optics production.
CHRISTIAN SCHINDLER AND THOMAS KÖHLER, CARL ZEISS JENA GmbH
The emergence of freeform surfaces for mid- and high-performance optical systems is a major development in optics due to the lack of rotational symmetry that is the hallmark of freeform optics. Yet this same freedom of design causes headaches for manufacturers, because sphere and asphere production relies heavily on rotational symmetric processes and metrology.
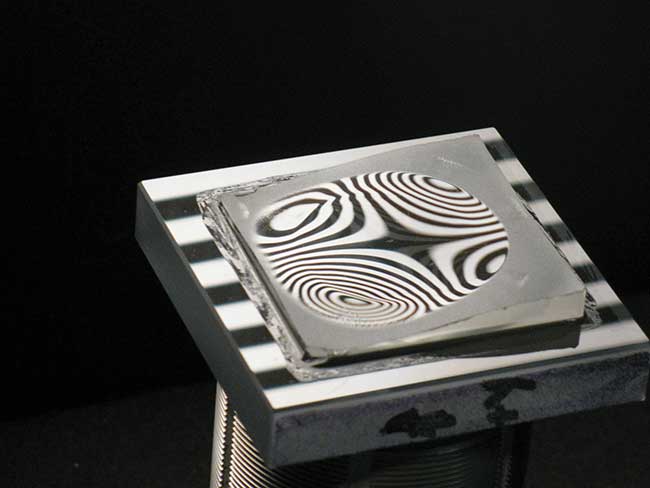
An Alvarez freeform, reflecting a screen with stripes. Photograph by Christian Seiler. Courtesy of Carl Zeiss.
Adapting existing production methods to freeform optics must go beyond simply extending machine capabilities and software; it necessitates completely new process chains. Research into developing new, cost-efficient production methods needs the close collaboration of optics designers and manufacturers.
The following are scenarios in which classical technologies were replaced; in others, new process chains were adopted.
Tight tolerances
Consider Alvarez-type freeform optics, used in a variety of applications such as diffraction-limited universal wavefront manipulators. This type of freeform requires both a high diameter-to-thickness aspect ratio and tight tolerances. To address this, manufacturers generally employ materials with a high refractive index — materials often the most demanding to process.
There is a vast range of freeform optical imaging components, all with different requirements for quality, price, and quantity. And depending on these criteria, different manufacturing techniques come into play (Figure 1).
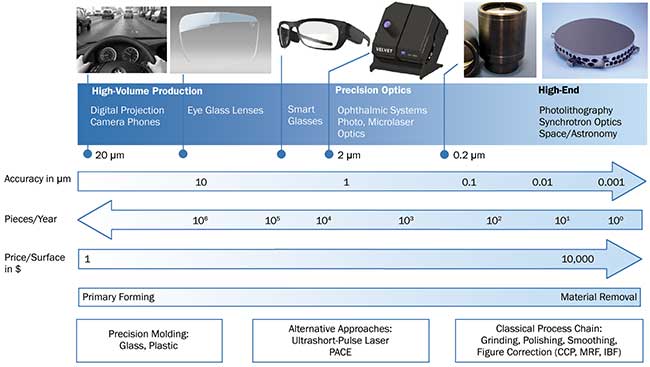
Figure 1. Freeform fabrication, volume vs. accuracy. PACE: plasma-assisted chemical etching; CCP: computer-controlled polisher; MRF: magnetorheological finishing; IBF: ion beam figuring. Graph by Norbert Kerwien. Courtesy of Carl Zeiss.
Alvarez-type freeforms are classified as precision optics in terms of quality requirements. A classical process chain based on highly sophisticated grinding and polishing machinery, proprietary developments, and a well-trained engineering staff is capable of supplying prototype-like parts in small batches.
Still, manufacturing challenges abound. The parts need to be thin — for example, part thickness of about 3 mm for a part size of about (25 × 30) mm2 is required — and exact references within the parts are mandated. Both the position and outer geometry must be accurate to less than 50 µm. As a result of the limited space provided by mechanical design, the clear apertures often extend very near to the edge of the part.
Freeform optics used in high-precision imaging requires tight tolerances for form, waviness, and roughness. Microroughness needs to be less than Sq <1 nm at (150 × 150) µm2. To account for deviations in form and waviness, tolerances for the permitted surface deviation are split into spatial wavelength bands ranging from 1 to >16 mm with maximum root mean square (rms) <5 to 15 nm per band. Sensitive glasses need specific process care and know-how1.
Classical process chain
The typical process for developing an optical system begins with an idea, proceeds through design, manufacturing, and system integration, and culminates with a product (Figure 2). The classical freeform process chain involves preprocessing and fixing thin plates on a zero-point clamping system. Grinding is applied, followed by polishing, smoothing, and correction steps.
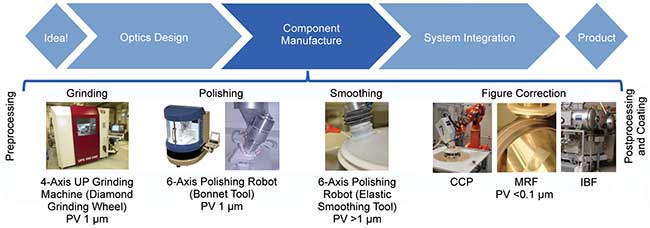
Figure 2. Freeform fabrication, classical process chain for glass. PV: peak to valley. Graph by Eckhard Roth. Courtesy of Carl Zeiss.
The standard grinding process achieves form errors of <2 µm. In addition, midspatial frequency structures in the lateral range of 0.5 to 5 per mm remain. In contrast, ultraprecision grinding yields form errors of less than 1 µm with no significant residual structures in the same frequency range. An additional advantage of ultraprecision machining glass is the reduction of subsurface damage induced by the grinding process approaching <10 µm. Subsurface damage of 15 to 20 µm is common for four-axis grinding.
As a result of precise, hydrostatic guides, dynamic drives, and a rigid construction, process improvements become feasible. It takes modified tooling and research in grinding theory to reach a reduction of subsurface damage down to <10 microns2. Grinding with higher accuracy and lower subsurface damage leads to a decrease in machining, working, and setup time for the whole process chain.
The polishing step (based on bonnet polishing) can be improved by better predicting the amount of local material to be removed. This must account for local radii and pressure changes. The localized pressure distribution between the tool and the workpiece is then calculated using finite-element methods (Figure 3). A revised polishing theory provides better results than the widely applied standard theory.
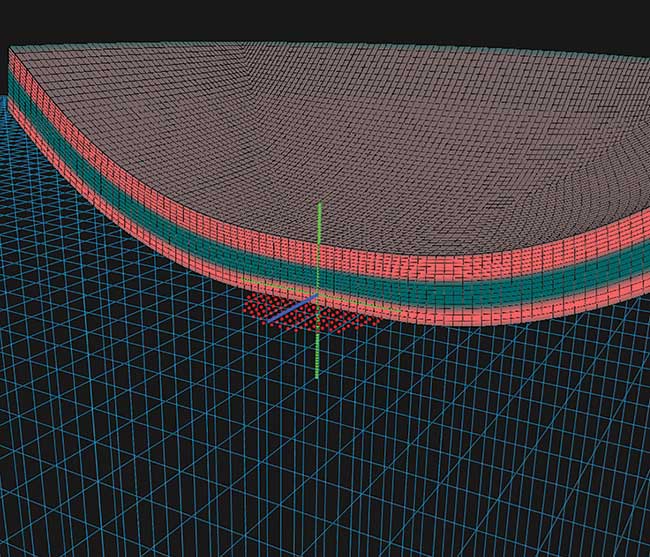
Figure 3. Freeform fabrication, finite-element simulation of a polishing bonnet. Graph by Tobias Beier. Courtesy of Carl Zeiss.
To correct midspatial frequency on freeforms, processing methods with smooth, elastic, adaptive tooling are essential. Therefore, different approaches for flexible, large-aperture tool setups for the removal of midspatial frequency errors are in development. A frequency-selective smoothing effect for a test pattern composed of wide spatial frequency disturbance, as seen in Figure 4, is realized for critical wavelengths of 1 to 5 mm with a decrease from 25 nm to <5 nm in spatial root mean square3.
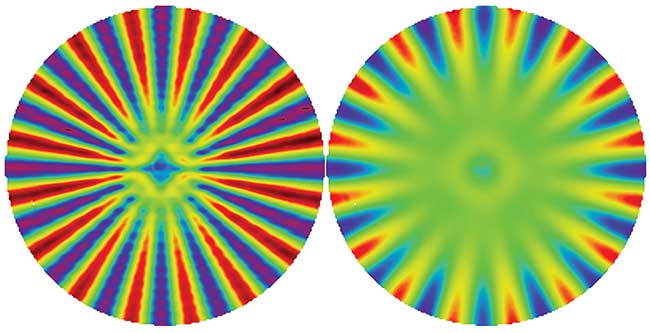
Figure 4. Freeform fabrication, artificial midfrequent form error applied (left); after local frequency selective smoothing (right). Processing and measurement by Heiko Löscher. Courtesy of Carl Zeiss.
To diminish nonrotationally symmetric deviations, achieve form accuracies <0.1 µm, and ensure tight microroughness requirements, processes such as magnetorheological finishing (MRF) are applied during the final step.
The achievable accuracy is limited, in practice, by the measuring accuracy.
Laser-based process chains
There are many ultrashort-pulsed (USP), laser-based processes (Figure 5) that have shown promise: Athermal ablation for 3D-material removal and local polishing by selective thermal interaction are two such technologies. When combined in one system, these processes could disrupt optics manufacturing.
Athermal ablation for 3D-material removal and local polishing by selective thermal interaction are processes that could disrupt optics manufacturing.
Other approaches are already used in industrial environments for optical elements with lower performance requirements, such as edging by ablation or by filament generation of glasses up to several millimeters thick. Techniques also include direct laser micro- or nanostructuring, selective laser etching for micromachining 3D parts, and additive manufacturing techniques, such as two-photon polymerization for structured or printed optics. Developing these approaches for higher accuracy is challenging because it still requires basic research on materials and processes. USP laser bonding and in-volume marking already provides new optical features and benefits for systems integration/alignment, such as in-glass references or direct metal-glass bonds.
Laser ablation is a technique that may soon replace fine grinding of optical glass, given the limitations in shape and size of conventional grinding tools. The advent of stable and high-output-power USP lasers allowed for contact- and wear-free processes. The sharp focusing of ultrashort laser pulses enables nonlinear multi-photon absorption and plasma interaction no matter which (transparent) material is irradiated. As a consequence of physical processes, matter gets ablated in the micrometer range by very low thermal influence on material properties4.
Laser parameters such as pulse energy, wavelength, and pulse length were tested for their influence on surfaces with roughness, subsurface damage, form deviation, and stress-induced birefringence. With a multipass ablation process for femto-second and picosecond lasers on fused silica, Zeiss process developers were able to achieve characteristic surface roughness rms <1 µm, ablation depths >0.1 µm per surface pass, form deviations <5 µm, and subsurface damages of <10 µm.
Precision glass molding
Glass molding is already an attractive method for mid- and high-volume manufacturing of spherical, aspherical, and freeform optical elements. The good news: The whole classical process chain can be replaced and shortened (Figure 5).
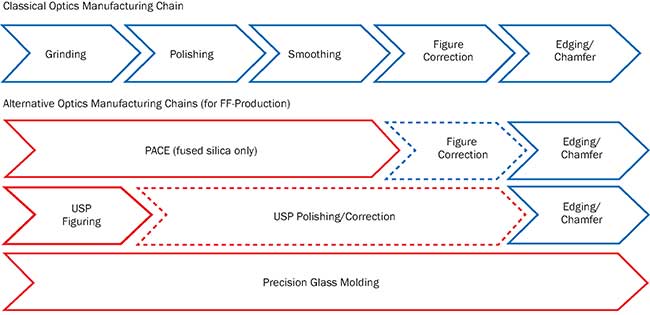
Figure 5. Classical process chain for glass, with alternative process chains. PACE: plasma-assisted chemical etching; USP: ultrashort pulse; FF: freeform. Graph by Christian Schindler. Courtesy of Carl Zeiss.
Nonisothermal processing is suitable for high quantities used in illumination optics. The temperature differences in process flow lead to a limited form accuracy down to several microns and local changes in refractive index. For high-precision optical elements, an isothermal precision glass molding process is required. It delivers form accuracy and other qualities for imaging optics, laser applications, and micro- and IR-optics but requires special low-Tg glasses. A multistage tool and shrinkage optimization process, in combination with finite element process modeling, is essential to achieving qualities in form accuracies <1 µm and roughness <3 nm. Tungsten carbide tools with sputtered films for higher durability and better separation of part and tool are needed, and fabrication is preferably carried out in a cleanroom environment.
The months-long prototyping phases can only be justified with quantities starting at several hundred replicates. The best subjects for applied research are the process-related drop and gradual change of refractive index in the range of 10−3 to 10−4 in the final part, the remaining residual stress birefringence after molding, and the aspect ratio of the desired freeform plates. In addition, a deterministic process for smoothing the ultraprecision-manufactured tools should be developed. With these achievements, submicron form errors with reduced midspatial features and a roughness below Rq <1 nm seem to be within reach5.
Freeform optics are ideal for imaging, given their small size and light weight. And their unique characteristics make them candidates for a number of higher-end applications, too. Yet producing and creating optimal freeform optic designs require ongoing efforts and cost-benefit analysis, especially in cases where freeform optics would supplant existing technologies. Therefore, the next major challenge is the transfer from a prototype-like process toward cost-effective serial production.
Design-to-manufacture approaches are the starting point for creating transparent and reproducible manufacturing steps. To accomplish this, a holistic view on process chains is necessary. The classical chain requires high form accuracy and low subsurface damage grinding, finite-element methods-based deterministic polishing, smoothing techniques for controlled midspatial frequency reduction, and advanced tactile and interferometric metrology. Additionally, alternative processes such as laser- or plasma-based surface modification and precision glass molding show disruptive potential.
Meet the authors
Christian Schindler is a process developer for optical manufacturing with expertise in laser material processing and ultraprecision grinding. He formed an application center for micromachining with ultrashort-pulsed lasers at the University of Applied Sciences (EAH) Jena; email: [email protected].
Thomas Köhler is a process developer for optical manufacturing with expertise in interferometric and tactile measurements of high-precision spheres, aspheres, and freeforms. He holds a Ph.D. from Friedrich Schiller University of Jena; email: [email protected].
References
1. T. Köhler et al. (2016). Mastering the art of freeform optics manufacturing. OptoNet Workshop: Ultra Precision Manufacturing of Aspheres and Freeforms, Jena, Germany.
2. P. Simon et al. (2016). Brittle-ductile transition in shape adaptive grinding (SAG). Frontiers in Optics, paper.
3. H. Scheibe et al. (2017). Technologies for cost-effective manufacturing of precision aspheres and freeforms. 59th Ilmenau Scientific Colloquium, Ilmenau, Germany.
4. A. Gillneret al. (2016). Process analytics of laser ablation processes. International Laser Technology Congress, Aachen, Germany.
5. A. Symmons et al. (2016). Design for manufacturability and optical performance trade-offs using precision glass molded aspheric lenses.” Proc SPIE, Vol. 9949.