Don Battistoni, Zygo Corp.
Today’s advanced semiconductor applications have pushed the limits of optical lithography systems. While the ability to fabricate optical components to their surface-form specifications is critical, the quality of the glass itself — or more specifically, its homogeneity — can ultimately determine whether it will succeed or fail in an application.
For more than 20 years, phase-shifting interferometry has been the technique of choice for measuring homogeneity. However, traditional methods suffer from a variety of issues that not only make the measurement difficult to perform, but also increase uncertainty about homogeneity beyond acceptable limits for the most demanding applications.
Zygo Corp. of Middlefield, Conn., recently developed a technology called Fourier transform phase-shifting interferometry that eliminates most of these issues, enabling more precise measurements. In addition, it can measure the linear component of homogeneity, which at times can be significantly greater than the nonlinear component. In such cases, a mechanically perfect lens with a linear homogeneity gradient would exhibit an optical wedge, deviating the beam and inducing unexpected aberration.
Until recently, there were essentially two techniques available to the metrologist. The first, called oil on plates, uses precision matched plates and oil that matches the index of the glass to be tested; the second, polished homogeneity, requires the surfaces of the sample to be polished to allow transmission of light. There are pros and cons to both methods, which generally are employed under different circumstances.
Oil on plates
Oil on plates is typically used when the sample to be tested is in an unpolished state. A plate that has been polished flat on one side is placed against each end of the sample. Index-matching oil is injected to fill the gaps between the sample and the plates, effectively removing the diffuse ground surface of the sample and allowing light transmission. Homogeneity is determined by measuring the transmitted wavefront of the sample cavity and subtracting that measurement with the test part removed, as shown in the reference cavity measurement (Figure 1).
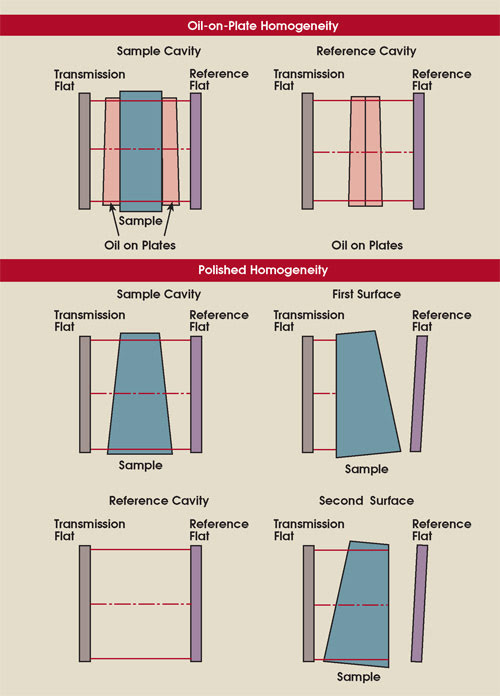
Figure 1. The traditional “oil on plate” technique for measuring homogeneity uses a matched pair of precision windows and index-matching oil to allow light transmission. Polished homogeneity requires four measurements. The sample end faces must be polished and must have an included angle between them.
The accuracy of this method is limited. Among other things, it suffers from setup difficulty and plate deformation during and between measurements, and the typically hazardous nature of the oil is a safety concern. Even if these issues were solvable in theory, the technique, as the name implies, is quite messy in practice.
The polished homogeneity method eliminates many of these concerns and, until recently, was generally accepted as the most accurate means of measurement. The sample is polished flat on both ends with an included angle between them to prevent internal Fizeau interference. It should be noted that this wedge requirement does present some difficulty because the easiest sample preparation method is to use a twin-faced lapping machine, which is designed to produce plane-parallel parts.
The sample is first measured in transmission. The reference flat is then misaligned, and each surface is measured individually. These two measurements are required to correct for changes in optical path length caused by surface irregularities. Finally, the reference flat is realigned, and the measurement of the empty cavity is subtracted from the sample cavity in the homogeneity calculation.
The two additional surface tests increase measurement time and prolong contact with the sample, both of which can compromise accuracy because of the multiple sample alignment requirements. In addition, the necessary wedge in the sample precludes the measurement of linear homogeneity.
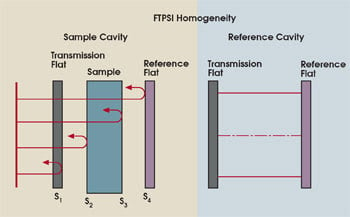
Figure 2. Two test setups are required by Fourier transform phase-shifting interferometry, which interprets the complex interference pattern generated by the wavefronts reflected from each of the surfaces in the cavity.
Fourier transform method
Fourier-transform-based technology eliminates the issues associated with oil on plates and overcomes the disadvantages of polished homogeneity. It involves only two measurements and doesn’t require a wedge in the sample, making preparation significantly easier and eliminating the need for realignment of the sample during testing. First, the transmitted wavefront of the sample cavity is measured, then the reference cavity (Figure 2). From the first measurement, the technology can extract the sample’s front and back surface information as well as its transmitted wavefront. Combined with the reference cavity information, both the linear and nonlinear components of homogeneity can be calculated.
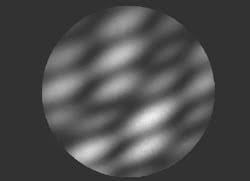
Figure 3. An interference pattern results from a four-surface sample cavity as shown in Figure 2.
With a plane-parallel sample aligned to the transmission flat, the resulting fringe pattern (Figure 3) will show multiple sets of two-beam interference among the four surfaces, labeled S1,2,3,4. The Fourier transform method’s ability to resolve and separate each of the interference patterns is based on the fact that each interference cavity (S1:S2, S2:S3, S3:S4 and S1:S4) has a unique optical path length. By varying the wavelength of the source during extended acquisition, each cavity produces a unique interference frequency. The first-order interference from each of these cavities can thus be identified and extracted from the measurement (Figure 4).
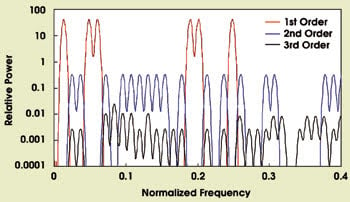
Figure 4. By varying the frequency during extended acquisition, the first-order interference from each of the cavities created in a four-surface measurement can be identified and extracted from the measurement data.
Combining this information with the reference cavity measurement data, we can now simultaneously measure the front and back surfaces, the thickness variation of the sample and the complete (linear and nonlinear) homogeneity (Figure 5).
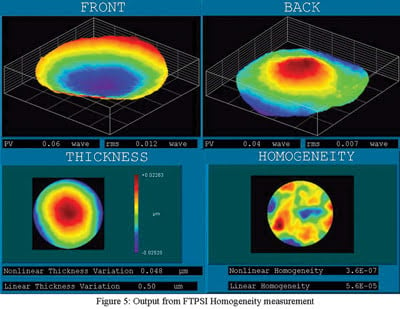
Figure 5. Output from a Zygo Fourier transform phase-shifting interferometer shows the sample’s front and back surface measurements, the sample thickness variation, and the linear and nonlinear homogeneity results.
Besides measuring the linear homogeneity component, the new method is faster and more precise, reduces operator interaction and minimizes sensitivity to environmental changes.
Advanced optical systems such as those that are used in next-generation lithography will continue to push the glass manufacturer for better and better quality. The patent-pending Fourier transform phase-shifting interferometry technique described here not only provides the metrologist with the power to meet those demands, but also significantly simplifies the homogeneity measurement process.
Acknowledgments
The author thanks George Hunter and Les Deck of Zygo for their contributions to this article.
Meet the author
Don Battistoni is field product specialist for large-aperture systems at Zygo Corp. in Middlefield, Conn.; e-mail: [email protected].