New technologies open up amazing possibilities for the machining of optical surfaces.
Karl Martinson, Corning Diamond Turning Div.
Single-point, diamond-turned optics, if programmed and fixtured properly, can typically be produced right off the machine at λ/4 peak to valley, with surface finish as low as 50 Å rms in bare aluminum and as low as 25 Å rms with nickel plating, enabling their use in visible and some ultraviolet applications. However, imaging at these wavelengths is limited by the significant diffractive effects of the diamond-turning grooves. For instance, a nickel-plated, diamond-turned mirror may have a surface finish of 25 Å, but the diamond-turning grooves will be so crisp that, to the naked eye, the dramatic diffraction of the mirror will show a rainbow effect, much like what you see when you look at a compact disc.
Great strides
New manufacturing processes provide much better performance in visible and UV applications by eliminating the structured diffraction. For example, a bare aluminum mirror with a surface roughness of 50 Å rms processed using the LEC technique developed by Corning Diamond Turning typically performs better at 450 nm than would a similar mirror diamond-turned in electroless nickel with a surface roughness of 25 Å rms.
Such recent advances in diamond-turning technology have taken much of the artistry out of the process. Compared with first- and second-generation machine tools, the latest generation of diamond machining equipment allows skilled programmers and operators to produce optics of quality and configurations that were not envisioned a few years ago.
Diamond turning is the process of forming optics using a tool with a single diamond point that comes in contact with the rotating material. The optical components created include spheres, toroids, and spherical and flat surfaces used in everything from deep-UV to visible to IR applications, all of which have different surface requirements.
Advances in the overall stiffness and rigidity of the diamond-turning platforms have allowed surface roughness to be driven down. Latest-generation air-bearing spindles are much more robust, and the vibration isolation systems on the machines are much more comprehensive. Although these advances may not eliminate the diffractive nature of a diamond-turned surface, they do help to reduce the severity of the effect. One improvement is in the positional feedback resolution of the tool path. Earlier machine platforms had positional feedback resolution measuring in millionths of an inch, but some of the newest machines boast resolution as low as 0.8 nm, or approximately 30 billionths of an inch.
Because of this precise positional feedback, the machine itself is no longer the limiting factor in the surface profile accuracy of the optic. The structural and thermal stability of the material being machined, along with the environmental control surrounding the machine itself, becomes much more of a constraint to surface accuracy.
Even more important are the design and accuracy of the fixturing that is used to mount and hold the optic; the most accurate machine tool in the world is worthless if the part being machined is fixtured improperly. For example, a perfect machine program will still yield an inferior optic if the part is mounted in the wrong location, skewed or tilted, or if centrifugal force during the machining process causes temporary deformation. Even the proper selection and orientation of the diamond-cutting tool is critical.
As the cutting-tool angle changes across the entire surface of a steeply curved optic, significant changes in surface finish and figure can occur. This is where some of the artistry of the diamond-turning process remains. A manufacturing process that makes the best use of the machine is key to the quality in the finished component. An analogy might be that a Ferrari is a high-performance machine only in the hands of a skilled driver and a savvy mechanic; otherwise, it’s just nice to look at.
Early diamond-turning equipment typically was limited to two axes of motion, X and Z, restricting production to rotationally symmetric surfaces. To produce nonrotationally symmetric surfaces such as aspheric cylinders or “free-form” optics, cumbersome approaches such as three-axis raster fly cutting had to be implemented. Although functional to a degree, this type of approach has produced somewhat limited surface profile accuracy and relatively rough surfaces that require significant postpolishing. There are still many limitations as to the types of surface profiles that can be manufactured this way.
Amazing possibilities
In the past year or so, things have changed. The newest-generation diamond-turning lathes are available with three and four axes of cutting-tool motion, and when combined with encoded spindle technology, the cutting-tool motion can be synchronized to the rotation of the lathe spindle to a high degree of precision.
These technologies open up amazing possibilities for machining optical surfaces. Toroids, aspheric toroids, aspheric cylinders, sinusoidal patterns, off-axis aspherics and even completely anamorphic “potato chip” surfaces can be machined in an on-axis configuration on a lathe. The surface accuracy and finish of these optics can equal any rotationally symmetric component’s.
Again, this is where the artistry of the process comes back into play. The programming skill required to produce a cutting-tool path for such surfaces is exponentially more difficult than for more traditional optics. In many cases, the definition of the optical surface is purely a “cloud of surface points,” with no mathematical basis.
These types of surfaces must be fitted to some sort of equivalent mathematical equation to program the diamond-turning machine. In addition, the same problems of fixture design and cutting-tool orientation can become more complex.
By combining current state-of-the-art diamond-turning technology with innovative new processing techniques, lightweight, thermally stable, high-accuracy mirrors with integral mounting features can be produced in volume with exceptional accuracy and consistency for visible, ultraviolet and multispectral applications. Even in low volumes, the benefit for military, aerospace and remote-sensing applications could be tremendous. As new applications continue to take advantage of the latest manufacturing technologies, the drive to take diamond machine tools to even higher levels of precision should yield even more impressive machines.
Smoothing the rough spots
Various materials also increase the complexity of diamond turning. For years, diamond turning has been associated with producing mirrors that were used mostly for infrared applications. Aluminum typically is the material of choice for diamond-turned mirrors because of its relatively low cost, structural and thermal stability, and compatibility with the turning process. But the diffractive effects of the diamond-turning “grooves” are generally too severe to provide adequate performance in the visible and the UV.
Process developments, such as diamond machining of high-purity aluminum that has been deposited on an aluminum blank, can effectively reduce measured root mean square roughness. However, the processes are costly and still tend to yield highly diffractive (and sometimes “streaky”) surfaces that can be difficult to clean. Other problems, such as “crazing” and poor adhesion of the aluminum, also have been reported.
Diamond turning and subsequent postpolishing of electroless nickel-plated aluminum can be an option for production of quality UV and visible mirrors, particularly if resistance to harsh environments is needed, but this process adds cost, weight and complexity to metal mirrors while having the negative effect of bimetallic stresses and the resulting instability over temperature change.
Efforts have been made to develop a process for polishing aluminum directly. Some have met with limited success. Most decrease surface roughness and diffraction, but are time-consuming and risk significant change to the mirror’s surface figure accuracy.
Corning Diamond Turning’s LEC technology can reduce the diffraction effects of diamond-turned aluminum mirrors. The process produces diffraction-free optical surfaces in aluminum without the need for nickel plating or postpolishing. Combined with recent materials research on the processing of aluminum and other diamond-machinable materials, LEC may finally allow the production of deep-UV-compatible mirrors in aluminum without added expense or negative side effects. Proper premachining treatment of the material allows the process to yield superior results.
LEC can dramatically reduce, and in many cases eliminate, the diffractive effects associated with diamond turning without requiring exhaustive polishing and without the danger of altering the surface figure of the mirror. No bimetallic stresses are involved, no aggressive mechanical removal of material and no risk of contaminating the mirror surface.

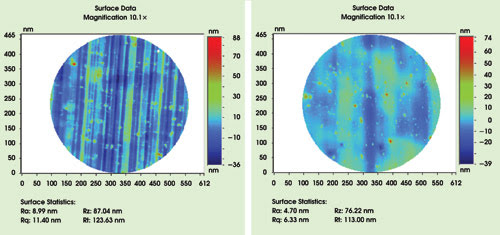
Figure 1. In this surface roughness plot of a conventionally diamond-turned mirror (left), the visible groove pattern results from the diamond-turning process. The Rq value shows a surface roughness of 114 Å rms. In the roughness plot of an LEC mirror (right), the high-order diffractive effect has been virtually eliminated. The Rq value shows a surface roughness of 63 Å rms. The surface will produce virtually no structured diffraction in the visible wavelengths.
Surface quality
Typically, the residual surface roughness of an LEC-processed mirror is dictated by the “grain” of the material (Figure 1). The first surface-roughness plot (measured with a Wyko NT2000 noncontact profilometer) is a map of a 1-mm section of a traditionally diamond-machined mirror. The second shows the same section of an identical mirror manufactured using the LEC process. Surface roughness has declined by nearly 50 percent, but the scattering effects have been dramatically reduced and almost completely randomized. The particulate matter inherent in the alloy is now the most prominent contributor to surface roughness and scattered light.
The LEC process has the added benefit of improved surface “cosmetics” (i.e., scratch-dig), compared with conventional diamond turning, and it leaves a pristine surface that is ready for any evaporative coating. The process is compatible with a variety of materials typically used for diamond turning, including aluminum, copper and nickel.

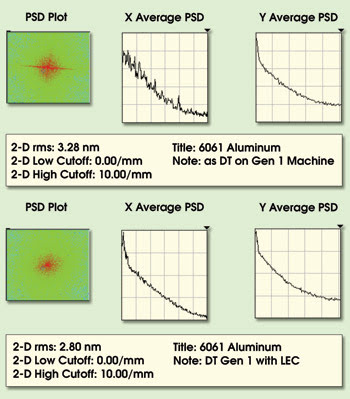
Figure 2. The visible-wavelength power spectral density measurements in two directions for a conventionally diamond-turned mirror (top) exhibit significant scatter in the X-axis (perpendicular to the diamond-turning grooves). Measurements taken from an LEC diamond-turned mirror (bottom) show almost complete elimination of the scattering effect in the same direction.
Functional analysis of the improvement in surface quality can be quantified by measuring the power spectral density and the bidirectional reflectance distribution, which are generally accepted measurement standards for quantifying the effects of scattered light in numerous applications (Figure 2). In the power spectral density measurements for both a traditionally diamond-machined aluminum mirror and an LEC-processed mirror, the Y-axis measurements are quite similar. This is because the incident rays of light run parallel to the diamond-turning grooves, which, while still producing some scattering of light, do not yield a grating or diffractive effect. But, there is a significant difference in power spectral density measurements in the X-axis, where the diffractive effects of the traditional diamond-turned mirror are evident. The LEC mirror shows a smooth curve with relatively few spikes.
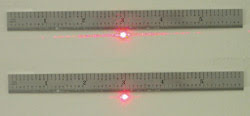
In images of a 633-nm laser spot reflected off two mirrors, the difference between the two is obvious (Figure 3). The traditionally diamond-turned mirror reflects many satellite spots (top), while the LEC mirror reflects only one laser spot (bottom).

Figure 3. A HeNe laser spot reflects off a conventionally diamond-turned flat mirror across the grooves (top). Note the broad scattering effect and satellite spots. The same laser spot reflects from an LEC mirror in the same orientation (bottom). Here, the scattering effect and the satellites are almost nonexistent.
Specialized processes
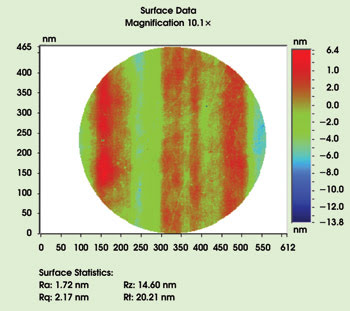
Because material grain structure tends to limit surface roughness when the process is applied to diamond-turned mirrors, Corning has tried to identify ways to improve surface finish even further. Through innovative treatment methods applied to existing aluminum alloys, it has produced aluminum mirrors that, after processing, yield surface roughness previously thought to be unachievable for diamond-turned aluminum (Figure 4). More importantly, the mirrors are completely free of diffraction effects.

Figure 4. In this surface roughness plot taken from a mirror manufactured using the LEC process in conjunction with Corning's proprietary LLC aluminum, surface roughness, represented by the Rq value, is quite low at 2.17 nm, or 21.7 Å rms. The mirror surface is devoid of high-order diffractive grooves. The wide color bands in the image are only a very low magnitude signature of the leadscrew in the diamond-turning machine. This mirror would be suitable for most UV-VIS imaging applications.
These highly specialized processes can produce aluminum mirrors that are fully functional for imaging use in deep-UV applications such as atomic spectroscopy, and for UV-VIS applications such as chromatography, satellite imaging and semiconductor inspection, while retaining all of the structural, weight and thermal advantages of aluminum.
Latest-generation three-axis diamond-turning equipment combined with creative fixturing and programming techniques also can produce completely nonsymmetric or free-form surfaces. This capability opens up numerous opportunities for maximizing optical system designs to include image field-flattening and -correction. Free-form surface capability even has benefits in ophthalmics, allowing much more accurate production of injection mold masters for “progressive” (no-line bifocal) eye-glass lenses and sportswear.
This technique also enables production of far-off-axis components that previously would have required conventional grinding and polishing or a huge swing capacity on a conventional diamond-turning lathe. Optics for astronomical applications, surveillance and cryogenic scene projectors also benefit from this approach.
Acknowledgments
I would like to thank Moore Nanotechnologies of Keene, N.H., for supplying information on diamond-turning machine platforms.
Meet the author
Karl Martinson is the sales and marketing director for Corning Diamond Turning Div. in Keene, N.H.; e-mail: [email protected].