Thaddeus Orosz, Bob Spetz and Shirley Thorkelson, ILX Lightwave Corp.
Researchers, scientists, test engineers and technicians who perform absolute power measurements expect them to be accurate and consistent. As lasers become more powerful, there is increasing concern with measurement consistency and, consequently, the instruments’ accuracy and traceability to a national standard.
High-quality power meters provide measurement assurance through a two-step system: calibration of the photodetector and the electronic gain stages. These steps are accomplished by using traceable optical and electrical standards for the device.
Calibration of the photodetectors can be performed over a wide range of wavelengths, depending on the detector being used and the application. The common method in the industry uses a broadband light source and a monochromator. The tuning range of the latter allows calibration over many wavelengths but, because the power output of the broadband source is typically very low and not adjustable, the meter is calibrated at only a single optical power. To verify accuracy of absolute power measurements over the full dynamic range, the meter’s linearity must be characterized and stated in the specifications.
Characterizing nonlinearity
Photodetectors are, by nature, very linear over a wide range of optical input powers, but when coupled into a power meter, the overall system linearity is affected by the measurement electronics. Covering the full dynamic range is important because power meters typically have seven decades of dynamic range, whereas its calibrations typically occur in only one of the higher gain ranges. The linearity test validates the power meter’s measurements throughout its dynamic range.
Regardless of the laser source — a laser diode, a solid-state laser or an LED — accuracy and linearity are critical for applications requiring absolute measurements. For instance, in laser diode manufacturing, an LIV test, which plots the optical power (light) and voltage (V) as a function of current (I), is very common. The laser current is stepped in small increments, and the resulting output power and voltage are measured. The power and voltage measurements must be accurate and repeatable over the full range.
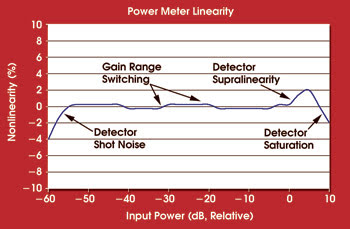
To achieve optical power measurement over a 60- to 70-dB dynamic range, power meters are designed with multiple gain stages. For any given gain range, there are nonlinearities at the end points. The switch-over points are optimized to minimize the nonlinearities and the resulting inaccuracies in the measurements (Figure 1). The total system linearity is a function of the photodetector properties and the electronic gain circuits.

Figure 1. This power meter linearity test shows the combined effects of detector and gain circuit nonlinearities. Power meters in general are designed such that the detector never reaches saturation, which occurs when additional optical input results in a nonlinear response.
To ensure consistent measurement accuracy, it’s important that power meter manufacturers measure and verify power linearity. There are two common methods. The first is based on comparison of the meter with a previously calibrated amplitude-adjustable source. It is simple to conduct but, because it requires a calibrated reference attenuator, is expensive.
The other, a self-calibrating technique called superposition, is time-consuming but less expensive, and can be duplicated in any lab with standard equipment.
The superposition test procedure (Figure 2), shown numerically in the table, is performed as follows: Two separate stable sources of the same wavelength are combined in a 50/50 coupler and input to the meter under test through a variable optical attenuator (VOA). The lasers are switched on separately, and the attenuator is adjusted to the lowest power to be tested. The individual power levels are recorded and labeled P1A and P1B. Then both lasers are switched on simultaneously, and the combined power is recorded and labeled P1Cactual. In the table, P1A and P1B are summed mathematically and called P1CIDEAL.

Figure 2. A test for linearity typically takes this configuration.
The two lasers again are switched on separately, and the variable optical attenuator is adjusted to power level P1CIDEAL. The new power levels are measured and labeled P2A and P2B. Both lasers are switched on simultaneously, and the combined power is recorded and labeled P2C-ACTUAL. With this method, the power is doubled (increased by 3.01 dB) at each step.
The difference between the ideal and actual power values is the nonlinearity, calculated as:
Nonlinearity = 10*log (combined sum/ideal sum)
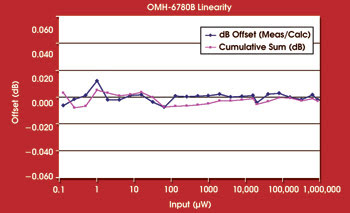
The total nonlinearity of the meter is the cumulative sum of all of the errors from each 3.01-dB step over the range test (Figure 3). The worst-case cumulative decibel delta is called the worst-case linearity performance of the power meter. The linearity specification is derived from that and is an indication of the accuracy across the measurement range of the instrument.

Figure 3. Data was taken from 100 nW to 0.1 μW in 3.01-dB steps. This test was run with two 1.0-W SDL 920-nm Fabry-Perot pump lasers. The linearity performance of an ILX Lightwave power/wave head is clearly within the specification of ±0.05 dB.
Accurate, repeatable measurements are necessary in laser diode testing development or production, where absolute power measurements are being made. Inaccurate measurements caused by an uncalibrated or inaccurate power meter could result in low yields in laser diode production. It is important that users have confidence in the power measurements they make so they can focus on the results, not the process.
Meet the authors
Thaddeus Orosz is product manager at ILX Lightwave Corp. in Bozeman, Mont.; e-mail: [email protected].
Bob Spetz is an applications engineer at the company; e-mail: [email protected].
Shirley Thorkelson is a senior optical engineer; e-mail: [email protected].