Laser-based portable metrology systems used in aircraft and automotive inspection are now used to assess solar collectors, wind turbines and Europe’s most advanced solar thermal projects.
PETE MORKEN, NIKON METROLOGY INC.
The development of clean energy is moving forward globally at an increasing pace. Making clean energy more efficient is critical to its adoption — and this is where large-volume precision measurement comes into play.
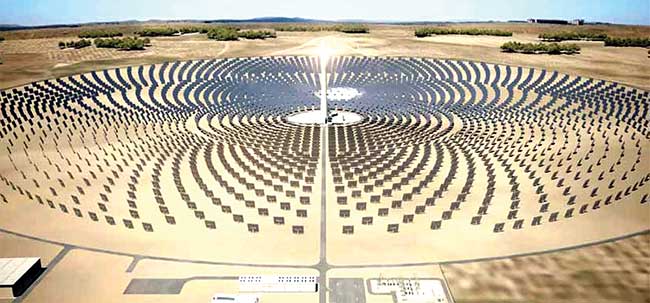
Gemasolar, located in Seville, Spain, is the world’s first commercial plant using a central tower and surrounding heliostat array to feed a thermal storage system. The project was built by Torresol Energy, a joint venture of Spanish engineering firm Sener Group and Abu Dhabi-based Masdar. Mirror structures in the high-precision heliostats precisely reflect sunbeams toward the receiver located at the top of a 140-m-high tower. Sener’s heliostat assembly subcontractor Moncobra SA uses frequency-modulated coherent laser radar technology (FM CLR) from Nikon Metrology Inc. to precisely position flat mirror panel arrays on the giant heliostats. Laser radar completes automatic, noncontact, gauge-free inspection of a single heliostat in a matter of minutes, allowing Moncobra to produce 22 heliostats daily. This is one of the many technology innovations Sener has introduced to maximize the output of its concentrated solar power (CSP) plant portfolio, supplying electricity in line with demand.

As photovoltaics, wind and other energy projects grow more competitive, inspection technologies need to contribute to production efficiencies while assuring critical quality targets. Courtesy of Nikon Metrology Inc.
Gemasolar is also the world’s first CSP plant to feature tower technology with a molten salts receiver. This thermal storage concept uses intense heat stored during the day to produce electricity at night. With thousands of 11- × 12-meter heliostats targeting the sunlight receiver, the salt substances heat up and descend to the hot salts tank where they are stored at more than 500 °C. From here, the salts are transferred to heat exchangers, and subsequently to the turbine and electrical transformer before adding electricity to the net grid. Although the use of a tower surrounded by flat-mirror heliostats is less mature than parabolic trough technology (long parabolic mirrors), it potentially offers a higher energy yield.

The Gemasolar heliostat array and thermal tower is located in Seville, Spain. Courtesy of Nikon Metrology Inc.
All heliostats are designed to exhibit a different slightly parabolic reflective shape, depending on the position of the heliostat in relation to the tower. Immediately following inspection, the measurement report is automatically saved on the network and sent to Sener for verification. The implemented control system decides whether the required curvature for each heliostat mirror array is achieved within specification. Based on mirror deviation values specified in the inspection report, assembly workers properly modify the orientation of the mirror panels. After tuning the mirrors, the laser radar performs a final inspection verification to confirm accuracy before turning out a new heliostat.

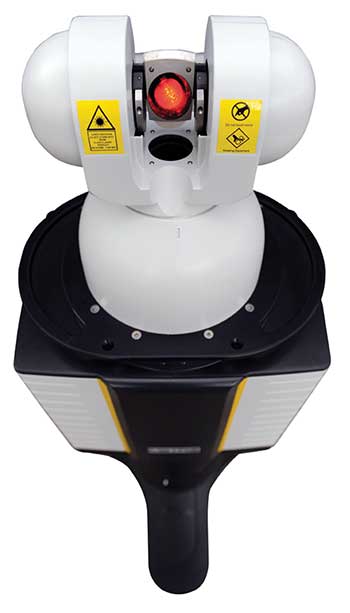
Nikon Metrology Inc.’s laser radar unit. Courtesy of Nikon Metrology Inc.
A different laser tracker
Laser trackers are nothing new. Similar in appearance, laser radar presents unique and significant differences. Laser trackers require an SMR (spherically mounted retroreflector) or other probing device that is held manually against the object being measured. By comparison, laser radar directs a focused laser beam to a point on the object being measured, while recapturing a tiny portion of the reflected light to determine absolute range to the measured point. Combined with horizontal and vertical laser beam angles, the 3D coordinates of the acquired points are determined in real time.
This can increase productivity, as fewer procedures are required, making the entire process significantly faster. The system can even run unattended.
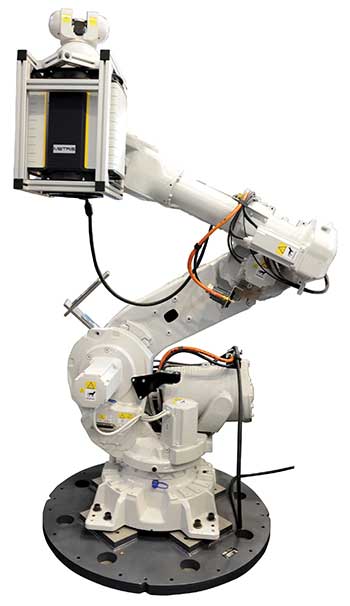
Essentially, laser trackers are manual systems that track a probe, unlike the laser radar, which is a driven system. This means laser radar can be automated and, if needed, set up on multiaxis robots for an even higher degree of automation. Production can continue uninterrupted while ensuring high-quality metrology results. The technology is also particularly well-suited for large part volumes. With an effective radius of up to 50 meters, a laser radar could be set up at the 50-yard line in a football game and hit both end zones with 3D uncertainty of less than 0.02 in.

Nikon Metrology Inc.’s laser radar unit, mounted on a multiaxis robot. Courtesy of Nikon Metrology Inc.
Measuring solar panels
As laser radar only requires a fraction of a percent of the reflected light to be returned and analyzed to determine measurement results, the technology is suited to handling highly reflective surfaces. In the fast-growing concentrated solar energy industry, such technology checks the geometric integrity of flat or parabolic mirrors and the understructure. Critical in this regard is its capability to accurately and efficiently trace faulty bending and misalignment.
It takes roughly five minutes to measure a single heliostat in enhanced metrology mode. This is much shorter compared to a laser tracker system, and also much less cumbersome because the tracker requires a crane to precisely position a large gauge with spring-loaded targets on top of a heliostat’s reflective surface. With the laser radar, it is possible to avoid the complexity of taking measurements using laser trackers. Noncontact inspection performed in a fraction of the time has been the main driver for Sener to opt for the laser radar inspection system.

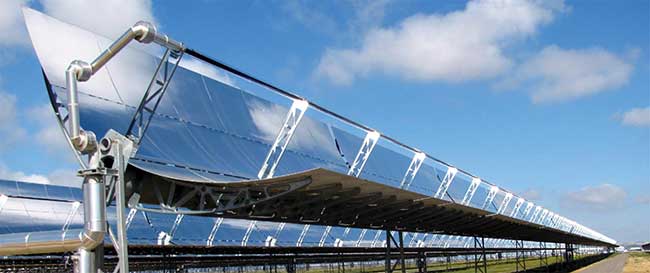
A parabolic trough in Cádiz, Spain. Laser-based inspection ensures geometric integrity. Courtesy of Nikon Metrology Inc.
Valle 1 and Valle 2 are adjacent Masdar solar plants located in Cádiz, Spain, that feature parabolic trough
solar technology combined with molten salt storage facilities. The two plants have a combined power capacity of 100 MW and are now fully operational. The footprint of the solar field covers 510,000 square meters, and the molten salt storage system allows for seven to eight hours of power generation without sunlight. These plants will produce approximately 330 GWh/year, which is equivalent to the average consumption of 40,000 households, or the entire city of Cádiz. Moreover, the plants displace more than 90,000 tons of CO2 a year.
Both plants’ parabolic trough technology has unique mechanical characteristics, such as noticeably lower steel weight and fewer assembly hours compared to similar collectors. These advantages are significant, given that a conventional 50-MW solar plant uses 90,000 meters of parabolic trough mirrors requiring about 15,000 tons of steel.
Measuring wind turbine blades
Wind turbine blades are highly engineered components with many geometry-dependent features, including the pressure and suction sides of the blade and custom leading edge profiles. A recent wind turbine blade project encompassed surface inspection of a 45-m blade that required completion in a single eight-hour period. The laser radar measured 48,000+ inspection locations with 0.025-mm, single-point uncertainty in the requisite shift. By comparison, completing the same single shift inspection assignment using laser tracking technology would require at least three separate laser tracker systems and operators, as well as large overlay templates and additional tooling.
Common sense checklist
In determining if laser radar is right for a given work or application, several common-sense business concerns must be addressed:
• Accuracy. There’s no point in beating around the bush — what is the accuracy threshold you and your customers require now and in the foreseeable future?
• Measuring volume. What parts demand measuring and inspection — micro parts or entire wind turbine blades, or in between? A long standoff scanner can also reach inaccessible or dangerous areas.
• Portability. Do parts have to be measured on the factory floor, in-process, or delivered to a controlled-environment metrology department? Is a separate metrology lab and/or a production inspection solution required as parts are made? Will a portable solution bridge the gap, if needed?
• Automation. The ability to automate and run the system unattended can result in lower manpower costs and is ideal for repetitive tasks.
• Data-acquisition speed and software compatibility. The nonstop growth in computing power has made possible many advances in inspection. Is report data available in easily understood forms? Can reporting be completed offline, leaving articulated arms or CMMs dedicated to inspection tasks?
• Cost. The noncontact and automated laser radar system can satisfy all of the following metrology aspects:
• Quality assurance applications, including part-to-CAD comparison, feature, and gap and flush inspection.
• Routine and event-driven inspections such as first-article inspections, incoming and outgoing inspections, and troubleshooting failure investigations.
• In-process applications, including component alignment and robotic positioning.
• Tool building and alignment, including locating and adjusting tool features in real time.
• Tool digitalization and documentation of as-built tools and die surfaces.
• Model digitalization such as scanning artistic models and performing design layups for in-process and outgoing quality assurance.
• Routine maintenance, including static and dynamic inspections of tooling assemblies.
As photovoltaics, wind and other energy projects grow more competitive with conventional generation, inspection technologies must contribute to production efficiencies while also ensuring critical quality targets. Laser radar, with its versatility and unique attributes, is a unique solution to this growing segment.
Meet the author
Pete Morken is a senior applications engineer at Nikon Metrology Inc.; email: [email protected].
Frequency-Modulated Coherent Laser Radar Technology (FM CLR), An Overview
The major strength of laser radar is that it can scan complex geometry that is too complex, hard to reach or labor-intensive to evaluate using other methods. The system works indoors or out, in any lighting, and on any material or finished surface with a reflectivity of even less than 1 percent. Laser radar is capable of measuring both freeform surfaces and geometric features due to proprietary frequency-modulated laser technology.
As the invisible eye-safe laser light travels to and from the target, it also travels through a reference path of calibrated optical fiber in an environmentally controlled module. Heterodyne detection of the return optical signal mixed coherently with the reference signal produces the most sensitive radar possible. The two paths are combined to determine the absolute range to the point, and the high-modulation bandwidth makes precise measurement possible in a millisecond. Combined with the measured horizontal and vertical laser beam angles, the 3D coordinates of the acquired point are determined in real time. As the measuring laser is invisible, the laser radar additionally emits a red laser pointer.