Noncontact measurement systems improve quality and reduce waste on the production line.
Dale Greer, Perceptron Inc.
Noncontact measurements determine the quality of a manufacturing process so that it can be controlled. Using laser sensors to gather real-time data throughout the production process helps reduce defects and wasted materials, ensure better overall quality and improve the manufacturing process from startup.
For more than 20 years, triangulation sensors have been installed in in-line automotive assembly stations to gather data on various parts. The same technology has been successfully used to guide robots during auto assembly for almost as many years. What has changed is not so much the technology of the sensor but rather the software and processing of the data, which now makes triangulation sensors more usable than ever.
Triangulation allows a sensor to measure the distance between itself and an object. Traditional two-dimensional imaging, in contrast, either cannot measure such distance or cannot do so accurately.
Triangulation sensors are considerably smaller and lighter than they were a few years ago, which allows more access to complex-shaped parts. They also can be used in combination with coordinate measurement machines, something not possible a few years ago.
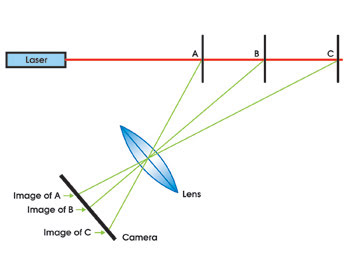
Figure 1. This diagram shows projected structured light and the technique used to measure the distance from the sensor to the object. An object at A produces an image different from that produced by objects at B or C.
The principle of triangulation sensing is quite simple. When a structured light is viewed at an angle, an object produces different images from different angles (Figure 1). Extending this concept to a 2-D sensor is the same idea, only the laser projects a plane of light, and a 2-D camera is required (Figure 2).
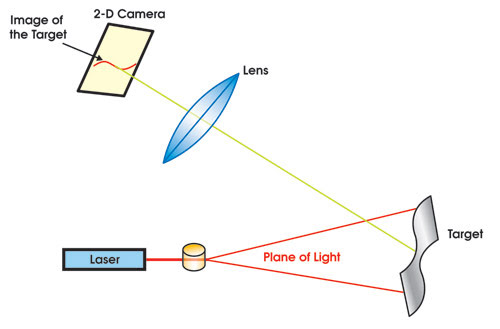
Figure 2. In this 2-D version of a triangulation sensor, the 2-D camera is not designed to take images outside of the laser plane. If the sensor is configured to focus on the laser plane, the images outside the laser plane will be out of focus. A 3-D version has a different structure to allow in-focus imaging outside of the laser plane, and it requires additional lighting. There are some engineering trade-offs to this sensor. For example, the near and far images of the laser plane will not be in focus.
Turning the pixels into millimeters is done by the measurement sensor and a proper mathematical model. With a sample of many target positions for every triangulation sensor, a least-squares best-fit operation is one means of converting the pixels to units.
Triangulation has many advantages. Data acquisition of X-Y-Z surface points is performed at a rate of thousands of points per second with accuracy better than 0.05 mm, and the image processing that converts the points produces simpler images. The sensor can be limited to a specific color to suppress ambient light, or the sensor can be set up so that light other than the structured light is not in focus.
The disadvantage of triangulation sensing is the multipath it produces. This is light from the laser projector that bounces from one surface to another and is seen by the sensor. These data appear as points measured but are not part of the real surface. Keeping this light out of focus with the sensor design helps eliminate some extraneous X-Y-Z points, but software is the most important tool to control them.
Using triangulation sensors for 3-D measurements is possible and necessary for automotive applications. For example, the 3-D locations of holes and slots are important for many reasons related to process-control. A sensor that measures only the laser images can be optimized to focus only on the laser. The 3-D result cannot be limited to the laser, so it has the same depth-of-focus issues known to every photographer. The 3-D result is obtained by combining a laser plane triangulation image and a gray-scale image of the hole. Typically, a light source is added to create the proper gray-scale image.
Photogrammetry and stereo gray-scale also can be used to acquire 3-D surface data, but they require much larger sensors and special efforts to stitch the patches of data together. Triangulation sensors are small and light enough to be merged with other 3-D devices to create something that is greater than the sum of the parts. For example, a triangulation sensor can be combined with a portable coordinate measuring machine or a calibrated robot (Figure 3). The sensor shown in Figure 3 acquires only 2-D data. Software integrates dozens of these measurements into full 3-D surface renderings by combining the capabilities of the robot and the sensor. If a hole or slot is desired, a detailed scan provides this capability while maintaining the advantages of the 2-D sensor. No additional lighting is required.
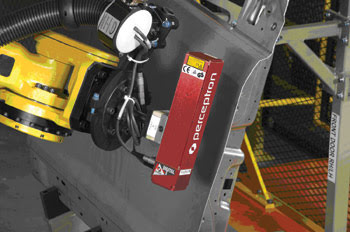
Figure 3. A robot-mounted sensor takes a 3-D measurement of a door edge on an automotive assembly line.
Careful calibration of the sensor and the robot or coordinate measuring machine creates a tool that can produce a very dense sampling of X-Y-Z points in a single coordinate frame. It has the precision and resolution appropriate for many applications, especially for automotive parts. For example, a triangulation sensor placed on a robot measuring a car door shows lots of data on a single part. These results can be compared with those for the computer-aided design (CAD), which is another method for recording data for a single part (Figure 4). A cloud-to-CAD diagram shows all of the measured deviations from the CAD-defined nominal surfaces, but it does not account for the differences in product tolerances and may not have the correct references.
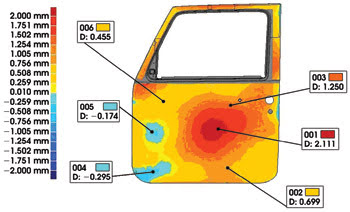
Figure 4. A cloud-to-CAD report shows the result of data collected by a triangulation sensor on a robot measuring a car door.
The limitation of methods such as CAD is that they are unable to register data on lots of parts.
Generating useful data
Whether the manufacturing process is gathering lots of data on a few parts or a sample set of points on thousands of identical parts, the challenge is to convert the millions of X-Y-Z points into something that can improve the product or the process. For data on either few or thousands of parts, the following must be considered:
• How are you going to measure each feature type? There are many ways to measure the features on a car. However, there is no single standard for measuring features such as corners, edges, surfaces, holes, slots and pins. Software must convert the collection of X-Y-Z points into streamlined results.
• Does the user need data that relates to how the part was made or how it will be used, or both? Some parts are located with tooling, but many need software to derive the correct presentation of the data.
• How will the user want the data reported or displayed? For the automotive application, there are at least two answers: normal to the surfaces or in the predefined coordinate frame.
In the car door example, one can establish how well the part will fit into the final assembly. The dense and accurate data shown in Figure 4 in the middle of the part is not as useful as the results around the edges and the holes.
A better way to display the results is a report that shows what is important to the product; specifically, the part of the door that fits to the assembled car (Figure 5). The other surfaces are important for smoothness but do not have the same dimensional tolerances as the edges of the door.
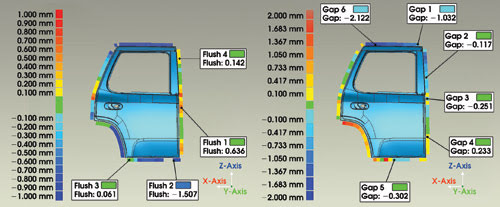
Figure 5. This report is focused on what is important in that it shows the edge measurement (right) and the plane measurement (left). These are the critical dimensions required for a door. When the car is assembled, the dimensions are critical to how it looks.
For data on many parts collected from an in-line system using triangulation, the same questions also apply, but there are others as well.
The simplest analysis is process containment, the object of which is to identify a bad situation before many defective parts are made. In automotive manufacturing that does not use measurement tools, there may be hundreds of parts between the location a problem happens and the place it is discovered. For example, if a bad hinge is installed on a car door but not detected as faulty until several other parts also have been attached and the door is tested, a lot of scrap metal has been produced.
The typical goal of the in-line measurement system is process control. Whereas process containment only discovers the problems, process control is designed to continually improve the product which decreases assembly costs. Although the mathematics for simple process containment was designed originally for a very small sample, the richer 100 percent data that triangulation sensors provide only enhances the results.
There are analysis techniques that yield stronger information than process containment with the richer data sets that are now possible. For example, automotive designers can examine how parts will look as final products. It also is possible to use these techniques to isolate particular functional areas around a part, such as the door opening measurements. Overall, mathematical analysis can improve quality on the assembly line by examining unexpected data patterns that indicate some kind of failure in the process.
Meet the author
Dale Greer is chief engineer at Perceptron Inc. in Plymouth, Mich.; e-mail: [email protected].