Full company details
Satisloh GmbH
 Wilhelm-Loh-Str. 2-4
35578 Wetzlar
Germany
Freeform Surfaces Present Opportunities and Challenges
Photonics Spectra
Nov 2020Freely designable optical surface profiles offer lighter, simpler, and more compact assemblies versus their spherical counterparts, but they are more challenging to manufacture and measure.MAX SCHWADE, SATISLOH GMBH
The classic example of a freeform surface in ophthalmic applications is the varifocal lens commonly used in eyeglasses. Due to the normal aging process, the eye’s ability to adapt between near and far slowly decreases. This leads to discomfort, especially at close range. The great advantage of varifocal lenses is that they combine different strengths in one lens. In contrast to single-vision lenses, they allow for a combination of three vision ranges: distance, intermediate, and near vision. Compared with simple rotationally symmetrical lenses, however, the description of these freeform surfaces is very complex and the calculation costly, as they are individually adapted to each spectacle wearer and each eye for optimal results.

Head-up displays can be produced exclusively with a freeform surface. These displays project a straight
image onto a curved glass surface, which means that the distortion of
the curved projection surface in the lens of the head-up display must be anticipated so it can be precisely canceled out from the perspective of the viewer. Courtesy of Getty Images/Mike Mareen.
Freeform surfaces are useful not only in ophthalmic applications, but also in precision optics. In systems with complex beam paths, for example, they can significantly reduce the number of lenses by combining several functions in one lens. As a result, freeform surfaces can make complex optical systems more compact and can significantly reduce their overall weight. This is particularly relevant for lenses in precision optics, which are usually made of mineral glass, ceramic materials, or crystals rather than lightweight plastic. Replacing several classic lenses with a freeform surface can also reduce the number of components in the assembly.
Certain applications, such as head-up displays, can even be produced exclusively with a freeform surface. The task of a head-up display is to project a straight image onto a curved glass surface. This means that the distortion of the curved projection surface in the lens of the head-up display must be anticipated so that it is then precisely canceled out in the addition. Similar to the varifocal lens in ophthalmic applications, the freeform surface must also be elaborately calculated and designed.
Manufacturing freeform lenses
In contrast to the often fully automated production of ophthalmic lenses, precision optic lenses are usually produced in small batches numbering up to 20 or, more rarely, 100 pieces without the automated linking of processes. The demands on these lenses in terms of accuracy, optical properties, and durability are ~10 to 1000× greater than for ophthalmic lenses. For this reason, production of precision lenses relies almost exclusively on high-quality and partly complex glass materials. Some of these hard, brittle materials place high demands on the machining process and the tools used. This is particularly true for precision-optic lenses with freeform surfaces. The complexity, requirements, and manufacturing costs of the individual lens increase significantly per optically effective area.

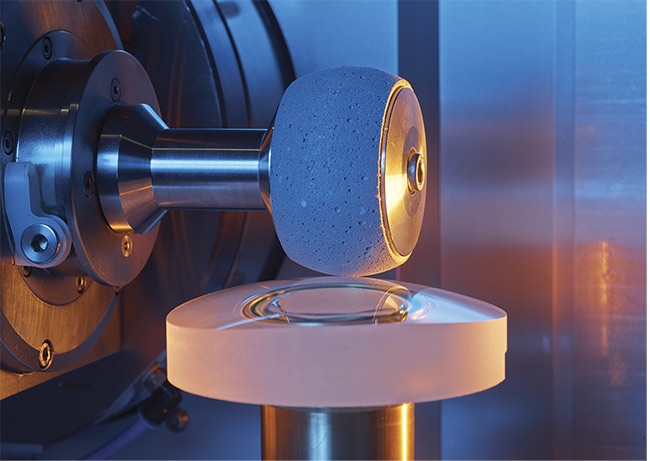
Wheel tools commonly serve as polishing instruments with point contact. They allow a comparatively high removal rate. Dressing maintains the tool’s shape and can restore the spherical shape if deformed by wear. Courtesy of Satisloh.
Lenses made of plastic can be produced effectively and economically by milling, turning, and polishing. In precision optics, diamond turning is a niche application and is usually only possible with metals and certain crystalline materials, such as germanium, zinc selenide, calcium fluoride, and silicon. The advantage to using these materials is the geometrically defined cutting edge they allow, and the possibility of producing freeform surfaces very flexibly and in a short time. In addition, they can achieve very good surface qualities directly without the need for a subsequent polishing process. In most cases, and for all other materials, grinding produces the basic geometric shape, typically through the use of bonded diamond grinding wheels. To achieve high geometric accuracy, the dressing of these tools is vital. Importantly, the wear of the grinding wheels means that the shape and contact point are not constant, depending on the kinematics used.
Ultimately, good surface quality and geometric accuracy can be achieved only through the polishing process. Classic polishing is a complex process that cannot yet be modeled with absolute accuracy. Like grinding, it involves removing material with a geometrically undefined cutting edge. But in contrast to grinding, polishing is a dwell-time-controlled or time-dependent process. The material is removed mainly mechanically between the polishing tool and the workpiece by the abrasive particles in the polishing medium, whereby the mechanical process partly overlaps with chemical processes.
The amount of material removed is very low and strongly dependent on various influencing factors. In addition to the size and number of abrasive particles, the amount of material removed is determined by contact pressure, hardness, and pore concentration of the tool and even the temperature of the polishing medium. Chemical properties, such as pH value and others, also have an influence.
Machining of precision optics requires a closed-loop iterative manufacturing process to achieve a high degree of accuracy. The lens is therefore measured to check for quality but also for correction purposes.
Between the individual production steps of pre-grinding, fine grinding, and polishing, the lens is measured so it can be corrected, if necessary, during the subsequent process step. Process steps may need to be repeated until the lens is within specification. This also means that the lens must be calibrated anew for each measuring process, both on the measuring machine and on the processing machine. The process can be problematic because precision lenses, unlike ophthalmic lenses, do not all share the same basic shape. Achieving the desired accuracy requires calculation of a locally resolved deviation from the measured lens. From this deviation — and an algorithm with a specific material removal simulation model — a dwell time on the tool path is then calculated according to the deviation.
The aim is to dwell as briefly as possible on surface sections with a small error to minimize material removal and, conversely, to dwell longer on sections with larger errors to reduce the deviation accordingly. Polishing is carried out as evenly as possible across the lens to avoid transitions.
The production of freeform surfaces, versus spherical lenses, is much more complex. Freeform surfaces are not rotationally symmetrical or described by a simple geometric curve. The lens, therefore, is usually not created via surface or line contact. Instead, its production proceeds via a point contact between tool and workpiece (i.e., the subaperture method). A certain overlap is necessary to ensure minimum removal. The more complex the geometry and the smaller the minimum local radius of the lens, the smaller the real point contact must be.
For various reasons, this leads to a significantly more complex manufacturing process and, depending on the process kinematics used, requires between three and six simultaneously moving machining axes. The movement of the axes is not always uniform, but it is subject to strong fluctuations depending on the geometry. The resulting accelerations place significantly higher demands on the processing machine and the necessary dynamics since surface defects occur more frequently at the points where acceleration parameters change. The smoother the movements and the greater the overlap between tool and workpiece, the easier it is to achieve optimal surface quality.
The machining program is also much more complex. Instead of a simple curve, the geometry is represented by a point cloud. Finer point spacing more accurately reproduces the freeform surface, but it also demands more complex calculation of the path and correction courses.

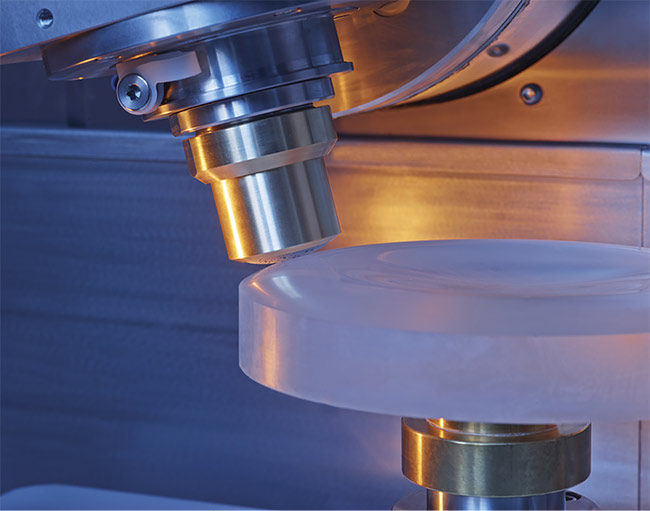
The drawbacks of wheel tools have led to the development of special polishing tools based on deterministic adaptive polishing technology. Designed to produce finer surface qualities and improved imaging accuracy, these tools can repair small geometrical deviations with pinpoint accuracy. Courtesy of Satisloh.
Smaller overlap between workpiece and tool increases the potential for transitions to have a negative impact on the surface quality and the accuracy of the geometry. Due to the point contact, the lens should be machined in a raster mode similar to milling or coordinate grinding. Raster mode grinding requires some care to ensure that the machining direction or the individual lines are not reflected in the workpiece. The most demanding freeform surfaces require removal of the remaining structures in a subsequent polishing step with greater overlap. Otherwise, geometric accuracy can suffer within the smallest inner radii.
Measuring freeform surfaces
The measurement of freeform surfaces is also much more complex. An interferometer is enough to measure spherical lenses quickly and effectively, though an alternative is to measure discrete points with a surface profiler. This relatively quick and easy approach also applies to measuring aspheres. Depending on the required accuracy, only one line on the surface must be measured for rotationally symmetrical surfaces.
The same processes can sometimes apply to freeform surfaces, but they involve considerably greater complexity. Freeform surfaces basically require the entire lens to be recorded and measured point by point using a suitable procedure, such as scanning several lines in equidistant sections and then merging them into a 3D graph. Depending on line spacing and lens size, this can take a long time. Ideally, use of a 3D measuring machine in conjunction with grinding enables the scanning of all points of the machining program, and thus determines the deviation at each point.
This accuracy is sufficient for grinding. But the interferometer provides even more precise results for polishing. Use of a computer-generated hologram to generate the desired shape of a freeform surface’s wavefront can help speed interferometer measurement. However, use of a hologram only applies to a specific lens, making it suitable only for series production due to the high acquisition costs. Other interferometric methods involving special setups, stitching, or tilted-wave techniques can reduce this disadvantage.


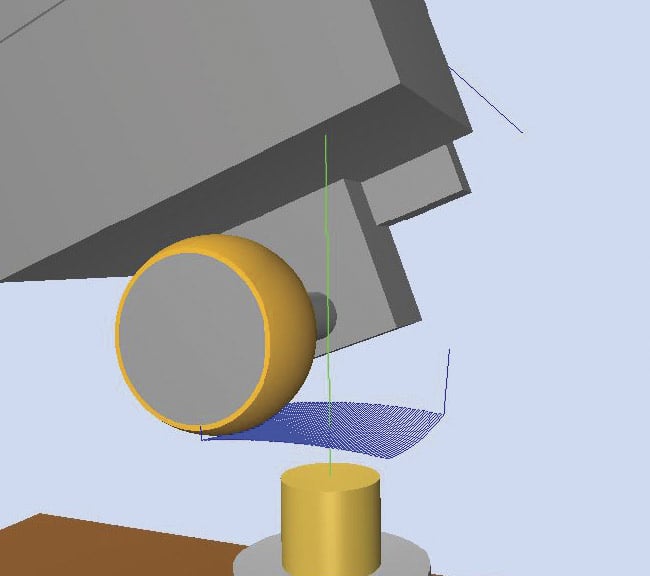
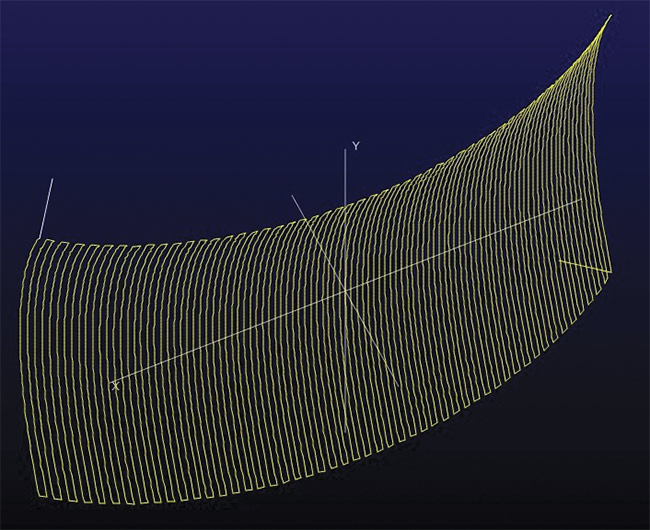
Machine simulation of a raster mode tool path (top). Tool path for raster mode machining (bottom). Production of freeform surfaces, in contrast to that of spherical lenses, is much more complex and requires a point
contact between tool and workpiece. This, in turn, requires some overlap to ensure minimum removal. Smaller overlaps between workpiece and tool, however, increase the potential for transitions to adversely affect surface quality and the accuracy of the geometry. Due to the point contact, the lens must be machined in a raster mode, which requires care to ensure that the machining direction or the individual lines are not reflected in the workpiece. Courtesy of Satisloh.
Alternatively, wave deformation can be determined in the optical system. Following surface measurement, calculating the actual deviation from the target geometry at each point involves superimposing the original and target geometry. A new machining program can be created from the difference as a correction program.
Polishing tools
A wheel tool typically serves as a polishing instrument with point contact. It allows a comparatively high removal rate, and dressing permits the tool shape to be maintained or the spherical shape to be restored if it is deformed by wear.
One major disadvantage of wheel tools, however, is that the pores create linear structures on the lens, which is not acceptable in optical applications. The high removal rate simultaneously limits the achievable surface qualities. As a result, these tools are not suitable for the production of micro-optics, as the minimum tool radius is limited. Wheel tools are also unwieldy and can lead to collisions.
These drawbacks have led to the development of special polishing tools based on deterministic adaptive polishing technology. Designed to produce finer surface qualities and improved imaging accuracy, these tools can repair the smallest geometrical deviations with pinpoint accuracy. Areas that correspond to the target geometry see less — and more locally limited — material removed.
Another advantage is that these tools can be variably equipped with different polishing medium carriers and offer various degrees of hardness. There is no need for a special polishing medium. This allows the tool to adapt to the individual needs and knowledge of the customer and their specific process and polishing kinematics. In addition, the tool can be used on a standard machine to cost-effectively produce aspheres and spheres if required.
One potential drawback is the low and unevenly distributed removal that these tools can cause. Knowledge of the exact distribution of the removal, however, offers a way to correct for this, and special software has been developed for this purpose. The software model enables removal with sufficient accuracy to individually determine the tool and workpiece geometry, the defect geometry, and a system-dependent stock removal coefficient. From this, it calculates a dwell-time-controlled program to achieve optimal surface quality and the smallest deviations from the nominal geometry. To ensure the process is as efficient as possible, it is best to first polish the surface as closely as possible to the nominal geometry with the wheel tool before correcting it with the adaptive polishing tool.
Summary
High-precision lenses with freeform surfaces undoubtedly offer significant potential benefits. Several optical functions can be combined in one lens to create more compact, simple, and lighter systems. In many cases, freeform surfaces offer the only solution to achieving complex optical applications.
With their potential, however, freeform surfaces can also add complexity to the entire process chain. The description of the freeform surface is much more complex, and the demands on the geometric accuracy increase significantly. The more demanding tool path — and its necessary dynamics — significantly increases the demands on the processing machines. The point contact between tool and lens, the resulting small overlap area, and the necessary grid make it difficult to meet the conditions for the highest surface qualities. Due to the more complex topography of freeform surfaces, the measurement required for the iterative manufacturing process is also more complex and significantly more time-consuming.
Achieving optimal surface quality and accuracy requires a polishing tool that leaves minimal structures and corrects errors as accurately as possible. The combination of adaptive polishing tools and supportive software is offering new options for modeling material removal and calculating precise trajectory curves with the corresponding dwell time of the tool at each path point.
Meet the author
Max Schwade studied electrical engineering at the Technical University of Dortmund and earned his doctorate in mechanical engineering at RWTH Aachen University. He joined Satisloh GmbH as the head of R&D Precision Optics in 2019; email:
[email protected].