When purchasing a laser, learning how to apply, troubleshoot, and evaluate that device is very important.
JOHN MCCAULEY, MKS Ophir
Given the pace at which technology advances, there always seems to be a learning curve. With the abundance of consumer electronics available, there typically is no right or wrong way to use these devices — the choice usually comes down to the method that best suits the end user. However, when purchasing a highly advanced device for use in the workplace, such as a laser, learning how to properly apply, troubleshoot, and evaluate that device becomes very important.
As for products that measure a laser’s performance, the application can be tricky and sometimes overwhelming, especially if the user is unfamiliar with a specific measurement product, the respective laser system or both. This article will detail why a laser’s performance is important for industrial laser materials processing, and will serve as a guide for the right and wrong ways to apply, ascertain, evaluate, and take action on the laser performance data gathered.

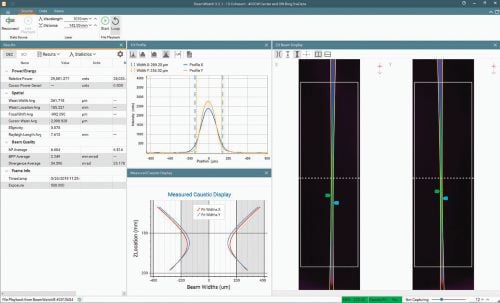
Figure 1. A laser beam focus spot shifts from the blue marker, where the spot started, to the green marker, where the spot is currently located.
Understanding all of this ultimately will help determine the efficiency of your laser. It also will be beneficial if you’ve had problems with your laser system but didn’t know where to start troubleshooting, or if you’ve spent more time than should have been required to develop any specific laser application.
Power density
When discussing laser applications, regardless of how the laser is used, it is imperative to understand how the laser is interacting with the material being processed. Power density typically is expressed in W/cm² and represents the measurement of how the laser is interacting with the material to which it is applied. This measurement is determined by evaluating two key laser performance characteristics.
First, the output power directed at the material being processed is measured by assessing how much laser light is being supplied by the entire laser system. This quantification can be a measure of continuous wave power if the laser is not pulsed or, if the laser is pulsed, an average power measurement (if pulse energy is measured, the term for how the laser is applied to the material is energy density). Secondly, the measurement of the diameter of the focused laser spot is taken to determine the area in which the laser’s focus has been concentrated.
Either laser power/energy or focused spot diameter can vary from what they are programmed or expected to be as a result of physical changes in the laser system, which is why it is important to measure these characteristics at the work site as accurately as possible. If either of these measurements changes, it can affect how the laser is interacting with the material being processed. These two characteristics can change for a number of reasons, which is why it’s important to measure them often. For example, if the turning mirrors or any other optics in the beam’s path become contaminated, two things could happen. For one, laser output power could drop, resulting in a decrease in overall power density. Alternatively, the location of the laser’s focused spot could fluctuate, resulting in a change in power density. In either event, the laser is not interacting with the process as it was designed to do.
High-power laser challenges
As you might imagine, precautions must be taken when measuring a laser’s performance, especially given the possible adverse effects to the eyes or skin. In addition, the higher the laser power, the more challenging its measurement becomes.
Laser OEMs continue to improve the technology that supplies laser light, increasing wall-plug efficiency while decreasing cost of ownership and maintenance-related downtime. However, that doesn’t change the fact that lasers and the systems into which they are integrated are made of physical components. Physical components always will degrade over time and, as a result, so too will the entire laser system — especially if the system is not properly maintained. Components such as mirrors and optics will age and also have the potential to become dirty. When that happens, their performances will deteriorate or, at times, catastrophically fail. When performance diminishes and results in a loss of laser power, the laser operator’s reaction often is to ramp up the power, ignoring the underlying problem. This approach will only prolong and amplify the problem; ultimately, time and money will need to be spent to correct the problem. When the laser no longer performs as it should, its parts should be scrapped. In a production environment, lost time and money are never good.
Laser characteristics to be measured
Today’s performance measurement products can gather all kinds of information. Laser output power is widely accepted in industry as a good indicator of the system’s overall performance. Tracking this measurement over time gives engineers or technicians the information they need to determine when corrective action is necessary. However, laser power does not tell the entire story about the system’s behavior.
Beam profiling provides an additional set of important measurements. Along with the visual representation of how the laser’s beam is sized and shaped, other useful measurements can be generated. These may include ellipticity, Gaussian or top-hat fit, beam propagation ratio, or the beam parameter product. Laser spot, focused spot, or beam waist size and time-based location of the focused spot, along with laser output over time, also are critical measurements to be taken when trying to understand the laser’s interaction with the process.

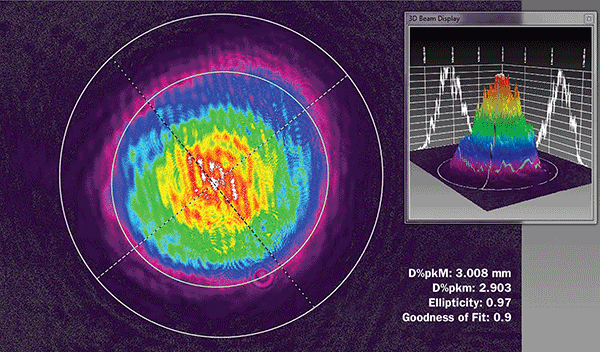
Figure 2. 2D and 3D beam profiles of a laser’s raw beam. Ellipticity: 97%; Gaussian goodness of fit: 90%.
When components start to age and become contaminated, thermal effects become more of a factor. When losses occur due to contamination, laser components can change shape. Even the slightest changes can result in a shift of the laser’s focused spot location. When this happens, the beam size being applied to the process will increase, resulting in a relatively lower power density. Dynamic focused spot location should be measured periodically in order to ensure optimal laser system performance.
When working with pulsed lasers, the time duration of the pulse and the pulse shape often are good indicators of how efficiently the laser’s pulsing technique is performing. The programmed pulse shape, pulse duration, and pulse frequency (i.e., repetition rate) should be measured periodically and compared with the laser’s settings.
Performance measurement techniques
The need to measure laser performance is as old as the laser itself. There have been many tools and techniques that have served the industry well, and they still are in use today but may not be providing the complete story of how your laser is performing. Some laser engineers still use simple, convection-cooled thermopile devices, known as “power pucks.” Similar in nature to a meat thermometer, the element is placed in the beam’s path and away from the focused spot, and the laser is fired for a given amount of time. The device then presents a number — either a temperature reading or an output reading, the latter of which is measured in watts. While this can indicate how the laser is performing at that point in time, the data usually is relatively incomplete because the data does not include what laser power is doing over a long period of time. Modern-day variations of this technique are still in use today and can, from measurement to measurement, provide long-term trending analysis of laser output power in both production and maintenance settings.

Electronic power measurement gives the engineer a better indication of how the laser is behaving. A fan-cooled or water-cooled thermopile sensor allows for the collection of laser power measurement data throughout the course of several minutes. This sensor, coupled with either a meter or interface to a local PC or laptop, provides a trend of how laser power changes during this time period. The equipment also can be integrated into the laser cell to give feedback to the robot or PLC to give the operator an alert of needed maintenance. Dynamic trends in laser power tell the engineer what might be wrong with a laser. For instance, a consistently low laser power — in the range of 10% to 15% or so — indicates that optics should be cleaned or changed; a drop in laser power over a few seconds indicates a damaged or well-aged optic in the beam’s path; and erratic power readings could indicate something wrong with the laser source, such as a faulty power supply or a resonator gas leak.
The challenge of legacy beam profiling techniques
Legacy beam profiling techniques such as burn paper, acrylic blocks, and fluorescent plates are still in use today. Again, though, they often provide an incomplete analysis because it is only an indication of how the laser is behaving at that point in time, usually only at the beam-on time. Electronic beam profiling techniques employing imaging cameras or scanning slit profiling systems provide the engineer with the means to collect valuable information about the laser’s behavior over time, as well as industry-accepted measurements and calculations on the data collected. Instead of information that can be interpreted subjectively by the person performing the analysis, objective data analysis can be compared against set industry standards.

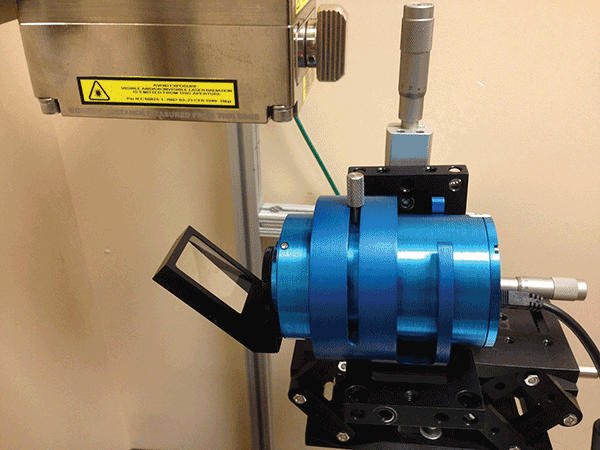
Figure 3. A scanning slit beam profiling system with a beam sampling optic taking measurement on a multikilowatt fiber laser used for welding.
In contrast to power pucks, burn paper, and acrylic blocks, camera-based and scanning slit beam profiling systems collect relevant and dynamic laser performance data that can be recorded or stored for later reference or offline analysis. By collecting data over the course of several seconds or minutes, the laser engineer can identify trends in beam sizes, beam shapes, and focused beam locations to best analyze problems the laser system might be having.
Beam profiling applied to high-power lasers can be complicated, as the powers of 1-µm wavelength lasers continue to climb. However, the application of noncontact beam profiling systems have enabled laser engineers and technicians to analyze high-power lasers without fear of damaging any components that might be in the beam’s path. These devices analyze the beam caustic, or the beam radius, around the waist so that the user can view and measure not only focused spot size, but also its location with respect to the process, in near real-time. As thermal effects on the laser can cause a shift in the focused spot, the devices allow the technician to quantify the shift and better determine whether any action should be taken to minimize the laser’s shift.

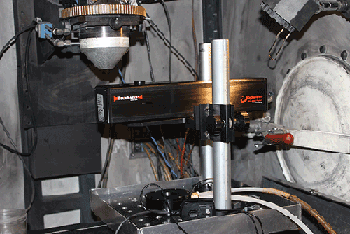
Figure 4. Ophir's noncontact beam analyzer, BeamWatch, takes beam profile measurements on an additive manufacturing laser system.
In-process and at-process laser measurement
When it comes to measuring a laser, one must decide when and how often the measurements should take place. Although the decision typically is based on user preference, two different systems are generally recommended: In-process and at-process measurement systems. Both systems have their own advantages and drawbacks.
In-process laser measurement usually consists of a measurement system that is permanently integrated into the entire laser system. The technique uses a sample portion of the laser beam somewhere along the beam’s path (usually close to the object being processed) and can provide continual, closed-loop feedback to the laser operator or the logical system. However, because of how the beam is sampled, it cannot analyze the entire system; the beam after the point where the sample is taken is not part of the analysis. Unfortunately, most problems with the laser system occur very close to the processing area.
At-process laser measurement, on the other hand, analyzes the entire laser system at once. At the laser’s worksite, the beam is directed into the analysis system, which could typically consist of a power- or energy-measurement system, a beam profiling system, and a temporal pulse shape measurement system. All of these work in tandem to perform the entire analysis. Even though these products could be integrated into the cell for relatively easy measurement, the disadvantage to this approach is that the laser system usually must be taken out of production to set up the measurement systems and to perform the respective analysis.
There are many challenges that come with laser materials processing. Understanding how your laser is performing should not have to be one of these hurdles. The tools that perform laser measurements give the user a means to accomplish more thorough application development and successful laser system integration, as well as to help in the implementation of a more comprehensive laser maintenance program.
Additionally, benchmarking an efficient laser process provides the user with the option to return to a defined laser behavior setting in the event that laser system’s physical components deteriorate or fail. Laser performance measurement products and techniques have evolved throughout the years, and dynamic data collection and analysis systems offer a more complete story of how a laser system is behaving.
Meet the author
John McCauley is a key accounts manager for automotive customers at Ophir in North Logan, Utah; email: [email protected].