Longwave and midwave infrared imaging systems can perform thorough seal inspection for pharmaceutical bottles and packaging.
HANK HOGAN, CONTRIBUTING EDITOR
Falling prices, rising resolutions, better analysis algorithms, and increased operational efficiency are expanding the use of thermal imaging in industrial inspections. These innovations are leading to use cases that were not feasible three to five years ago, such as spotting defects in aluminum seals on bottles and poor welds between plastic and metal.
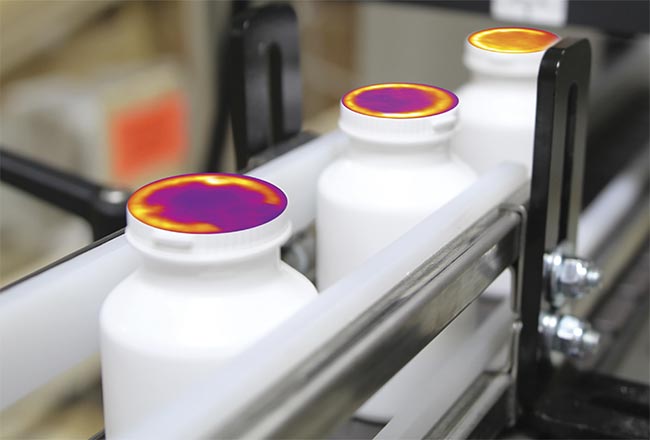
Software analyzes the heat signature of a seal. A false color image shows how the heat signature of the seal varies from bottle to bottle, with bad seals possessing characteristics indicative of fold-overs, voids, and other defects.
Courtesy of moviTHERM.
“We’re really seeing adoption of the technology go crazy,” said David Bursell, vice president of business development for thermal imaging solution provider moviTHERM. “As the price of the technology continues to come down and it becomes more readily available, we’re seeing the adoption rates skyrocket.”
Otto Martinez, product manager for thermal imaging at Fluke, said that there have been advancements in the sensors, allowing suppliers, such as Fluke, to tailor cameras and solutions for specific application needs.
“We can also now measure higher temperatures more accurately and can discern temperatures more precisely. So, if there is a one-to-two-degree difference in temperature, we are now able to capture this.”
But even with these innovations, specialized expertise is still needed, such as knowledge of the emissivity of materials. It may also take expert knowledge to handle inspections that are performed near large heat sources, a situation found in some industrial settings.
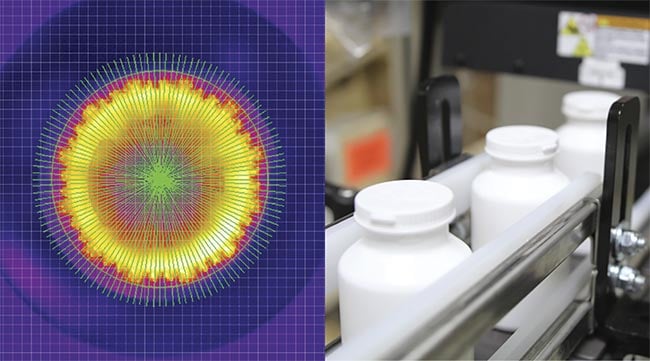
Thermal imaging enables inspection of bottle seals through bottle caps. A representative
thermal image of the aluminum seal underneath the cap (left) after bottles go through the sealing process (right). Courtesy of moviTHERM.
Regarding advancements in thermal imaging for industrial inspections, Bursell said that two spectral ranges are used. One runs from 7 to 14 µm, or longwave infrared (LWIR). The other covers 3 to 5 µm, or midwave infrared (MIR). Inspection systems operating in the first region may use an uncooled camera while those targeting MIR often cool the sensor, a difference required by performance needs.
Verifying the seal
Bottle seal inspection has undergone recent innovations. Bottles that contain vitamins or painkillers, to cite only two examples, have seals attached to the bottle. Consisting of a thin aluminum film, the seal helps ensure that the contents of the bottle are of the proper quality and purity, untouched by contamination or other environmental factors while in transit from the producer to the consumer or, in the case of pharmaceuticals, a pharmacist.
Verifying the seal is challenging. A seal may look fine visually but have a fold-over, a void, or other issues. In the past, manufacturers verified seal integrity by subjecting a seal to pressure, submerging it, or by other means. These checks tended to be time-consuming and sometimes destructive. Manufacturers often used a sampling method, pulling a certain percentage of bottles for inspection.
With thermal imaging, inspection can be 100% and penetrate the bottle cap itself. The inspection happens shortly after the sealing process, because this involves heating the film up after tightening the cap. The glue under the seal melts, which forms the seal — if everything goes as planned.
A thermal system can evaluate the seal before it cools completely. Software compares the captured image to that of a favorable seal, with analysis detecting fold-overs, voids, and other defects caused by machines along the production line.
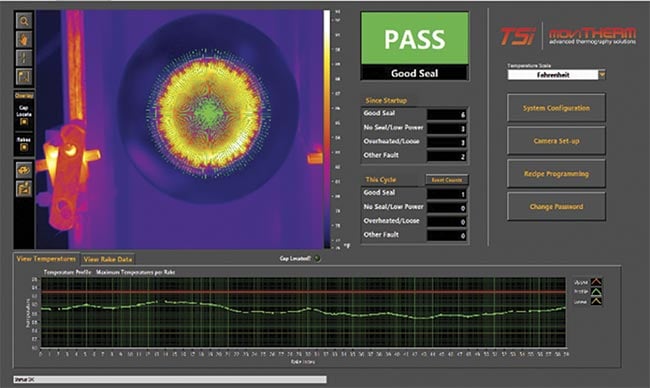
Software analyzes the heat signature of a seal and determines if it is “good” or “bad.” Courtesy of moviTHERM
“Through this statistical comparison pixel by pixel of the seal, we can see overheat, underheat, fold-over, defective heat, and torque issues,” Bursell said.
Thus, the system can classify products as “good” or “bad.” It also can provide insight into why a particular bottle has a bad seal. Producers can use this information to adjust processing equipment and reduce or eliminate the manufacture of defective products.
Higher cooling temperatures
A particular innovation cited by Bursell is the change in cooling requirements for the latest MIR cameras. These systems no longer require being cooled to the temperature of liquid nitrogen, 77 K. Instead, they operate at a higher temperature. This is one reason why the mean time to failure for the cooler has nearly quadrupled, moving from as low as 8000 h for the old technology to as much as 30,000 h for the new.
A longer operating life means that costs have dropped significantly. With the old technology, users might keep a spare camera around to maximize production line uptime. With the new technology, they are less likely to do so, thereby reducing equipment costs.
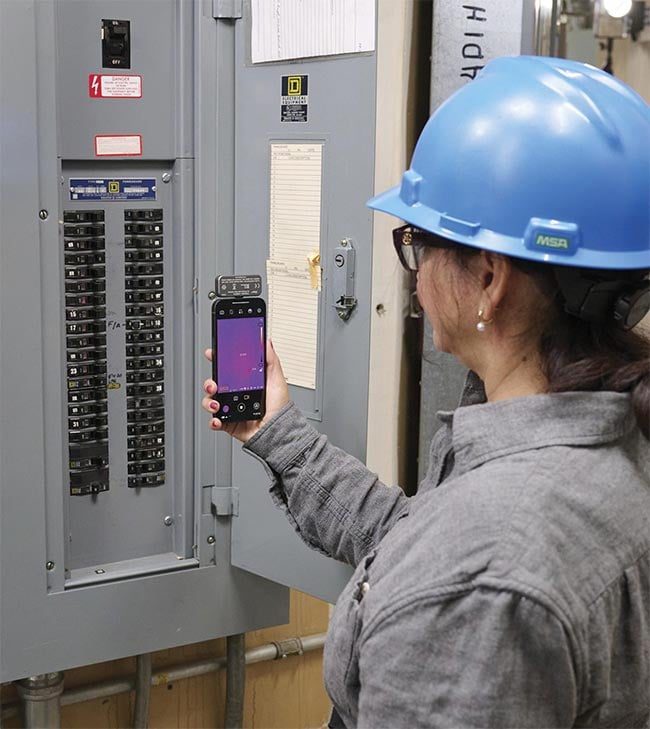
A mobile thermal imager in action as an operator diagnoses potential problems. Courtesy of Fluke Corp.
Proper placement and positioning of the camera are critical. Because the inspection does not involve additional heating of the seal, the camera must be
able to image the seal within 1 to 3 s after its formation. Finding space to mount the camera can be difficult, but today’s smaller cameras make proper placement easier.
Stephan Larmann, sales manager
for InfraTec, said that some new applications are enabled by advancements in sensors, such as increased resolution. In years past, a typical focal plane array for a camera might have 640 × 512 pixels. Today the standard is 1280 × 1024.
As for sensitivity, cooled sensors can currently detect a noise equivalent temperature difference (NETD) of ~20 mK, more than enough to spot slight temperature differentials. But there is another factor to consider: the stability of the temperature of the camera.
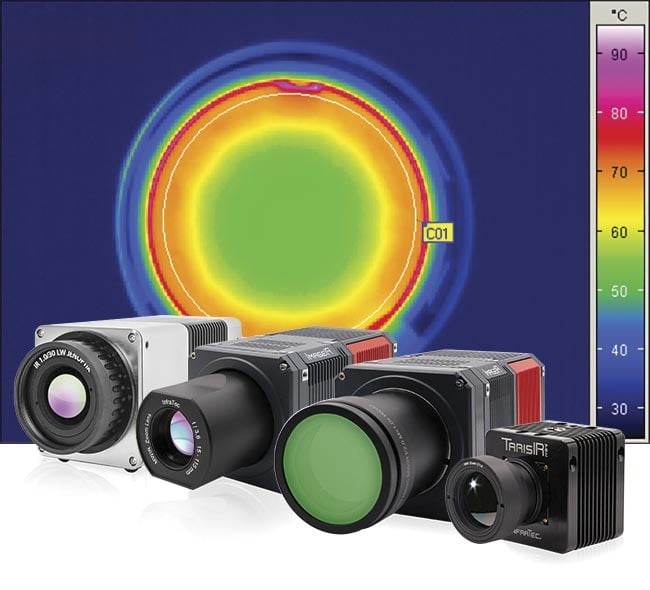
A thermal image of an aluminum lid after
sealing to a plastic container. InfraTec’s IRBIS software detects seal defects, such as the deviations
at 12 o’clock in the image behind the cameras, where colors represent calibrated temperature values. The easy-peel tab, visible at 4 to 5 o’clock, must be noted to prevent false alarms.
Courtesy of InfraTec.
“If they’re in an environment where you have a lot of changes in the ambient temperature, that will influence the camera. So, you have to do all kinds of stuff to compensate for those effects,” Larmann said.
He said that achieving stability is more challenging with smaller cameras; they have less thermal mass and so ambient changes affect them more.
Demand for smaller cameras
The trend toward smaller cameras is strong. This is due in part to demand from the drone market because mounting thermal cameras on an airborne platform enables new applications. For example, a drone equipped with a thermal camera allows fields of solar panels to be inspected, which previously required crewed aircraft. Alternatively, a person would have to walk up and down the rows of panels carrying a hand-held imager, Martinez said.
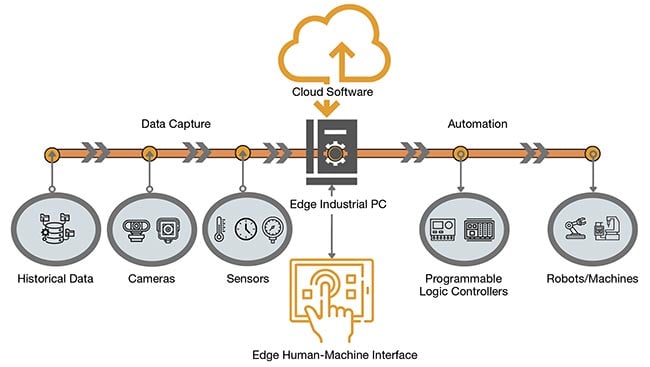
Thermal imaging can be part of an integrated inspection solution. This begins with imaging a part to capture its heat signature. Software combines this data with information from other sensors and historical data, building up a complete picture of the process. Courtesy of Eigen Innovations.
Apart from the camera, other key considerations in devising any solution are the properties of the material. All substances emit infrared photons at a fraction of the ideal black body, with the ratio between the actual and ideal called the emissivity. Aluminum has a low emissivity, whereas plastic has a much higher one. Thus, without taking this difference into account, aluminum may appear much cooler than plastic, even though the two materials are the same temperature. Larmann said that applying such material knowledge is often essential to developing an infrared inspection solution that works.
This material expertise and image interpretation know-how can be built into software, allowing automated decision-making as to the quality of a part and its suitability for further processing and shipment. Traditionally, this analysis has been rules-based, such as the requirement that the part be above a certain temperature. The advent of AI and machine learning has changed this picture, according to James Finch, chief operating officer of Eigen Innovations. The company devises solutions for industrial quality inspection, with ~70% of this work involving thermal imaging.
Eigen Innovations uses a standardization process in developing the images for training its AI models. For example, a plastic weld that a thermal camera cannot capture in one field of view. Eigen might use three cameras to create a virtual image standardized depiction of the weld. The company then trains its model using this standard image.
This approach, Finch said, avoids
the problem of transient features,
such as a production floor operator walking by, that would be in one image and not in another. In this case, the operator would be an anomaly, leading to noise that would hamper training. The technique used by Eigen combats such issues.
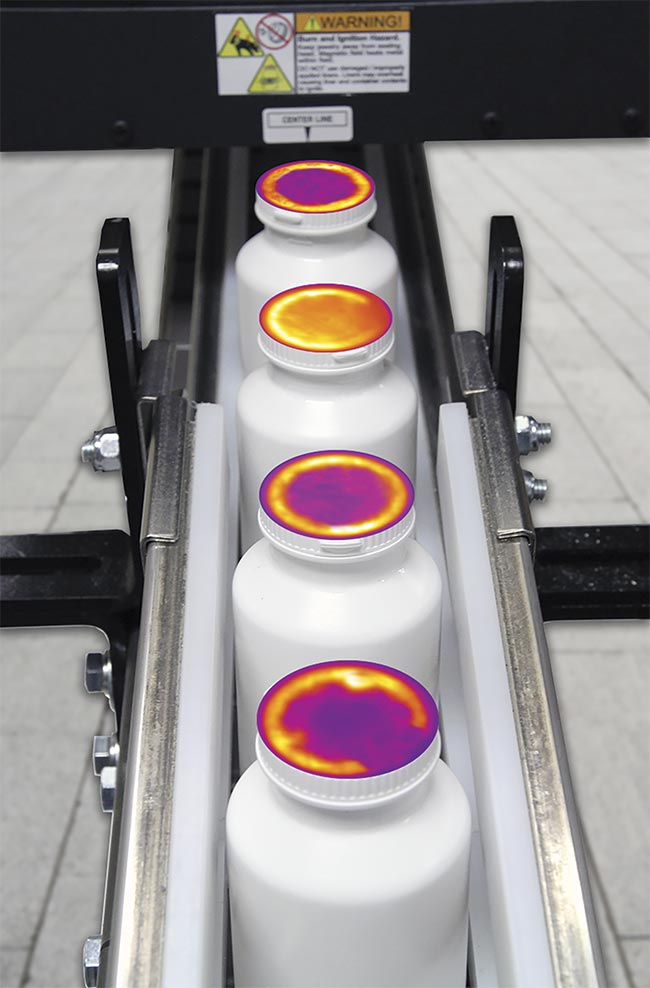
The heat signature of a bottle seal can indicate defects. Courtesy of Eigen Innovations.
“The image standardization process is really good for reducing noise in an image and unlocking scalability with AI,” Finch said. The last point makes it easier to roll out an AI solution.
The company can also use more than image data in its analysis, using information such as the serial number, core process data, and more. Finch recalled one example, which involved a soldering station. There was variation in the thermal image and in the current profile associated with the soldering
process itself. The combination of different data sources helped provide clues as to the cause of the variability and played a role in devising a solution.
Finch said AI will play an increasingly prominent role in thermal industrial inspections. On the hardware side, Larmann predicted a further increase in the number of pixels in thermal sensors. The next step up is in the works, with a doubling of pixels in both x and y to 2560 and 2048, respectively. This advancement will increase the field of view and resolution.
Along with this innovation, a continued decrease in camera size will occur. In combination with increasingly sophisticated software, the result will be further expansion of the capabilities of thermal imaging and its usefulness for industrial inspections.
Larmann said, though, that these innovations cannot overcome all issues, such as having inadequate space to mount a camera. Another challenge can be finding a location close enough to the process but not to the point that the intense heat makes it difficult to get a reliable thermal image. A third hurdle may pertain to the differences between the performance in a lab setting and on the production floor. Larmann’s advice to potential users of thermal industrial inspections is straightforward: Avoid buying a camera based solely on its specifications.
Or, as he put it, “Test it before you buy something. Make sure it works.”