SVS-Vistek Cameras Help Test Sheet Metal Safety
Sheet metal is an attractive material for auto manufacturers looking to increase fuel efficiency and reduce overall vehicle weight. Before it can be used for fabrication of components and structures, the material’s response to gross deformations that occur during forming and, crucially, during collisions must be fully understood.
Scientists at the Swiss Federal Institute of Technology in Zurich (ETH Zurich) have developed a novel axisymmetric V-bending device that identifies and measures the weakest direction of fracture strains in different types of sheet metal. “Plane strain” tension is one of the most critical loading conditions leading to ductile failure during metal forming and car crashes.
Accordingly, knowing the fracture strain and weakest orientation for stress is necessary for the safe use of sheet metal in automobile design.

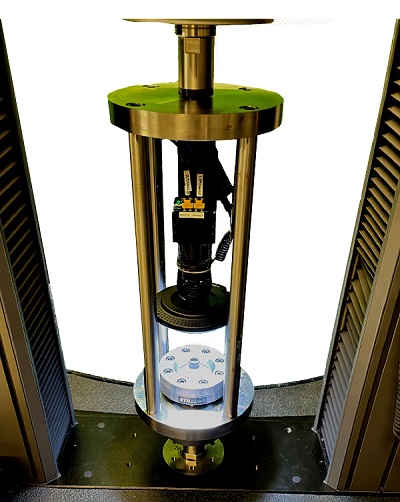
Experimental setup of the axisymmetric V-bending device. Courtesy of ETH Zurich.
In most plane strain tension fracture experiments, metals are tested in one orientation at a time, meaning several experiments with differing orientations have to be performed for a test. The approach developed by ETH Zurich, however, tests all orientations simultaneously and determines the orientation with the lowest fracture strain under plane strain tension.
Using their device, the scientists performed experiments on two widely used aluminum alloys and two types of steel. Disc-shaped samples of the different metals were bent over a tubular knife with a diameter of 54 mm. Pressure load was applied by a 250-kN electromechanical testing machine with a crosshead speed of 2 mm/min.
To facilitate digital image correction, the researchers applied a random pattern with a white background and black speckles to the metals. They used an SVS-Vistek hr25CCX CMOS CoaXPress camera equipped with a 55-mm f2.0 lens to image the test at 2 fps and a spatial resolution of 14 μm/px. An LED ring light was mounted on the lens to light the surface evenly during the experiment. Images from the experiments were post-processed with VIC-2D DIC software to measure in-plane full-field displacements and strains. Strain fields were computed using a Gaussian filter.
The camera imaged the entire top surface of the metal specimens throughout the experiment, allowing for timely crack detection and digital image correlation-based strain measurements. Further, the setup probed all material directions in a single experiment and determined the least ductile material orientation for low strain — saving time without compromising analysis quality.
/Buyers_Guide/SVS-Vistek_GmbH/c14402