Optimizing positioning systems for microassembly processes requires an understanding of the potential errors that can cause precision part placement to go awry.
Bruce Fiala, Wright Industries
Progressive assembly operations such as guiding, gluing and bonding often take place around a static package in three-dimensional space. Integrating the different mechanical systems to ensure that the active components are available within that space presents a challenge.
When determining system capability for photonic applications, it helps to understand the types of errors associated with the mechanical system and the techniques that can help minimize them. This should be second nature to the mechanical and control engineers on the integration side and the designers of the product.
Axis-specific errors
A first consideration is linear error. Resolution is defined as the minimum distance measured by a closed-loop feedback system. This is the resolution of the system, and it does not imply the ability to actually move that distance. Also important is minimum bidirectional step size, or the smallest repeatable step size a system can achieve. The bidirectional nature is important because mechanical errors and stiction are taken into consideration.
Next, the designer should examine position repeatability, which is the ability of a system to return repeatedly to a given point in space. The system’s linear accuracy also needs to be evaluated. Derived from repeatability and resolution, this is the difference between the actual position and the desired position along a line, compared with an absolute reference. Companies usually specify stage accuracy, for example, as a percentage of full stroke.
In this spatial axis-specific error category, flatness and straightness specify the path deviation from the best-fit straight line along the axis of motion of a stage. Flatness is the vertical runout, and straightness is the horizontal runout. However, factory specifications assume that the stage mounts to a lapped surface, which is often not feasible for every stage in a system.
For rotary stages, eccentricity, the deviation of the center over one revolution, and wobble, the angular deviation of the axis over one revolution, are key (Figure 1).
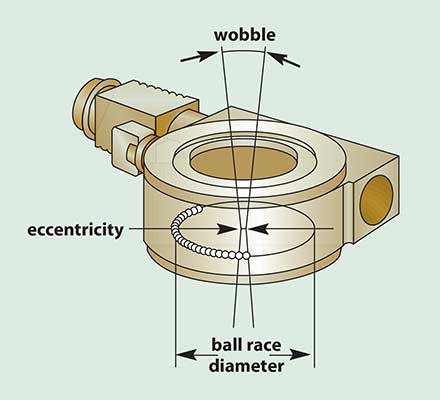
Figure 1. Potential error must be considered when designing positioning systems.
System-specific errors
The process of stacking components basically combines axes to form a positioning system, with each stage spatially related to and dependent on the previous stage. Also of note are Abbe errors, linear errors caused by underlying angular errors. Small angular errors along the stage axis produce translation errors at the work surface; and the farther the work area is from the stage, the larger the linear error (Figure 2).
Orthogonality error should be added to the designer’s checklist. This is the degree of perpendicularity error between two axes in a plane. Over its travel, a pair of axes for a high-quality, factory-assembled system with a range of motion of 200 × 200 mm can translate to 10 μm in X and Y because of such errors.
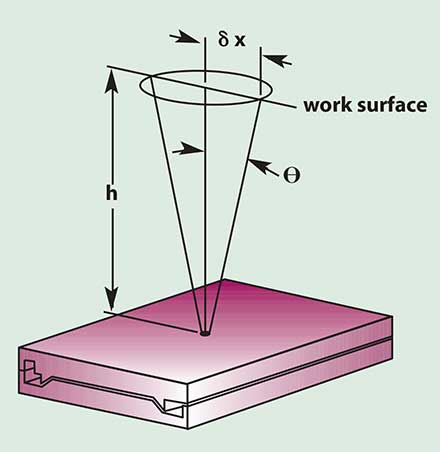
Figure 2. Small angular errors at the stage surface produce translation errors at the work surface. The Abbe error (δx)equals the angle (θ) times the offset (h).
The next step is to examine the position, path and placement accuracy that the system will require:
• Position accuracy is the difference between the actual location and the desired location, compared with an absolute reference (Figure 3).
• Path accuracy pertains to a mechanism in motion and its deviation in position from a planned path. Precision dispensing of an epoxy ring is an example of where this would be required.
• Placement accuracy usually means the result of placing one object in some orientation relative to another with a degree of certainty. While loosely based on the mechanical precision of a system, this specification is really the outcome of the hardware, the software and calibration working together to perform an operation.
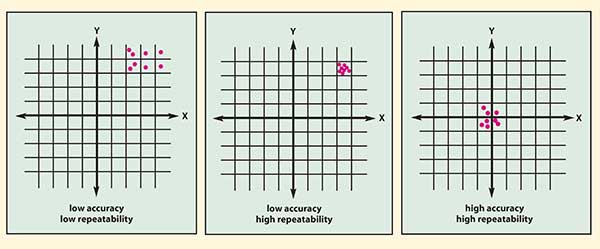
Figure 3. Two-dimensional position repeatability and accuracy of a tool tip relative to a target point; for example, (0,0) at the intersection of the X- and Y-axes.
All of these errors are compounded by the thermal expansion of each axis, by tooling plates and by machine bases due to ambient temperature and duty-cycle variations. Systems also can experience substantial errors when stages bearing a load are cantilevered. When stages are stacked, the total error will differ at each location within a work envelope.
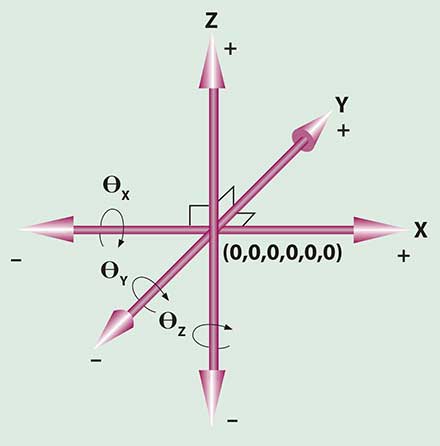
Figure 4. The Cartesian coordinate system provides a framework to define a location in six degrees of space relative to a datum (0,0,0,0,0,0).
One should also review the coordinate system that is used to identify positioning in 3-D space. The native coordinate system for most platforms is the Cartesian coordinate system (Figure 4). In some assembly applications, however, maneuvering around the center of a gripped object is necessary. This center point is sometimes referred to as the virtual pivot point. By defining a tool coordinate system and using a motion control code to facilitate it, the object can be rotated without translating in X, Y or Z.
This technique will require spatially relating the tool tip, which is attached to the tooling surface (on the Rz axis), to the mechanism’s Cartesian coordinate system (Figure 5). Using real-world units in one common reference frame, the position in six degree space and the orientation of each link must be described. Then describing how each axis couples with and relates to the prior axis in the stack is necessary to accurately define the tool-tip location. Each link is represented as a vector, and multiple vectors are related to define a manipulator.
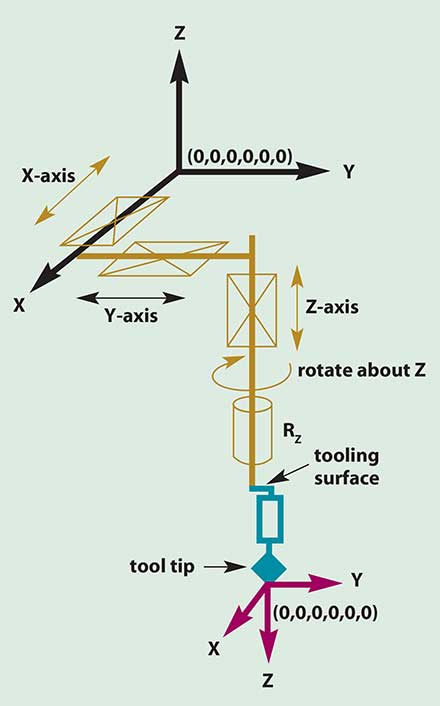
Figure 5. The tool coordinate system helps define a location in six degrees of space relative to a tool tip (0,0,0,0,0,0).
Maximizing precision
In the product and platform design phases, a variety of factors to reduce placement error of the positioning stages and complexity of the control system should be considered. For example, the number of axes of motion (degrees of freedom) must be minimized for an assembly process. Top-down assembly is preferred. Having symmetrical parts reduces pick strategy issues. Also consider that an angularly oriented part immediately increases complexity by adding a rotational axis of motion, which then adds complexity to the mathematical description of tool-tip location.
Other ways to reduce positioning-system complexity include:
• Minimization of planarity and perpendicularity requirements.
• Use of constant mechanical features such as geometry and height to enable repeatable picking by an end effector.
• Emphasis on repeatable, high-contrast locating features when using vision guidance.
• Exploration of alternative picking choices. The ability to vacuum pick a part, for example, reduces the need for multiple end-effector types and minimizes rotational moves.
To reduce the magnitude of pick flexibility required, repeatable presentation in X, Y, Z and θz (related to tool-tip location) is important. If vision-guided picking or placing must be used, repeatable part presentation within the camera’s field of view reduces the need to move the camera to find the object. And, to minimize Z accuracy requirements, perform all operations at the same Z height, if possible.
Also evaluate end-effector flexibility; e.g., if a part is sturdy enough to take a load, it may be possible to allow the end effector to preload into the part. Force sensing can be used for precision Z picking and placing. If a part has a repeatable geometry, an end effector might be designed to mechanically center the part upon picking. Devising a manipulator for multiple tools by rotating each into an active position or by using a tool-exchanging scheme also might be an option. For a precision application, locating the tip relative to the tooling surface after each change may be necessary.
Eye on accuracy
For pick-and-place operations, placement tolerance will be no better than the pick repeatability unless the position of the gripped part is refined after gripping. Whenever possible, engineers should design the microassembly system to rely on resolution and repeatability. If accuracy is truly needed, the emphasis should be placed on local rather than on global accuracy, which is more difficult to attain.
If machine vision is employed, consider the camera magnification needed to achieve the placement tolerance; e.g., how many magnifications are needed? Other design issues include positioning the cameras and calibrating their frames to the motion reference frames.
One way to significantly reduce complexity is to rely on software-driven calibration and mapping techniques, which, on all but the nonlinear errors, might improve X and Y accuracy by 10 to 20 times. The integrity of the calibration will depend on accurate, repeatable mechanics and on quality vision images with good contrast. Mapped relationships remain constant only when ambient and operating temperatures do not change. A steel surface 200 mm wide, for example, will grow 2 μm for every degree Fahrenheit the temperature increases.
The goal should be to keep the design simple. Accuracy needed for mathematically derived locations is not a concern if one can teach the system to move to a location by first moving the equipment manually. It also may be possible to avoid the need for absolute placement within a large area of the work envelope as well as to minimize the required accurate work area.
Visual active alignment is an option when the placement of a device relative to another in the same field of view can be monitored. The placement accuracy then depends on mechanical resolution and on finding the objects relative to one another within the camera’s field of view, rather than on total system accuracy. The need for total accuracy also diminishes to local if one device can be placed relative to another.
In an emitter/detector situation, where the emitter is activated while the detector signal is monitored, signal-based active alignment will work. The signal strength provides relative position feedback. Positioning tolerance then relies on resolution, not on repeatability or accuracy.
A simple rule
One simple rule is to work with as few degrees of freedom as possible in an assembly process because calibration techniques for Z, θx, θy and θz are difficult to implement. Minimizing the differences between work heights and eliminating angular movements also will reduce accuracy requirements.
If a downward-looking camera is designed to move with the active tool tip, it helps to reduce the distance between the tool tip and the camera centerlines. Designers also should examine whether an upward-looking camera can be used to locate the part relative to the tool tip after picking, a step that negates pick inaccuracies.
When visually locating a gripped part with an upward-looking camera, move the part into the center of the field of view before capturing the final image. This reduces reliance on the accuracy of the camera calibration. Calibrating at a point rather than at the whole camera field reduces the need to relate location to a point rather than to the area and orientation of the camera frame.
Development of a successful positioning strategy for microassembly processes should involve a detailed collaboration among product designers and mechanical and control engineers. Each must fully understand all aspects of the system, where positioning errors come from and how to minimize them. The result is a more simple, cost-effective precision solution.