Laser scanning technology is employed in a variety of applications, each of which has specific requirements for speed, accuracy, cost and reliability.
Yuhong Huang and Eric Ulmer, General Scanning
To obtain optimal performance from a laser scanning system, the system integrator must carefully weigh the effects of each component and consider how best to implement hardware and software to maximize the system. Once the desired performance is achieved, attention shifts to manufacturability and the challenges of reducing costs without compromising the system’s full potential. Finally, a cost-effective, high-performance system is sold with a commitment to reliability and effective maintenance.
With these challenges in mind, scanning component manufacturers have focused their efforts on finding solutions to these related and critical questions: How can components be customized for a specific application? How can calibration time be reduced while still improving consistency? How can components be field monitored to predict and potentially extend their remaining useful life?
In an effort to answer these questions, General Scanning developed the VM2500 marking system.
A virtual marking system
At the core of the scanning system is a galvanometer scanner. This limited rotation device coupled with a servo driver has both electrical and mechanical properties that determine its overall system response to a given positioning command. Originally, galvanometers were designed for general-purpose applications because of relatively simple modeling capabilities that provided limited insight to the system’s final performance. In this case, tweaking a galvanometer design literally meant building a new prototype for test. The time required for such an iterative effort could quickly prove impractical. Furthermore, an accurate servo and galvanometer model could predict the system step response and bandwidth, but it provided imperfect understanding of how the system would perform in a customer’s actual application.
The virtual marking system project began by applying advanced finite element analysis (FEA) models to both the mechanical and electromagnetic properties of the galvanometer. This resulted in increased accuracy, flexibility and unified control of the key parameters such as the material used, geometry and electrical properties, which achieve the ideal galvanometer properties for resonant modes, torque, resistance and inductance. The servo controller is also modeled and designed to compliment the galvanometer properties to achieve the desired performance results.
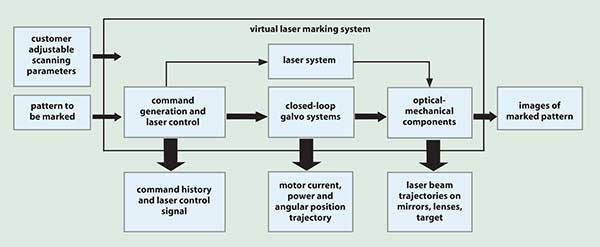
In addition to the refined galvanometer and servo models, three additional models are required before the total laser scanning system can be virtually realized in its entirety. First, the position commands to the servo are simulated and incorporate the laser beam control relationship to these commands. Second, the output response of the galvanometer model to command inputs is converted to an angular position trajectory. Finally, the system optics are modeled to include their effects on the final laser beam trajectory. Figure 1 summarizes the complete model for a virtual laser marking system.

Figure 1. Virtual laser marking system.
Note that the inputs to this model are defined by the customer and can represent any application. In this way, the model becomes a tool for optimizing the parameters of the closed-loop galvanometer system to obtain the best output for a given application. The results of tweaking a galvanometer parameter are immediately realized in the model’s output, reducing development time.
In the case of the VM2500, the galvanometer was optimized for marking applications. Since marking patterns typically consist of structured, small-step commands, the design is optimized for minimal small step times that create the fastest quality character markings. Figure 2 shows the marking results of the virtual model and compares it with actual marking results.

Figure 2. Virtual vs. actual laser marks.
With the scanning system’s design now optimized for a specific application, development attention turns to calibrating a system for consistent peak performance.
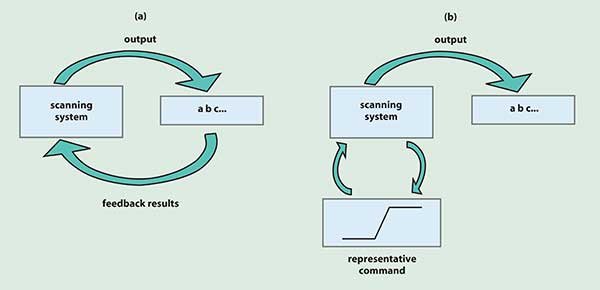
The analog servo has been the proven workhorse in the laser scanning industry. With only a few adjustable parameters, an analog servo can be manually tuned with a galvanometer to produce good performance for a given application. The tuning is likely carried out using a command representative of an application (i.e., a small step) while viewing the system response in the time domain. This limited view of the system response provides relatively crude control of the desired frequency response.
To address this need, instead of an analog servo, the system was developed using a digital servo, referred to as the ISD. Limited only by microprocessor speeds and accuracy, digital servo technology builds upon the traditional PID analog servo and introduces advanced frequency shaping capabilities that increase scanning speeds without compromising position stability or accuracy.
Even though digital servo technology introduces the flexibility missing from its analog counterpart, this flexibility can only be useful if it is properly implemented. With just a few adjustment terms on the analog servo, tuning parameters can be modified somewhat independently from each other. In contrast, the large number of servo parameters on a digital servo interact with each other in subtle ways, limiting the effectiveness and consistency of manual tuning.
A new tuning methodology was required to take advantage of the digital servo’s flexibility. This was by developing what we termed auto-tune technology. Instead of adjusting each tuning parameter sequentially while viewing the system response, auto-tune adjusts all tuning parameters in parallel. Auto-tune starts with a snap shot of the scanner system’s dynamics and finishes with an automatically generated tune. Not only is the auto-tune done in a fraction of the time required for a comparable manual tune, the resulting calibration represents the optimized system response for a specific customer’s application — not a representative command (Figure 3).

Figure 3. A comparison of auto-tune (a) and manual-tune (b) technology.
As an additional benefit, this brings a new level of calibration consistency at any production volume. One study performed at General Scanning looked closely at the auto-tune results of approximately 1500 calibration runs on the same dual-axis scanning system. The results showed standard deviation of tune parameters under 0.5 percent. This level of consistency is not possible through manual tuning and brings a new level of quality and confidence that ensures peak system performance.
Customer support
Auto-tune provides a high level of customer support. The current goal is to build on its potential ability to analyze systems through remote access and calibrate as needed to compensate for aging components. Both of these benefits will provide an advantage to system manufacturers who can schedule preventative maintenance for a customer as a result of remote checkups on the scanner system. In addition, the ability to refresh a scanner system by exercising the auto-tune will extend its useful life and maintain operation close to its original performance.
Advances in scanner system modeling, digital servo technology and a new tuning methodology bring laser-scanning technology to the customer in a package customized for their specific application. The improved performance, consistency and potential benefits for customer support offered by an optimized scan system are expected to drive the industry standard. This will enable existing laser scanning systems to reach new levels of performance and allow new applications to reach their full potential.