The step from successfully demonstrating a new laser process on a limited number of samples under laboratory conditions, to scaling that process up for high-volume industrial use is a big one. In particular, it’s necessary to determine how variations in process parameters affect end results, so that acceptable process input and operating ranges can be determined.
JOCHEN DEILE AND FRANK GAEBLER, COHERENT INC.
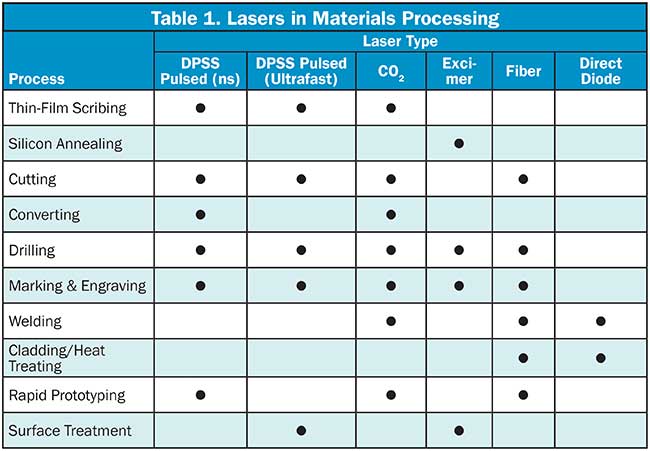
Materials processing with lasers is actually a broad term for a diverse range of applications. The major categories of these uses, and the lasers that service them, are summarized Table 1. At one end, multikilowatt fiber and CO2 lasers are employed for cutting and welding metal in industries such as automotive, shipbuilding and appliance production. At the other end of the spectrum, ultraviolet and ultrafast lasers are used to drill micron-sized holes and scribe thin films in high precision processes for microelectronics, display and solar cell fabrication.
Process qualification is important in all of these areas, although the main focus and primary considerations change across the spectrum of applications. For example, in many sheet-metal cutting applications, the environments are not well-controlled, and there are often batch-to-batch variations in incoming materials. In this case, it’s important to develop a process that can operate successfully despite these variations, often for automated, around-the-clock use with minimal operator intervention.
In contrast, the manufacturing environments for high precision processes are typically tightly controlled. But, the need to hold tighter mechanical tolerances may put greater emphasis on the development of precision fixtures. Ultrafast processes in particular may require better control of optical alignment in order to maintain the high peak powers needed to drive nonlinear effects.
Cost is key
Whatever the particulars of the fabrication task, the first input for the process qualification procedure is a statement from the manufacturer of what the process must achieve. Specifically, this involves setting nominal values and tolerances for all process results, such as the diameter, depth and position of a laser-drilled hole.
The next key piece of input for process qualification is cost. For most manufacturers, the actual metric is cost per part. This input must be considered at the very outset, because any new production methodology will only be adopted when it is cheaper than the existing method for accomplishing the same task; when it offers significantly greater operational flexibility; or when it allows producers to increase the functionality or value of their products in a way that enables them to raise their own price to the consumer.
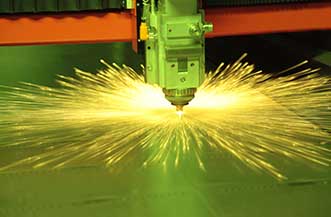
Figure 1. Different types of materials processing, such as cutting and welding metal or drilling micron-sized holes and scribing thin films, call for different types of lasers. Whatever laser is chosen to do the job, the statistical discipline of process qualification is crucial to ensuring a process can operate successfully and around the clock despite variations, such as materials, fixtures, laser output, beam delivery and ambient conditions.
There are several factors that influence cost per part. The most obvious are the capital cost of the production equipment and its cost of ownership characteristics, such as power consumption, other consumables and maintenance costs. However, there are many other factors, as well. For example, the production rate, meaning the number of parts produced in a given time period, is usually a significant consideration, especially if the process represents a production bottleneck. Also, the incremental capacity of the machine may be a consideration. Specifically, would it be better from a risk mediation point of view to utilize several lower-capacity machines, even though they are less cost-effective? Process yields, the level of rework required or the need for some form of post processing, such as part cleaning, also directly impact cost.
Another significant cost issue is the manpower required to support it. Does the equipment require an operator, and, if so, at what skill level? Can the new machine be readily integrated with other production equipment? If necessary, does it lend itself to automated part loading and unloading?
The maintenance requirements for a machine may also affect the manpower budget, specifically if the manufacturer needs to have specialized personnel on staff to perform routine maintenance and adjustment of the system. This is a particular consideration for laser-based equipment, because laser and optics adjustment may be outside of the expertise of a company’s existing maintenance staff. Of course downtime, either for routine maintenance or repair, plus the cost of repair itself, can also have a major cost impact.
Process variables
Once targets for all these factors are determined, then process qualification involves developing a production methodology that meets these cost and quality constraints, and that can be reproduced on a large scale basis. Process qualification is, by its very nature, a statistical discipline. It is not sufficient to simply prove a given process on a small number of parts, because this will fail to show the underlying variations that will naturally occur when the process is scaled up to higher quantities. Thus, enough testing must be performed to yield a large enough sample size so that accurate statistics can be determined on the level of part-to-part variation that can be expected in volume production.
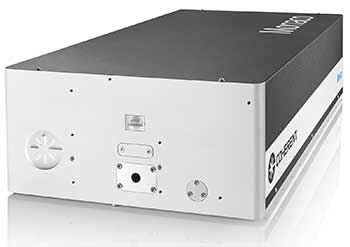
Figure 2. Industrial ultrafast lasers, such as the Coherent Inc. Monaco (400-fs pulsewidth), are becoming increasingly popular for high precision materials processing. Their high peak power and short pulsewidth produces reduced heat affected zones (HAZ) and a lower ablation threshold as compared to longer pulsewidths, thus enabling high precision processing of a wide range of metal, semiconductor and organic materials. Courtesy of Coherent Inc.
Several factors lead to the variation in process output just mentioned. Some of the most obvious ones include materials, fixtures, laser output, beam delivery, ambient conditions and other process input conditions, such as electrical power or cooling water supply. It’s worth examining these factors in more detail.
In a real world manufacturing environment, materials are often sourced from multiple vendors, and even within an individual vendor’s product, there may be batch-to-batch or unit-to-unit inconsistencies. These variations can be broadly placed into two classes. The first is dimensional variations, such as thickness, which obviously impact processes such as cutting and drilling.
The second type of material variation is intrinsic, or differences in the properties of the material itself, such as absorption or reflectance characteristics, refractive index, thermal conductivity, internal stress characteristics, chemical composition and the like. These variations may directly affect the laser-material interaction, and alter process results.
In terms of laser output, the most obvious variable that affects process outcome is laser power or pulse energy. Furthermore, many processes are sensitive to pulse shape, especially to the extent that it determines peak power. This is particularly critical for ultrafast lasers, which often interact with materials through a nonlinear process, which is necessarily highly dependent upon peak power.
Changes in ambient environmental conditions, specifically temperature and humidity, can impact a process in several ways. For example, both optomechanical mounts and optics themselves may respond to temperature changes in a way that alters beam pointing or the beam shape. This changes the geometry or position of the focus, which becomes more critical when producing smaller features. Again, the size, and hence fluence on target, is especially critical with ultrafast lasers since the ablation rate is a function of fluence.
Even in the absence of any environmentally produced fluctuations, there is always a variation in the performance of mechanical parts. For example, if parts are loaded into a given mechanical fixture 1,000 times, there is going to be a distribution in the position of where the part actually sits each time.
Real world process qualification
In theory, the ideal way to determine acceptable limits for each process variable would be to vary each parameter individually while holding all the others constant, and then see the impact of this change on results.
However, this approach is impractical, and, usually, impossible. This is because there are typically a large number of variables present in a given process, and some of them, such as laser pulse shape, cannot easily be varied deterministically.
As a result, real world process qualification usually starts with system design. Specifically, this involves selecting system components, such as lasers, optical mounts and part fixtures, which have already proven themselves to be stable over time under relevant operating conditions. In other words, picking a highly stable laser source eliminates the need to test the process for the effects of variations in laser power or pulse-to-pulse stability.
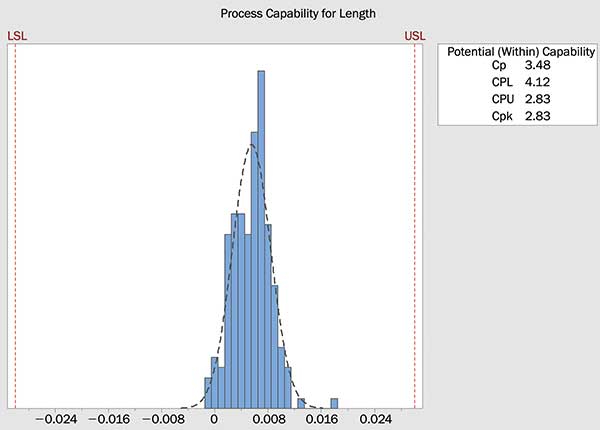
Figure 3. Normalized statistical data acquired for length of the processed glass parts. Courtesy of Coherent Inc.
Also, in some cases, it’s not necessary to test the influence of a given variable. Instead, some overhead is simply added into the process so that it will work properly, even in the presence of the expected variation. For example, it might be determined during testing that, under ideal conditions, a laser cutting process could operate successfully at a feed rate of 1 m/s. But, since it is known that there will be material variations in production, the production feedrate is set to 0.8 m/s to accommodate for this.
Of course, this has a cost impact. Running a process at a slower rate reduces production, but it will probably also lower scrap rates. Because of this, a key aspect of process qualification is identifying which factors are most critical. Specifically, what outcomes are absolutely necessary to proper operation of the finished part, and which parameters are less critical.
Finally, a sufficient quantity of parts must be produced using the process under test in order to provide a statistically valid determination of the levels of part-to-part variation that can be expected in volume production.
Display glass application
Reviewing an actual process qualification example might help to make this all more concrete. In one case, a laser manufacturer was contracted by a display manufacturer to qualify a process for cutting thin glass — less than 1 mm — using an ultrafast laser.
This producer had been cutting glass mechanically, but this necessitated grinding and polishing post-cut to deliver the desired cut edge quality. Also, mechanical cutting didn’t have the capability to produce curved cuts, or to work with non-flat glass, both of which were becoming requirements in this application. Ultrafast laser processing offered the potential to overcome all these drawbacks. The producer determined the production rates, tolerances and yields that would be necessary in order for the ultrafast laser-based process to be a cost-effective replacement technology.
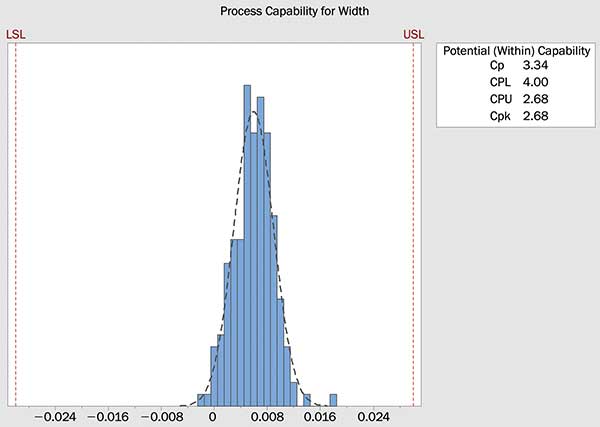
Figure 4. Normalized statistical data acquired for width of the processed glass parts. Courtesy of Coherent Inc.
It was quickly determined that a workstation employing high-speed, motorized XY stages for part positioning would be required in order to meet the processing time requirements. The task then became determining a compromise between acceleration values for stage movement that minimized processing time, while still producing positioning errors that were within the user’s specifications for dimensional accuracy. Then, the goal was to find the most cost-effective controller and stage package that could reliably deliver this level of performance.
A series of test runs using various stage acceleration values were performed to determine these tradeoffs. These tests were repeated three days in a row, several times a day, to prove that the process was stable over time and as ambient operating conditions varied. Testing also utilized parts from several lots to account for batch-to-batch differences in the material. In particular, variations in internal stress in the glass had already been identified by the customer as a problem that affected end results.
After processing, parts dimensions were measured using an optical microscope. Plus, an optical surface profilometer was employed to gauge surface quality. From this, statistical plots of the results were assembled for the distribution in the length and width dimensions of the cut piece and in the processed edge surface roughness (Figures 3-5). The length and width plots are histograms of the particular dimension measured, along with the upper specification limit (USL) and lower specification limit (LSL) provided by the manufacturer. Plus, a best fit line to the distribution of values measured is shown.
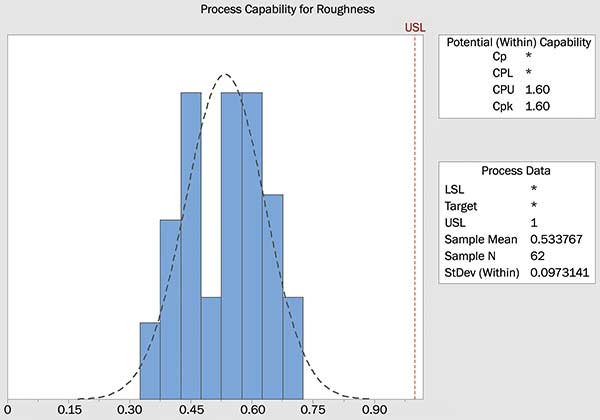
Figure 5. Normalized statistical data acquired for edge roughness of the processed glass parts. Courtesy of Coherent Inc.
From this data, the statistical quantity for the process capability (Cpk) was calculated. Cpk is a number that quantifies how closely a process is performing to its specification limits, relative to the natural variability of the process. The higher the value for Cpk, the less likely it is that any given part produced will be outside of the specification limit. For example, a Cpk value of 1.33 represents a process yield of 99.99 percent.
In this example, the process was qualified by determining the Cpk values for the mechanical tolerances in three runs in over three consecutive days. The plots show the capability for the combined data. More specifically, they plot deviation from nominal, not the actual value for the dimensions. With Cpk values of well over 2, the process as it was configured was proven to be highly capable. In addition, the surface roughness was measured, and a Cpk value of 1.6 was calculated. Again, this showed the process to be operating extremely well.
In conclusion, process qualification is a necessary step in moving from the “proof of concept” stage into production reality. Because the nuances of laser processing are not always well-understood by end users, this can often be best accomplished by working with a laser supplier that has capabilities for performing process validation studies.
Meet the authors
Jochen Deile is a product manager for Coherent Inc. in Richmond, Calif.; email: [email protected]. Frank Gaebler is the director of marketing for Coherent Inc. in Dieburg, Germany; email: [email protected].