Dominic V. Acquista, Photonics Media
Powder bed laser melting (PBLM) is a branch of additive manufacturing in which a preprocessed material is selectively melted layer by layer in the form of a powder bed to produce desired workpieces from a 3D model data set. The energy required for this is selectively introduced into the process zone using laser beam sources, which melts the powder material to create layers of the resulting part. During the subsequent cooling process, the material hardens and forms the desired parts.
Though it is effective, a key challenge for PBLM’s general industrial implementation compared with conventional methods is that the manufactured part can be checked for defects only when it is unpacked from the surrounding powder material at the end of the process. If defects are detected at this stage, they are generally almost impossible to rectify.

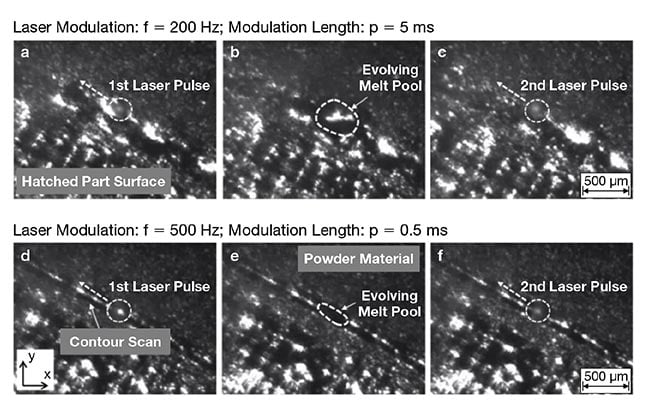
The graphic shows the powder bed laser melting (PBLM) process from the EoSens3.0MCX5’s perspective. The laser at 200 Hz with a modulation length of 5 ms (a-c), and the sytem’s laser at 500 Hz with a modulation length of 0.5 ms (d-f). Courtesy of Mikrotron.
The designers of powder bed 3D laser-printing modular laboratory systems Aconity3D enlisted Mikrotron to help catch manufacturing defects before they are too late to correct.
Keeping the process stable
Part of the problem with the PBLM process is that developers have yet to standardize it or fully develop it in accordance with the current state of the art.
“We have developed a process in which the data from a high-speed machine vision system helps [to record] the influence of selected process parameters on produced parts and enable conclusions to be drawn about parameter influences,” said Lutz Lübbert, Aconity3D machine development project manager.
The high-speed machine vision system the company chose was the Mikrotron EoSens3.0MCX5, due to the required speed and accuracy needed for the manufacturing process, which has been six years in the making.

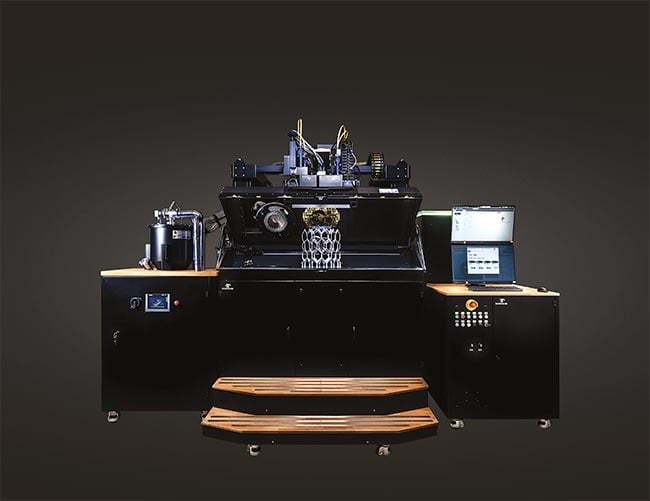
The AconityTWO, which uses Aconity3D’s machine vision process monitoring tool. Courtesy of Aconity3D.
“With these high-speed cameras, we can, for example, compare contour scans of material layers across the build process and observe the behavior of the melt pool in critical part areas,” Lübbert said. “In this way, we can reliably identify defects, such as melt pools breaking off or inhomogeneous surface conditions. The influence of changing laser parameters, such as the modulation frequency and modulation length on the size of the melt pool, can thus be recognized if all other laser parameters remain constant. The data obtained in this way can be used to expand our knowledge of PBLM processes and isolate the underlying effects.”
The in-line inspection effect
Compared with conventional production methods, which often rely on the density of the cast semifinished products, this in-line inspection method has the potential to detect production defects at an early stage. This results in a reduced number of destructive material tests and lower manufacturing costs.
In addition, reliable process monitoring with a conclusive correlation between the process parameters used and the resulting part properties
is a prerequisite for closed-loop process control. Such control systems have been used for conventional laser welding processes for many years. “In PBLM processes, however, process monitoring or even process control is still at a very early technological stage, but our developments are helping to reduce this backlog,” Lübbert said.
The main obstacle to in-line process monitoring and control of PBLM processes is the transient nature of the process, which is determined by a variety of different phenomena, such as melt pool turbulence, welding fume formation, spatter, and other anomalies in the powder bed. These underlying disturbing process phenomena increase the measurement noise and reduce the accuracy of the information that can be obtained directly from the melt pool.
Adapting the camera
Karl Laderer, Mikrotron’s DACH area sales manager, discussed a few reasons why the EoSens3.0MCX5 was ultimately the ideal choice for PBLM process inspection. He said that the camera sensor’s region of interest can be scaled in both the y-direction and x-direction. This means the frame rate can be increased via the reduction of pixels that appear in the x-direction.

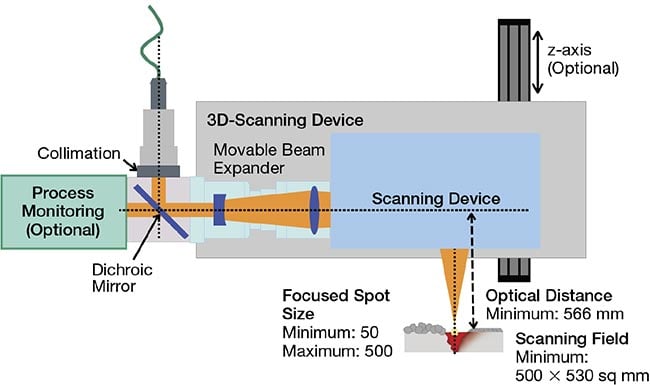
An overview of Aconity3D’s powder bed laser melting (PBLM) manufacturing process. It shows how the EoSens3.0MCX5 is integrated within conity3D’s existing hardware and how it is able to monitor the pieces on the powder bed during manufacturing. Courtesy of Mikrotron.
“In this way, small regions of interest with a high frame rate can be realized, which gives users in every field of application enormous flexibility to adapt the camera precisely to the requirements at hand,” Laderer said.
He also said that the 3-MP sensor’s
8- × 8-µm pixel size and fan-less
design for integration purposes are
important camera features because they have helped to deliver reliable results when monitoring the PBLM process. To decrease costs, Aconity-
3D chose to use the CXP6 interface camera model, rather than the more expensive CXP12 version, though they have found that the less expensive version handles data streams without any noticeable problems.
Future implementation
PBLM is already being used in the automotive, medical, and aerospace industries, among others, where it is increasingly establishing itself in series production. But with the addition of machine vision-based process monitoring and inspection, these areas could soon be seeing a boost.
With these high-speed cameras, we can compare contour scans of material layers across the build process and observe the behavior of the melt pool in critical part areas.
“We believe that process monitoring
using high-speed vision systems is an effective tool to learn more about the running mechanisms and improve the quality of parts during production, rather than analyzing the finished parts for later parameter optimization,” Lübbert said.
The in-line process monitoring tool developed by Aconity-3D is available for almost all of the company’s systems. According to Lübbert, the target group for these systems are research institutions in Germany and abroad as well as the research departments of large companies that deal with PBLM processes.
Lübbert said, “Our aim is to drive forward the development of detection algorithms that can quickly and reliably identify excessive melt pool sizes in order to initiate immediate countermeasures. Based on our good experience with the products we have used so far and the helpful support from our machine vision partner, including for programming issues, I also see the high-speed cameras from [Mikroton’s parent company] SVS-Vistek as essential components for our future systems.”